Several years ago there was already a fashion for badges and keychains made of clay, and now, after a while, the fashion has returned. Why did people start making jewelry from polymer clay en masse?
It has the main advantage over other materials and that is that clay can be easily molded into different shapes and is very plastic. It also hardens quickly and you don’t have to wait for several hours.
When you buy polymer clay, you might think that it is plasticine. But no. It differs from it in that it freezes and hardens. Therefore, it cannot be compared with such a material; polymer clay is more similar to pottery clay.
The advantages of using clay when sculpting badges and keychains:
- It's easy to use. It can be used by a person not only with experience, but also by a simple beginner who decided to try it for the first time.
- Using clay under normal conditions.
- A huge range of material possibilities.
- Large range of colors and shades.
- Lightweight and very durable.
How to make badges and keychains yourself
Badges are the simplest thing that can be made from polymer clay. But for this you will need certain materials and tools.
- The work surface can be an ordinary table, as long as it is free of knots.
- Polymer clay in your favorite color.
- Kitchen rolling pin.
- Stacks and special knives.
- Polymer adhesive for connecting small parts together.
- Silicone mold.
- Accessories: for badges these are clasps that will be attached somewhere, for keychains “ears” by which they will be hung.
- The oven is where everything will dry.
To start making badges, you need to set up a workplace. Adjust the lighting so you can see everything. Make sure that it is comfortable while working and there is no constraint while sculpting. Don’t forget to wipe your work table from dust and dirt, clay likes to collect all this.
Choose what technique the badge or keychain will be made in. It is best to use the most common and accessible ones. Later, when you have a little more experience, you can use a little more complicated ones.
Prepare liquid plastic to glue small parts.
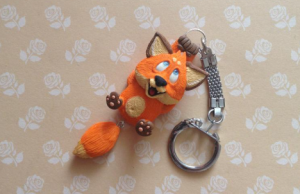
Fox icon
Materials for modeling:
- Polymer clay of different colors. In this case, you need white, black and orange.
- A sheet of paper in a box. It will be useful for the sketch on which the icons will be molded.
- Pencil with softness level HB.
- Scissors.
- Smooth surface for modeling.
- Scalpel.
- Sponge with large pores.
- Rolling pin.
- Sandpaper.
- Clasp.
- Super glue.
- Vial cap.
Work steps:
- Draw the future head of the fox on a piece of paper. It should be on a square 3*3 cm.
- Cut out the template along the contour of the head.
- White clay needs to be kneaded. Therefore, we knead it thoroughly with our hands, so it will become more plastic.
- After heating the clay, place it on the work surface.You need to put a template on top and trace around the edges with a scalpel so that the outline of the head remains on the clay.
- Having cut off the excess clay, we round the edges with the pads of our fingers for the future face of the fox. After rounding, we go over it with a sponge.
- Roll out the orange clay using a rolling pin. It should turn into a thin layer.
- Using the lid, cut out the orange halves of the circle from the layer. We attach them to the very top of the head and press.
The end result should be a white fox face with orange ears and forehead. All that remains is to trim off the unnecessary clay with the same scalpel, form the eyes and nose from 3 small balls and stick it on the face. Create holes for the eyes.
Acrylic paint will be needed to make highlights on the eyes. After making the badge, put the badge in the oven to dry for twenty minutes, coat it with varnish after baking and glue the clasp.
 0
0