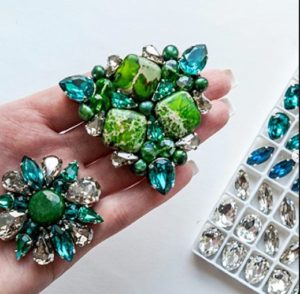
A homemade accessory is an absolutely unique thing that you will not see on any other fashionista. Using beads, rhinestones and various sparkles, you can make a lovely brooch with your own hands, which will decorate both a dress and the lapel of a coat or jacket. It is important to be patient and in a good mood, then you will get a very beautiful and neat decoration.
Features of making brooches with rhinestones and beads, beads
To make a beautiful brooch with your own hands, it will not be enough to just purchase rhinestones. In addition to them, it is important to take care of the sketch, base and other available materials.
What rhinestones can I use?
 The choice of rhinestones for making depends on what kind of base you will prepare for creating a brooch. Rhinestones can be either glued or sewn onto a fabric or leather surface. Glue-based rhinestones are attached using hot steam. To do this, you will have to iron the base from the back side or cover the glitter with a cloth and iron it on top. Some rhinestones do not have an adhesive layer.In this case We recommend purchasing special textile glue. It will firmly glue the decorations and will not spoil the main fabric.
The next type of rhinestones has small holes for sewing. They can be sewn to a soft base like buttons. Typically, such rhinestones have a fairly large diameter, so attaching them will not be difficult.
Second base option - hard surface such as polymer clay, foil, sheet of thick cardboard. Rhinestones can only be glued onto it, and in most cases, each individual bead can be glued to it. But the result in this case should be simply excellent!
How to choose a layout?
Before you start gluing or sewing on rhinestones, you need to visualize what your brooch will look like. To do this, you need to make a sketch in one of the following ways:
- draw a figure yourself on a sheet of paper and then transfer it to the base;
- find and download a suitable layout from the Internet. This option is suitable if you have a simple shaped brooch in mind, such as a heart or a star. However, you can also find unusual forms on the Internet - dragonfly, feather, etc.
Making a simple brooch with rhinestones
For ladies inexperienced in needlework, we offer a simple version of a brooch. You can start with this model and then try to make an unusual figured decoration. Of course, even in this option you can experiment with the shapes, colors and placement of rhinestones.
What is needed for production
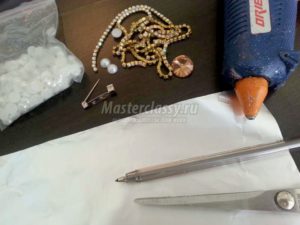
Before starting needlework, prepare all the necessary materials. You will need:
 baking foil;
- round rhinestones (for example, halves of pearls and other options);
- large crystal (large in relation to round sparkles);
- rhinestone ribbon;
- glue or glue gun;
- scissors;
- pen or pencil;
- fastening mechanism (like a pin or any other that you find in the store).
 baking foil;
Step by step process
After all the preparations, start creating the brooch:
- First, decide on the form. This can be done by placing all the beads in the sequence that suits you. The easiest way is to make a brooch in the shape of some geometric figure;
- prepare a base - aluminum foil, and mark on it the places where the rhinestones will be located;
- warm up the glue gun or take any other silicone glue. Apply a little of it to the foil and glue the core - the largest rhinestone. Choose it at your discretion. It can be either a crystal or a natural stone or bead;
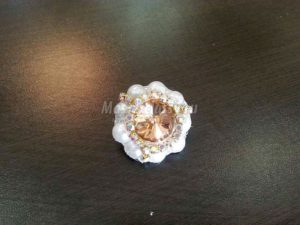
- Apply more glue around and stick smaller decorations. You should get a kind of flower. Don't worry if there is glue showing between the beads. Silicone is easily removed from smooth materials, so you can remove excess at the final stage;
- After the base has dried, you can start decorating. We recommend using rhinestone ribbon - it looks very impressive. In practice, you can decorate a brooch with any beads, glass beads, etc. Everything is up to your taste;
- Next, you need to carefully trim off all excess foil. Any remaining pieces that appear can simply be folded back. Coat the back surface of the decoration with a thin layer of glue - it will “lamine” the foil;
- The last stage is attaching the fastener. Sparing no glue, attach it to the back wall. Wait until it dries completely and remove any glue that appears. The elegant brooch is ready!
 First, decide on the form. This can be done by placing all the beads in the sequence that suits you. The easiest way is to make a brooch in the shape of some geometric figure;
Brooch made of rhinestones, beads and beads
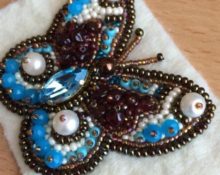
This version has a more complicated brooch. In addition to rhinestones, it uses beads and other materials.Plus, she's in the shape of a butterfly. You can show your imagination and make a dragonfly, a feather, a heart and many other delights.
Materials and tools
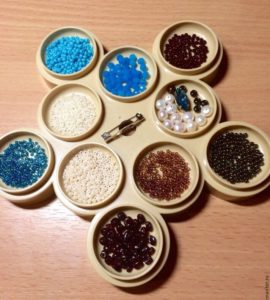
Before starting work, prepare:
 rhinestones;
- beads and beads (you can also take natural stones);
- felt;
- wire;
- thin needle and thread;
- scissors;
- pen;
- fastener for fastening.
 rhinestones;
Step-by-step algorithm
To create a wonderful butterfly you need:
 transfer the counter figures onto the felt using a stencil or a ready-made sketch. If necessary, draw for yourself the location of the internal elements;
- In place of the butterfly’s body, attach a large elongated crystal, the higher one is a round bead. This will be the head;
- Bead around all the contours: wings, body, head. Use a thin thread or even clear fishing line;
- further work is the fruit of your imagination. Embroider the wings with a variety of beads and rhinestones. Follow the color scheme, but use beads of different sizes. This will make the brooch look more voluminous. Don't forget about wing symmetry! Although a butterfly’s wings may differ in real life, identical wings look more aesthetically pleasing in brooches.
 The next step is to create the antennae. Cut two pieces from the wire and insert them into the hole of the bead simulating a head. This way you can string small beads onto the antennae;
- after the manipulations, carefully cut out the figure along the contour;
- To prevent the brooch from falling apart over time, you need to strengthen the back wall. This can be done using leather or another layer of felt. To do this, cut out another butterfly shape, generously coat it with glue and glue it to the back;
- sew or glue the fastener. The wonderful butterfly is ready.
 transfer the counter figures onto the felt using a stencil or a ready-made sketch. If necessary, draw for yourself the location of the internal elements;
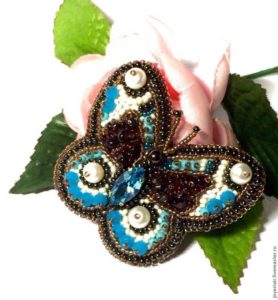 The next step is to create the antennae. Cut two pieces from the wire and insert them into the hole of the bead simulating a head. This way you can string small beads onto the antennae;
 0
0