This decoration is popular among women of all ages due to its practicality. Beads can be matched to a dress, suit, trousers, etc. Plus, it is easy to combine outfits and accessories with them.
 It’s easy to make such original beads with your own hands. For this house you need to have a fishing line (as an alternative - a strong thread), beads, beads of different colors.
How to weave beads from seed beads with your own hands
At the material selection stage, you can select elements of different diameters and colors. This will allow you to create a product with an unusual texture, plus it will be universal, since it can be combined with a large number of clothes.
Important! When selecting colors, to avoid disharmony, you can select shades of materials according to the “hot-cold” principle. Any color has both warm and cold tones.
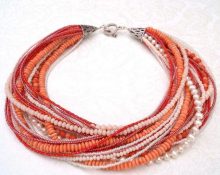
The simplest assembly option is to string beads, with or without beads, onto a fishing line. A long thread is made and connected into a ring. Then it is put on the neck by folding it in several rows. No clasp needed.If you don’t want to do this work every time, you can secure all the rows around the neck with thread or fishing line.
A product woven into a three-row braid requires a little more skill and time. To do this, make a common knot on one side, divide all the strung threads into three equal parts, and braid them into a braid. Then the braid is fixed using a common knot, followed by fastening the clasp. Products in which numerous rows go one above the other look no less interesting.
Step-by-step master class
Let's consider creating simple but effective beads. Even beginners can do them.
DIY multi-row beads
To create multi-row beads you will need:
- beads, beads;
- fishing line;
- two pins;
- bead huggers;
- round nose pliers, wire cutters.
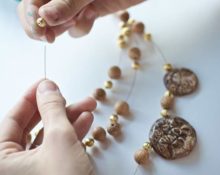
Work order and assembly
The principle of assembling jewelry.
- Cut the fishing line into sections equal to the required length, taking into account allowances for tying knots at the beginning and at the end (ultimately 65–70 cm).

- Next, beads are strung on each thread mixed with prepared beads.
- You need to start working by fixing the outer bead. To do this, simply put one bead on the fishing line.
- Pull the line through the hole again, tying a knot.
- That's it, the setting is ready.
- Now you need to string beads, beads, preparing many threads for assembly. To prevent the beads from scattering from the fishing line, you must remember to secure the first and last beads according to the principle described above. There should be a large allowance on each thread after the last bead so that it can be easily tied.
- When the threads are ready, they need to be connected together. To do this, gather all the allowance tips from one end and tie a knot close to the bead row. You will get a fluffy tail from fishing line.At this stage, you should check whether all the threads are at the same level. If not, then fix it by tightening it in the right place.
- The two resulting tails need to be cut off, leaving 1.5 cm of fishing line from the knot.
- Melt the tail on the candle to the knot. It is important to be careful not to touch the knot, otherwise the finished rows will break.
The final stage of assembling the beads.
- Take the pin and bend it into a loop using pliers. The pin loop should be no longer than the knot.
- Insert this loop into the knot between the threads so that the free end of the pin is on the other side.
- Squeeze the loop and put a hugger on top that will hide the melted ends.
- Form a loop again and insert the clasp into it.
- Repeat similarly on the other side of the beads.
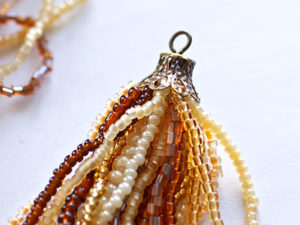
DIY air beaded beads
This necklace will perfectly complement an elegant evening look and add femininity. Suitable for long and short dresses, tight and loose. Even if jeans are combined with a smart top and jacket, then a combination with airy beads is also possible for this option.
Important! Don’t be intimidated by the fact that you need a hook to weave. The work process is so simple that craftswomen without crocheting skills can handle it.
Work order and assembly
To assemble the air beads you will need:
- beads of different colors;
- fishing line;
- hook;
- 2 jewelry pins;
- several connecting rings for fastening;
- bead huggers;
- Any clasp for securing beads.
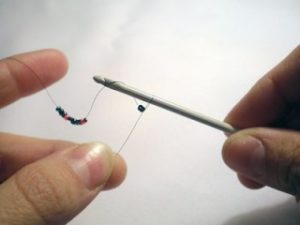
The first step is to prepare a fishing line with beads.
- Mix beads of all colors that should be included in the product, and use a needle to thread a long thread.
- The line should remain on the reel; there is no need to cut it yet.
- Now we take a hook and weave a regular chain from the fishing line, 4-5 empty loops at once, then gradually add beads at a time.If you want to make the necklace more airy, the loops should sometimes be left empty.
- Nothing else is needed, weave a long chain until all the strung beads are finished. It is important to ensure that the threads do not get tangled or mixed.
- When all the beads are gone, the second edge of the fishing line needs to be cut.
Decoration assembly stage.
- Now it is important to give the product the required length.
- Place chains with beads parallel to each other, forming rows. You can lower it lower or raise it higher, based on your idea.
- The two edges need to be fixed with pins, then in the place of fixation, after forming the necklace, tie it tightly with fishing line in several folds and with 2-3 knots.
The base is ready, all that remains is to fasten the clasp.
- To do this you will need a pin and a hug.
- Thread the pin into the first knot at the place of fixation, thread it through the hold and form a loop.
- Do the same with the second node.
- Now connect the pin loop and the clasp using rings.
- The product is ready.
 0
0