 A sash belt, unlike ordinary ones, is wrapped around the waist several times. Its width can be uniform along its length or taper towards the ends. Such products are sewn from fabric, knitwear or soft leather.
We will tell you how to sew a sash yourself.
How to make a sash pattern
To prepare the drawing you will need some data.
Required measurements
The initial data for constructing a pattern drawing are lenght and width sash.
- Length is determined by waist circumference. It is equal to twice the waist circumference, an increase of 3–5 cm for tying a knot and 45 cm for the free ends.
- The width is determined arbitrarily, taking into account the model.
Drawing
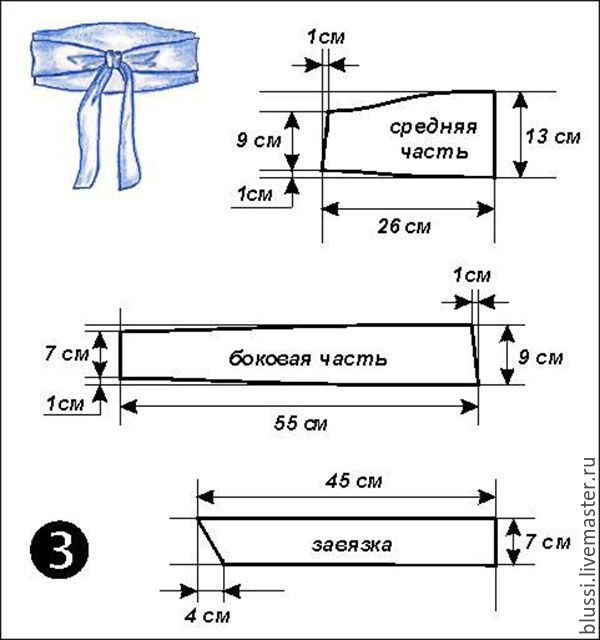
Consider constructing a pattern consisting of 2 middle, 4 side parts and 4 ties.

middle part
Constructed with a fold line and represents rectangle with sides corresponding to 1/4 of the waist circumference and the width of the belt.
- In the proposed pattern diagram, the rectangle has dimensions of 56*13.
- To fit the figure on the left side on the vertical line of the rectangle from the bottom point up and from the top point to the right, a centimeter is laid off.
- The resulting points are connected by a straight line.
- 9 cm is set aside from the bottom point. Next, trace lines are drawn for the upper and lower edges of the belt.
Side part
- It is a rectangle measuring 55*9.
- For a tight fit, 1 cm is set aside horizontally on the right side from the top point to the left.
- On the vertical line on the left side of the top and bottom points, 1 cm is laid off and a width of 7 cm is obtained.
- The marked points are connected by straight lines.
The beginning
- It looks like a rectangle with dimensions 45*7 with a bevel of 4 cm.
- To construct it, 4 cm is laid horizontally from the lowest point on the left side to the right.
- Connect to the highest point.
Uncover
Attention! Before cutting, the fabric is folded in half.

- The pattern of the middle part is combined with the fold line and outlined along the contour.
- The details of the side part and the ties are placed with the long side along the base of the fabric.
- Parts are cut with a seam allowance of 1 cm.
Advice! The details of the belt can be cut out directly onto the fabric by first marking it.
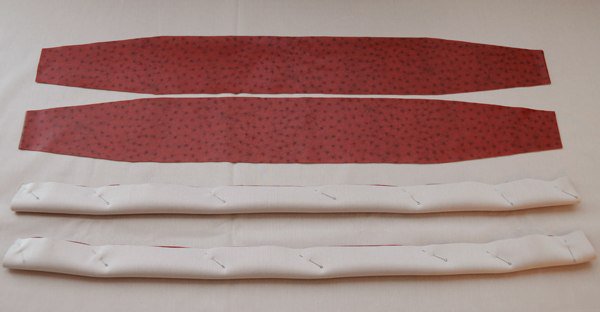
- The middle part of the belt is duplicated to ensure rigidity and dimensional stability of the future product. It is better to use thick collar duplerin as a material.
How to sew a sash belt with your own hands
 The technology of sewing a sash is relatively simple.
- First, the upper and lower parts of the belt are assembled separately, grinding down the middle parts with the sides and ties.
Important! It is better to start stitching parts from the middle to the edges in four stages.
- On one side of the middle part, an unstitched area 3 cm wide is left for tying.
- The seams of the individual belt elements are ironed.
- Next, the details of the upper and lower parts of the belt are chopped along the entire length. In this case, the holes must match exactly.
- The fastened parts are stitched along the perimeter, leaving an unstitched section 4–5 cm long in the lower part.
- Then the belt is turned right side out, the seam allowances are straightened well and the product is ironed.
- The unstitched area is hemmed with a hidden seam. Next, the edge is basted along the entire perimeter.
- The final operation is to perform a finishing stitch at a distance of 0.7 cm.


 0
0


