creativecommons.org
A luxurious beaded collar can turn an ordinary dress into a formal outfit. This accessory has become an indispensable element of a woman's wardrobe in recent years. With his help, a momentary transformation from a business woman into a romantic person ceased to be a problem. A beaded collar can be worn with classic dresses, shirts or sleeveless vests. The assortment of modern brands includes many such products. They are relatively inexpensive, but it is not always possible to find a suitable accessory for a particular outfit.
If you can’t choose collars made of beads and beads to match your dress, and you have time before a celebration or other event, you can make the decoration yourself. The advantages of exclusive products are that no one is guaranteed to have an analogue. Here the question arises: how to make a collar from beads if you have no experience in such work. The master classes presented in the article will help with this.
DIY beaded collar - master class
Making collars from beads and beads with your own hands is not only simple, but also interesting. The main thing is to understand the principle of the process and understand the sequence of actions. After this, the work will go much faster. To make a beaded collar with your own hands, you should prepare:
- A small roll of medium-thick tape;
- Weaving pattern. It can be found on the Internet;
- Scissors, fishing line, thread;
- Two needles;
- Beads 12 millimeters;
- Beads 6 millimeters;
- Beads are 8 mm.
During the creation process, a beaded collar must be constantly measured to control proportionality and overall appearance. All threads must be secured as firmly as possible. Otherwise, the product will unravel when weaving and will not hold well when worn. Master class on how to make a collar decoration with your own hands:
- We measure a meter-long thread, thread it first into one needle, then into the second, with opposite ends. Tie strong knots at the ends of the thread so that the thread does not fall out of the eye.
- On one needle we put three beads of six millimeters (sixes). We move them to the middle of the thread. Take the fourth bead and put it on both needles alternately. The needles move through the part towards each other. We repeat these steps again.
- We secure the future beaded collar to the dress on a flat, smooth surface with adhesive tape. This will help fix the decoration, the beads will not be in one place. It’s much easier to work this way – the workpiece becomes almost motionless.
- We repeat the action from point 2. The number of repetitions should be regulated by the selected scheme.
- Let's move on to weaving the second row. We use figure eight beads. You can choose one of the weaving methods.The first option is to start working from the center, then you will need a thread of eighty centimeters. The second option is to start from the starting point and divide the collar in the center at the transition. Then you will need one and a half meters of thread.
- In the second row, we again act according to the principle of point 2. You need to thread two threads into a six bead, then put three eight beads on one needle. Again, insert two needles into the last element and tighten.
- We put the adjacent six on the needle. We thread the left thread into two figure eights, the last part is threaded again with two needles and tightened. This process is repeated until the end of the row.
- Let's move on to the next row. Place three parts on a needle, the last one on a pair of needles, and tighten. The left thread threads two parts, the last part is threaded with two needles and tightened.
- We repeat the principle of operation, but take the largest beads - twelve millimeters each. The initial weaving element is the second figure eight. Once completed, we receive the finished half of the decoration. To finish the beaded collar with your own hands, we make the second part by analogy.
This completes the collar with beads. Now you need to come up with an original and durable fastener. This could be a satin ribbon, a small carbine or a special chain with a lock.
How to weave a collar from beads with your own hands - a pearl collar
creativecommons.org
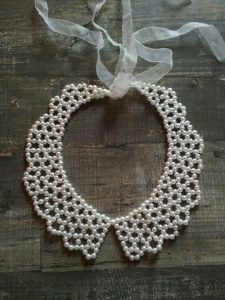
A pearl collar can be woven in the same way as a regular beaded collar. But there are other, combined options. They look more impressive and highlight the beauty of pearls. The first way to make a beautiful pearl accessory for any outfit requires the following materials:
- Crochet closure;
- Needle;
- White nylon thread;
- Three types of pearl beads - small, medium and large sizes;
- A piece of white or milky felt.
Draw the collar pattern on paper. Cut out the elements from paper. We transfer the pattern to non-woven fabric and felt. Sew beads on the front side of the decoration. For the first two rows we use small beads, for the second two - medium parts, the next lines are made from large elements. We connect the two parts of the decoration. Sew on the crochet fastener and the collar is ready.
The second method differs in that it uses strings of pearls rather than beads. To make a collar from beads and beads with your own hands you will need:
- Scissors, needle, thread.
- The ribbon is thin.
- Pencil, glue.
- Strings of pearls.
The principle of making jewelry:
- We take felt and draw a collar on the wrong side. The product can have any shape. We fold the material and cut out the design.
- Select pearl threads of suitable length. The thread will be flexible if you do not put the pearls on it too tightly.
- We cut the tape into two equal parts, fasten it on both sides of the collar, and lubricate the outer surface of the fabric with glue.
- Gently press the pearl threads onto the felt.
- The remaining free space can be filled with beads and pearl beads.
- The finished product should dry overnight.
DIY beaded collar - master class
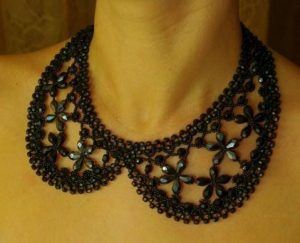
You can make a beaded collar with your own hands in the form of an openwork mesh. This accessory will decorate any outfit. It looks openwork, almost weightless, and will go with any dress or suit. To create a decoration you need:
- Beads with a diameter of three millimeters. Material number eight looks good. In total, the necklace consists of 1215 elements.
- Special needle and thread for beads;.
- Round nose pliers, fastener.
- Scissors.
- Rings – 2 pieces.
- The chain is ten centimeters.
The weaving process consists of several stages:
- Insert a one and a half meter thread on both sides into two needles. Find your favorite weaving pattern. There are three options for creating a mesh necklace. Let's consider one of them, which is the simplest and most understandable. Regardless of the weaving method, the necklace will look almost the same.
- It is necessary to make a circuit containing thirty-nine elements. To do this, lower 5 beads along the thread. Put on the next link, thread it with two needles from opposite sides. Pull both sides of the thread. The bead will divide the thread into two equal parts.
- Put 2 parts on each needle, pass the next one with two needles. Proceed according to this scheme until a chain of thirty-nine elements is formed. We fix the work with knots, hide the remaining thread in the workpiece.
- Go through the entire base using the scale technique, 6 parts at a time. Take a two-meter thread. We fix one end in the first element between a pair of lower parts. We put on the next six beads, fastening the thread to the second link from the bottom.
- Make a pass through the sixth element using a reverse stroke. This creates a beaded loop. The next loop is made of five parts, the sixth is common with the previous element. According to this principle, we work along the entire chain, create subsequent loops, and attach them to the parts in the first row.
- The beginning of the next row is the middle of the first scaly element on the side. The row tends in the direction opposite to the first line. We continue to make similar scales. There should be eighteen of them in total. Afterwards the gate is divided into two sections.
- Pick up 8 beads, attach them to the center of the outer row of scales, then continue to pick up 5 pieces each. We go all the way through the row. We make the next two lines in accordance with the diagram.
- The last and penultimate row will have 8 and 7 elements instead of 6.
- The second half is made according to the principle of mirror reflection.


 0
0