To create a full head of hair or a voluminous long hairstyle, special extensions are often purchased. If you attach them correctly, the hairstyle will look natural, and no one will know that a significant part of the hair is not yours. Read on to learn about the basic principles of fixing curls and fixation lines.
What kind of hair are there on hairpins?
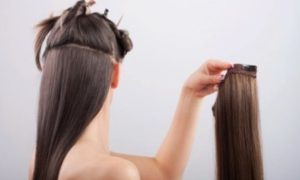 To create a luxurious hairstyle in a few minutes, the fashion industry offers to use hair extensions secured with special hairpins. Natural strands or artificial hair can act in this capacity.
Natural curls look natural, they are more manageable, fit well into styling, they can be dyed, curled with curling irons, or straightened with an iron without fear. In a word, everything that girls do with their hair can also be used for natural hair with clips. A set of such strands is not cheap.It all depends on the product, which can be of different origins:
- European curls;
- Indian;
- Asian;
- Russians.
The Asian species is represented on the world market by hard, low-quality strands, which undergo lengthy chemical treatment before reaching the counter. It is clear that their price will be cheaper and their service life will be shorter than others.
The highest quality products are represented by the Russian look, which will look like your own strands. Indian and European curls are slightly inferior in quality to Russian ones, but their prices are also more affordable, and they last a long time.
Artificial hair has a very significant advantage - low price.. But it is more difficult to match them; they do not tolerate coloring or heat treatment. If you do not intend to create a full head of hair every day, then this is a good option for temporary wear.
Important! You need to choose your hair “live”, applying strands and carefully selecting the color. For thin and rare ones, you need to purchase a very high-quality natural product. The artificial look of curls in this combination will look unnatural.
How to secure your hair firmly with bobby pins?
Contacting a professional is the best decision, but doing it often or daily is expensive and impractical. You need to learn how to secure it yourself. The process itself is simple and short in time.
For ease of use, you will need several long duck pins.. You can do without them, but at first it will help to avoid mistakes, do everything efficiently and reduce time.
Let's start creating the hairstyle:
 wash your hair, dry it, comb it;
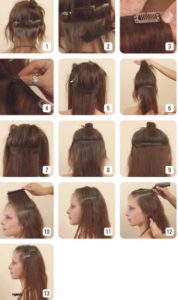
- We start work by attaching long strands. We hook them to the very bottom of the back of the head, retreating a couple of centimeters from the neck.To do this, we divide the hair into a horizontal parting, raise the upper part to the center, and temporarily pin it with a weft;
- place the pad on the parting, placing it symmetrically on the head, and secure it with hairpins;
- we check the fixation, cover it with our curls so that the fastenings are not visible;
- make the parting higher, place the next strand, secure it, cover it with your hair;
- we continue to work, moving from bottom to top, repeating the main steps;
- the highest place of fixation should be covered with a sufficient amount of its curls and look natural;
- in the same way we attach the strands at the temples.
Important! Sometimes there are recommendations to comb the lower part and spray with hairspray before parting the hair. Professionals say that unnecessary mechanical impact is impractical, especially since the result of the backcombing will not be visible under the weight of the extension strand.
bangs
The parting is placed in the desired place of attachment of the false bangs with a reserve of curls to disguise the attached strand;
 the line can be horizontal or oblique depending on the model of the lining;
- hair is secured with wefts;
- the overlay is fixed with hairpins;
- The clips are removed from the head, and the original strands cover the attachment points.
Tail
 First, the tail is made from its volume;
- then a false tail is fixed on top. The central clip should be fixed strictly in the center at the top of the tail;
- ribbons are wrapped around the base and tied tightly;
- to disguise the fastening of the lining, the base is wrapped in the original strand;
- The hairstyle is left as is or braided.
One wide strand
This curl is about 25 cm long and is attached along a horizontal parting, laid from one ear to the other:
 attach the extension strand with the clamps open;
- align, check symmetry;
- snap the hairpins one by one;
- Only after this, loosen the hair pinned up on the top of your head.
Important! If you want to add extra volume to your hairstyle, part it above the recommended line, but make sure that the extensions are not visible.
Individual curls
A set of extensions usually consists of 3 wide strands for the back of the head and 4 narrow strands for the temples, 2 on each side. It won’t be difficult to fix them by adopting the method described above:
- place a parting at the bottom of the back of the head and fasten the shortest of the wide strands;
- We mark the next parting on the top line of the ears, here we attach a curl a little wider and longer;
- for the widest one we find a place on the top of the head, but make sure that the secret of the overlays is not revealed;
- We determine the places for fixing the temporal curls by selecting and checking through a mirror. Higher mounts will create more volume.
How to make a beautiful hairstyle with such hair?
 Having mastered the process of attaching extensions, you can begin creating hairstyles with new hair. It can be just loose hair or large curled curls. Often, various braids are woven from the increased volume: Russian, French, openwork, fishtail. You can divide the curls in two and twist them into a bundle, folding them into “horns” and securing them with bobby pins. A good option for a “malvinka” is loose hair, picked up from the temples and secured in a ponytail at the back.


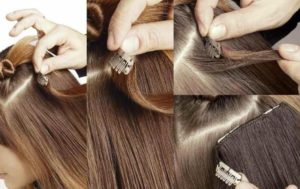 wash your hair, dry it, comb it;
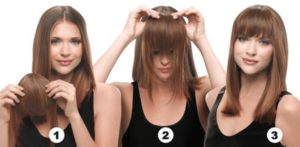 the line can be horizontal or oblique depending on the model of the lining;
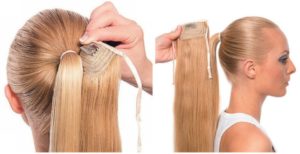 First, the tail is made from its volume;
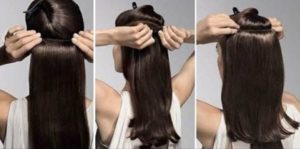 attach the extension strand with the clamps open;
 0
0