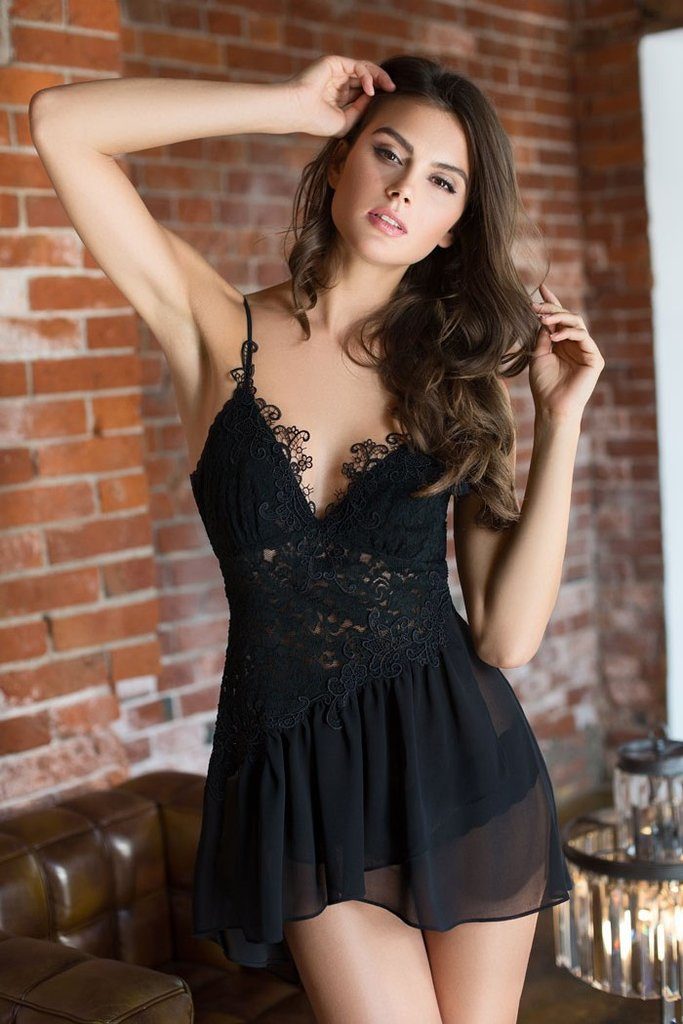
A peignoir is a must-have in every woman's wardrobe. This seductive outfit takes its name from the French language - one of the most beautiful in the world. It is in it that a woman can feel truly attractive and emphasize her elegance and sophistication.
 There are a huge number of different types of negligees. They differ in criteria such as length, purpose, style or cut. Sometimes it can be very difficult to choose the right one from the extremely wide range provided in the modern market. Or it may happen that an almost ideal outfit does not suit any one parameter - size, color or length. What to do in this case? Don't despair - you can always sew a peignoir yourself.
The advantage of this solution is that you can sew exactly what suits you perfectly.This is not a very difficult task, which does not require special skills or experience in sewing - any novice woman can cope with sewing this product.
But first, you should carefully study not only the entire step-by-step sewing scheme, but also the materials from which professional tailors make negligees.
In addition, you will need to choose styles - look at photos on the Internet and decide what you like best. Or you can combine several elements from different styles. After all, this is the beauty of DIY sewing!
What material is used when sewing a peignoir?
 So, let's start with choosing the material. This is a very important point that you should definitely pay attention to - not only the comfort during further use of the product, but also the final result itself depends on it. After all, some fabrics can be quite difficult to “handle” for a beginner.
For example, it will be more difficult to work with natural fabrics. They are more demanding not only in the sewing process, but also in further care. But what exactly materials can be suitable for a peignoir?
Take a closer look at the models provided in stores. Most often it is chiffon, guipure, satin, silk. It is important that you like the fabric you want to use - this way the final item will turn out to be really beautiful and unusual.
In addition, pay attention to the color scheme. Choose the shade that best suits your appearance and appeals internally.
IMPORTANT! It is best to choose plain materials and sew a product from them. At the end of the work, you can decorate the peignoir with ruffles or lace to your taste.Too colorful outfits of this style look ridiculous and ugly, and you shouldn’t go overboard with a lot of decor.
Peignoir patterns
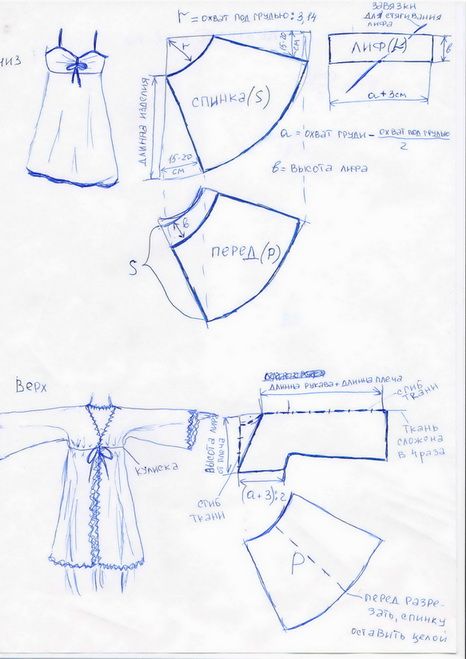 The most important step is creating the pattern. Here you can do two things: either find and download a ready-made version on the Internet, which is quite simple to do, and you will also be confident in the result, or build the model yourself. In addition, you can take a ready-made pattern as a basis and only slightly change it, adjusting it to your own size and personal tastes.
Only those craftswomen who have not only drawing skills, but also some knowledge in the field of design, will be able to create a completely new model. Designing a peignoir is not difficult, but it is important to maintain proportions, draw the correct outline of the parts and cut them out correctly. To avoid mistakes, it will be easier to take one of the provided patterns.
The next step is to take measurements. It is with their help that you need to carefully calculate the dimensions of all parts of the future product. Be careful - if you make a mistake at this stage, you can ruin all further work. It's better to check everything several times than to redo it all over again.
How to sew a peignoir with your own hands
 Before you start sewing, prepare all the necessary materials. The final list will depend on the specific model you choose.
Then select decorative elements, and also look at the sequence of your actions in order to understand what the sewing process will consist of.
Let's look at the work using the example of a simple peignoir; manufacturing does not require much material or time and can be done by any beginner.
- The first step is to design the main part of the entire product - the skirt.At this stage it is necessary to determine the length of the product. The standard length is calculated using the formula: hip circumference + 20 cm, but you can add as much as you want.
- Then cut out a rectangle and round off its lower ends. Process the resulting piece along the edges so that the threads do not unravel and the product looks neat.
- For the bodice, you can use triangular elements - two from different types of fabric. You can take natural one as one of them. Don't forget to arrange the darts. The remaining two stripes will become the back of the bodice.
- The lace should be sewn with a stitch in order to tighten it later. Please note that it should be several times wider than the triangles. Sew both bodice pieces together and then sew them to the back.
- The next step is to finish the top with binding and leave the ties. Now you need to stitch the base and tighten the bodice. Sew both parts of the peignoir together and add a silk belt.
- Finally, you can sew on a variety of decorative elements - bows, ribbons or lace. Only your imagination can limit you.
- A beautiful do-it-yourself thing is ready!
Now you know how to quickly and easily sew a peignoir with your own hands. This outfit will become one of your favorites, not only because it was made independently, but also because every detail in it is thought out and designed in accordance with your taste. If you are pleased with the result, you can start sewing another similar product - the simplicity of the process allows you to sew as many things as you want. This is also facilitated by the small amount of materials required for work.
 1
1