creativecommons.org
To make a lampshade from ribbons with your own hands, first of all you will need to decide on what frame you will make your design. There are many options.
- Take an old lampshade, remove the old covering and use it as a new frame.
- Buy a new lamp with a plain lampshade and cover it with ribbons.
- Make your own wire frame. Then you can dream up the shape of the lampshade and its size. To implement the idea, you need to purchase steel wire at any hardware store. It will make the frame strong and reliable. Let's sketch out a sketch of our craft and start making it - cut pieces of steel wire equal in length with wire cutters and secure them to the upper and lower rings using soft thin wire or simply bend them. To prevent rust from appearing on it, it is better to paint such a frame.
- Use construction mesh for the frame - cut off the required piece, roll it in the shape of a cone or cylinder and secure it with scraps of mesh.
Having prepared the frame, let's start making the lampshade.
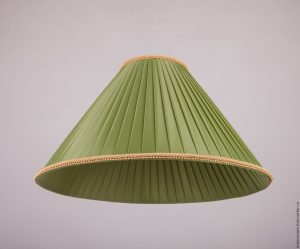
DIY satin ribbon lampshade
The fastest and easiest option is to change the decor of a lamp. Let's consider a master class on making a lampshade from ribbons.
- Let's prepare a satin ribbon, the width of which is from 1.5 to 2.5 cm, glue (PVA), clothespins or safety pins to secure the ribbons.
- On one ring of the frame we glue the edge of a satin ribbon and secure it with a clothespin. We are waiting for the glue to dry completely.
- We begin to wind the tape from one ring to another, making small overlaps. On the top ring we make them wider.
- We finish winding in the same way as we started - secure with glue and secure with a clothespin or pin.

creativecommons.org
The lamp can be decorated with a border or tape glued along the line of the larger ring located at the bottom of the product.
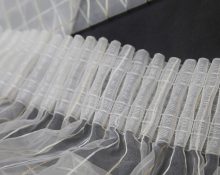
The second option is similar to the first, but there are differences - the tape is wound without overlap. After winding the first circle, we unfold the tape 90° and fasten it like all the others. Then we pass it under the first one, pull it out and put it on the second one, down again and up through one. The result is a weave that gradually fills the entire structure.
Another type of weaving is two ribbons. Then each subsequent row must shift by one crossbar. This weaving will direct the light downwards - ideal for floor lamps located near the bed. It will illuminate your pillow, book, curtains. If you plan to read, it is advisable to stretch the fabric under the weave to provide more even lighting.
Without it, streams of light will break through the cracks of the weaving and create various light stripes.
The third type of decoration is suitable for a cylindrical frame shape. The materials are the same. We will wind the tape vertically, as in the second option - closely without overlap. Then we take the ribbon horizontally and attach it to the bottom ring, leaving a 20 cm piece of ribbon free. We begin to weave our masterpiece - we thread the horizontal ribbon under the vertical one, then over the vertical one and so we braid the entire circle. We cut off the excess ribbon, leaving 20 cm free. We tie the two loose ends in the form of a bow.
We make the second row in the same way, but we fasten the ribbons so that the bow is on the opposite side. We braid the entire lamp in the same way.
The selected ribbons can be of different colors or the same color, but different in texture and saturation. It all depends on your taste and imagination.
 0
0