creativecommons.org
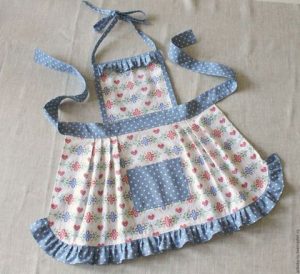
Every child wants to feel like an adult. He tries to help his mother wash the dishes or prepare dinner. However, it is not always possible to cope with the task accurately. The result is greasy stains on clothes, traces of fruits, vegetables and other troubles. An apron will help to avoid such consequences. Not every parent is ready to buy a product - some don’t like the quality, others don’t like the models and colors. Moreover, it is not at all difficult to sew a children’s apron to your own taste. The sample can be found on the Internet in photographs, the fabric can be found in a sewing store. All that remains is to make an exclusive design.
The child will surely enjoy feeling like a real chef and becoming like his mother. And the amount of washing is guaranteed to be reduced.
How to sew a children's kitchen apron - tips
Oilcloth or synthetics are not suitable for a baby - it is advisable to choose cotton or linen fabric. An alternative option is denim.But it will be difficult to sew it by hand; it’s easier with a sewing machine. A few more tips:
- You can sew an apron for newborns and babies from a beautiful kitchen towel. The product will be practical and wear-resistant. It is advisable to choose a non-staining towel with a beautiful pattern. Sewing an apron will take a little time.
- A modern, most practical version of the material is laminated cotton. This model can be used not only in the kitchen, but also in the drawing process. If you sew a children's apron for kindergarten from such fabric, it is guaranteed to last longer than fabric products.
- Processing with bias tape is the best option, but it is quite difficult to buy, so other alternatives are used.
Children's apron - master class on how to sew a children's apron
creativecommons.org
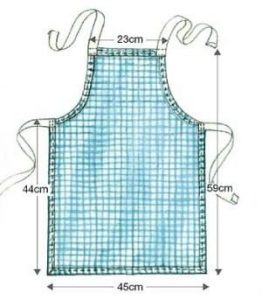
The apron pattern is as simple as possible. First you need to take your child’s measurements. You will need length, hip volume, width and height of the top. After that:
- To create an imaginary midline on a large sheet of paper, fold it in half. The top edge of the product is installed on the line.
- The height of the chest piece is placed on the midline. We set a point and count half the volume of the child’s hips to the side of it. Let's put one more point.
- Using the measurements, we draw out the contours of the apron, smoothly connecting them. The bottom element is the hem, which can be of any length. Short aprons are more for beauty, long ones protect against stains. If the child is not particularly keen on being in the kitchen, he just wants to look like an adult, a short length is enough. And for amateur chefs, it is better to make an apron that reaches the knees or below.
- After finishing connecting the points, you need to use scissors to walk along the middle line, cutting the layout clearly in half.
- All that remains is to trace the contours of half the pattern on the wrong side of the material. An allowance is needed if you plan to add a flounce, frill or other decorative elements. Otherwise, five millimeters is enough.
Now you need to sweep and stitch all the elements. Another step is to make pockets. They can be decorated in an original way with appliqués or embroidery. To process the cut, tape will do. It is better to work with cotton trim, but it is not always available. The ties and harnesses are made from braid, ribbon, and fabric strips. For boys, rag options are more suitable; girls will like satin bows or shiny ribbons.
 0
0