creativecommons.org
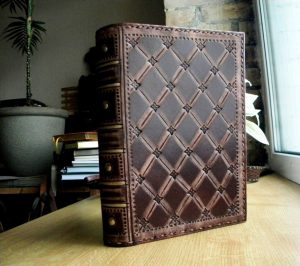
A book can be not only a source of knowledge, but also a family heirloom. Some publications have been passed down from generation to generation for many years. There are books that are dear to a person as a memory. I don’t want such literature to deteriorate before my eyes, gather dust on a shelf, or suffer from external factors. In this case, the best solution to the problem would be a leather book cover. The material can be natural or artificial, of any color and type.
Specialized workshops offer restoration services for old books, but they are quite expensive. Therefore, there is often nothing left but to make a leather book cover yourself. This is an interesting job that will take some time. But the owner of the publication will be able to create the endpaper design for valuable literature himself. You can make a leather album with your own hands using the same principle, for example, cover a collection of family photographs with natural material. It is enough to master the process once.
How to make a book cover from leather - DIY leather cover
Before creating leather book binding with your own hands, you should prepare all the necessary tools and material. To work you will need:
- Natural or artificial leather.
- Ruler, scissors.
- Medium sized cloth.
- A stationery knife, ten cotton pads.
- A meter of thick cardboard for the cover.
- Wooden sticks.
- Thick paper for endpapers.
- Wood glue.
Step-by-step instructions on how to make a leather book cover:
- The original book cover and flyleaf are removed. The book must be open. The hand rests on the first pages and presses them tightly. At this moment the cover is pulled in a different direction. It is important to be careful, otherwise you may damage the pages or binding.
- The spine of the publication is cleaned - adhesive residues, excess paper. Cotton pads are alternately wetted in water. They carefully remove the layer of previous glue along the entire binding. As a last resort, a tissue flap can be used instead of discs.
- The sheet type for the endpaper is calculated. You can make the first page a single color or add drawings, patterns, etc. When choosing, it is important to consider the topic of literature. The future endpaper is trimmed according to the size of the publication. The height of the sheet should ideally match the contours of the book. The width should be twice the width of the publication.
- The cut sheet is folded in half. Before bending, it is important to determine the direction of the fibers. The paper should only be folded along the grain. Otherwise, there is a high probability of deformation of the sheet under the influence of humidity. An incorrectly folded endpaper also causes a loud rustling sound when opening the publication. You need to create two such sheets.
- The folded paper is applied to the cover of the literature. Size compliance is checked.If the copies are suitable, they are glued to the first and last sheet of the book in one piece. When applying glue, it is important to distribute it correctly around the perimeter. A strip of no more than one centimeter is applied. The layer is as thin as possible.
- The fabric is fixed in the spine area with glue. A small piece of material should have a rectangular shape. It is carefully smoothed out, all wrinkles are removed.
- At the bottom and top of the spine, small pieces of fabric are fixed with glue. They make the imitation binding more similar to the original. A drop of glue is applied to a rectangular piece of fabric. A thick thread is glued to the center, after which the ends of the fabric are glued together.
- Rectangles are cut out of ordinary cardboard. These are two bases for the future cover. They are attached to the publication one by one for the purpose of correcting and adjusting the sizes. According to the standard, the book cover extends beyond the boundaries of the publication pages on three sides.
- A cardboard strip is cut out for the spine. The size must completely match the length and width of the spine. The strip is connected to the rest of the elements using tape. Afterwards, a one-centimeter indent is formed between all parts of the cover.
- The work with the skin begins. You will need thin leather of medium elasticity. Then it will be easier to cover the book with leather. The outer side of the cardboard is carefully coated with glue. The application layer should be thin. The entire surface of the cardboard must be completely coated.
- The skin is placed on top of the cover coated with glue. It is glued to the paper with a special spatula. During work, light pressure is allowed, but the material cannot be stretched.
- When the leather covering is completely glued, the excess fabric around the edges is trimmed.You must leave 2.5 cm as a reserve on all sides of the book. Triangles of corners are cut off.
- The cardboard is smeared with glue from the inside, the allowances are folded. Corner bends should be handled with the utmost care.
- After the glue has completely dried, it is necessary to check the tightness of the fit of the new cover. If there are no flaws, a new cover is glued to the front and back endpapers. Next to the spine on the front side, dowels are placed on the cover. The updated book is then sent to press.
Using the above technique, a beautiful leather folder and leather notebook can be created. You can sew any logo on top of the cover.
How to make a leather binding for a book - interesting facts
creativecommons.org
When your DIY leather book cover is ready, you want to give it some personality. To achieve this, there are several special design methods that have been used by specialists for many years. An expensive but elegant decoration for a leather book is embossing. The work uses gold leaf and foil. Having made the leather binding with your own hands, you can decorate it with inlays.
There are three types of embossing on leather covers:
- Embossing on a gold foil base. The most popular way to decorate literature today. The publication looks expensive and luxurious.
- Embossing type. This is a special way of creating a layered image. Craftsmen can create concave and convex designs. In this case, the work is carried out without the use of ink or paint. The only thing that can sometimes be added is a little foil.
- Blind type. A flat brass stamp heated to a specific temperature is used to create an indentation on the cover. Using embossing, a specific image or inscription is highlighted.
 0
0