Every woman needs to be a little bit of a seamstress. It is not necessary to know how to cut and sew complex things. It is important to have basic skills that will be useful in everyday life. One of these is to sew on a button. But it always needs to be fastened to something, so learning how to make a loop out of thread is extremely important and useful. The loop is used as a fastener, as a hanger for towels or curtains, and also as decoration for clothing and interior items.
How to make an air loop by hand?
The fastest and easiest option is to make a loop from one thread. To perform an air loop you will need:
- needle;
- scissors;
- thin threads or floss;
- a product on which you will make a loop (this could be a hanging toy on the Christmas tree, a light towel, etc.).
First, mark the place where the loop should be. Further:
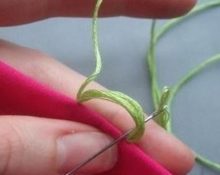
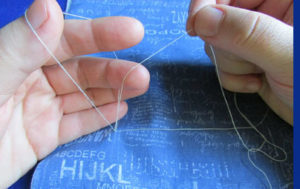
 Thread the thread through a needle, pierce the attachment point and make several stitches in one place. This is necessary to secure the thread. Besides, we don’t need extra knots at all.
- After this, make another stitch, but do not tighten. Instead, drape the resulting loop over the index finger and thumb of your opposite hand.
- Use the middle finger of the same hand to hold the working thread so that it does not get tangled.
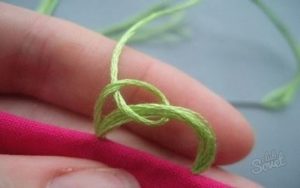
- Drop the thread from two fingers so that it remains on the middle one, and then tie it with a knot.
- Repeat as many knots as you think necessary for good fastening.
- Finally, thread the working thread through the loop and tie.
- To hide the end, run it inside out or the back of the item. All is ready!
 Thread the thread through a needle, pierce the attachment point and make several stitches in one place. This is necessary to secure the thread. Besides, we don’t need extra knots at all.
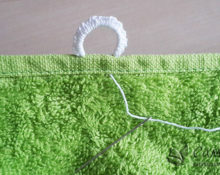
Loop of threads tied with threads
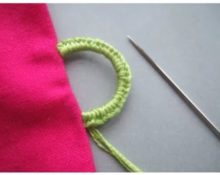
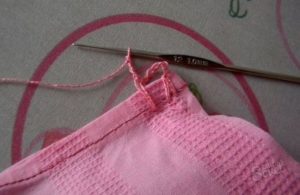
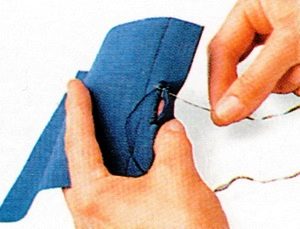
If you need to hang a heavier item or sew an additional fastener on a child's jacket, then it's time to improve a simple air loop. Make it twisted. It will withstand not only more weight, but also more tension, for example, from the back of a woman’s blouse. To create it you will need a needle with a fairly dense thread and the product itself. Do the following:
 on the wrong side, secure the thread with a knot or a pair of stitches and bring it out at the point where the imaginary loop should begin;
- Thread the thread onto the finger of your other hand (use your middle finger). If the loop is made to fasten a button, then make sure that its size matches the diameter of the button;
- bring the thread inside out at the second point next to the first puncture, and then thread it through the first hole again on the front side. Repeat the action 4-5 times. The result should be a thick loop;
- pass the needle through the loop, and then through the second one formed;
- tighten the knot at the beginning of the loop (push it to one of the edges);
- repeat manipulations with the knots until you reach the opposite edge of the loop;
- fasten the thread from the wrong side.The mount turned out to be not only strong, but also very beautiful.
 on the wrong side, secure the thread with a knot or a pair of stitches and bring it out at the point where the imaginary loop should begin;
Crochet buttonhole
 For needlewomen who know how to crochet, we offer our own version of the loop. You can make it using iris-type knitting threads and the hook itself. The knitting process is very fast and completely uncomplicated:
- secure the thread with a needle and remove it. Next the hook will come into action;
- make a single crochet (also called chain stitches) of the length required for the size of the button;
- thread the needle again and secure the arc to the product. Everything is very simple!
Advice! Knitting threads tend to stretch over time. Do not make a loop with a margin. Let the button fit tightly into it at first, but after literally 2-3 wears the loop will stretch.
Making a loop for a button
If no type of air loop suits you, but you need a slot, then you should take care of its careful processing. I wouldn't want my favorite thing to bloom. Perform the following sequence of actions:
 Use tailor's chalk or soap to mark the locations and length of the slits. Do this carefully so that in the future the item will fit correctly on you;
- cut holes using sharp scissors. It is better to use small ones;
- take a needle and thread and fasten it on the wrong side of one of the ends of the cut;
- Using a simple buttonhole stitch, finish the edges of the slit. Make stitches very close to each other so that the fabric does not unravel. Leave at least 3 mm from the edge;
- Use a few stitches to secure the thread.
 Use tailor's chalk or soap to mark the locations and length of the slits. Do this carefully so that in the future the item will fit correctly on you;
Advice! Don't pull the thread too tight or it may cut through the edges of your hole.
How to make a buttonhole on a sewing machine?
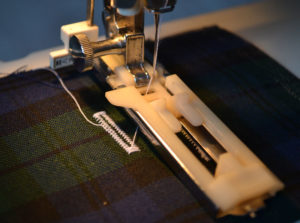 For craftsmen who are comfortable with a sewing machine, we can offer another option - to make a buttonhole with its help. Your task is to process the cut loop. In this case, it is necessary to overcast the edge with a zigzag stitch to the nearest mm. You can also punch a hole on the machine - there is a special function for this. Be careful and always practice on rough fabric to avoid disappointment. And remember - don't be afraid to do crafts! Almost anyone can do all the loop options!
 0
0