Today, laces are not just a means of keeping shoes on your feet. They are a decorative element that can add style and creativity to an image. The ordinary bows that we were so accustomed to in childhood will not surprise anyone today. Nowadays, you can tie your shoelaces in more original ways. The most interesting ones will be discussed in the article.
What to consider when choosing a method?
Lacing varies. When choosing one method or another, it is important to remember some of its nuances. Don't forget that shoes are not only about beauty. Comfort is important. Properly laced boots not only look good: they don’t tighten your feet and don’t come off while walking. To achieve this effect, you need to consider:
- For what purpose is lacing selected? If you are going to be running, cycling or actively walking, you need to securely fasten your shoes to your feet. Therefore, you will have to tighten the lace a little more than usual (but you should pay attention to ensure that no elements of the sneaker put pressure on your foot).
- Foot shape.Some tying methods are completely unsuitable for people who have wide or narrow heels or high insteps (the shoes will rub).
- Shoe style. Not every lacing is universal. One method is suitable for sports sneakers, the other for classic ones.
Interesting! Many techniques for tying shoelaces without bows involve using the last extra hole. This helps distribute pressure evenly across the top of the foot. Thanks to this tying, there will be less discomfort and unpleasant sensations while walking.
We lace and hide the ends
The shoes can be fixed on the foot so that the bows do not stick out. You'll have to tie your shoelaces anyway, but It’s better to do it inside, as if hiding everything unnecessary under the tongue.
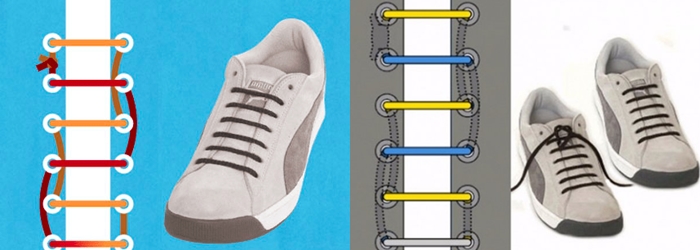
Method number 1. Hidden node
Is the most common. They can be used to lace both sneakers and sneakers, as well as other, more formal shoes. So, the “Hidden Knot” is tied in several stages:
- work must begin from the top. First, a lace is threaded into the upper left hole; this must be done from the inside;
- then on the inside we pass it through a longitudinal hole (that is, the one located below);
- leaving one loop free, carefully pull the lace into the next one on the right side.
These “steps” must be completed to the bottom extreme hole. Then the lace is threaded in the same way from bottom to top. If done correctly, the aglet (plastic tips) will meet on the inside top of the boot tongue.. This is where the “hidden node” is formed.
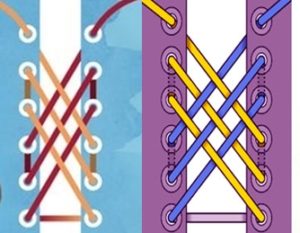
Method number 2. Web
Quite an interesting technique, which was appreciated by avid fashionistas and young people. In order to implement such tying, we take the following steps:
 We thread the lace into the second loops from the inside. From the outside we insert it into the first, lowest hole;
- then carefully, not too tightly, fold both parts of the lace crosswise and thread the agglets into the third loops;
- then from the inside we again send the lace down to the first hole. There we again fold its ends crosswise and bring it out through the fourth loops;
- from the outside we bring them to the second holes (it is important to do this under the already prepared holes, and not above them) and lift them to the fifth;
- the aeglets should meet at the top. There we hide them under the tongue and tie a strong knot.
 We thread the lace into the second loops from the inside. From the outside we insert it into the first, lowest hole;
By the way! For the “Spider Web” technique, it is better to choose long laces, even if there are few holes on the shoes.
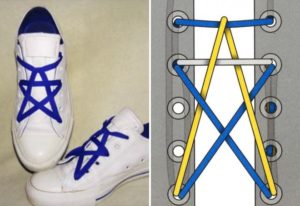
Method number 3. Letter “A”
This tie looks great on athletic shoes. It is not difficult to master such an unusual technique; it is only important to follow all the steps in strict sequence.
Important! The letter "A" is a decorative tie, its purpose is to decorate the shoe, not to secure it to the foot.
For this technique to show itself in all its glory, you need to choose thin, flat laces. Their shade and the color of the shoes should be contrasting (this will make the weaving more noticeable).
So, all the work consists of the following stages:
 To begin, fold the lace in half to determine the middle. Then we pass it through the third upper pair of holes so that a straight line appears in this area;
- We bring both segments out from the wrong side and pass them to the lower holes;
- We pass the left segment obliquely down and bring it out through the loop from which the second part of the lace is already coming out. We form a cross and raise the left side one hole higher;
- here we fix another straight line that will connect both halves of the shoe;
- On this straight segment we fasten the right side of the lace. Then we lower it from the left side and pass it into the lowest hole;
- from the wrong side we raise the right segment. We also bring the left segment to the top loop (on the right side);
- Now we tie the ends under the tongue. It is important not to tighten them, otherwise you can ruin the entire weave.
 To begin, fold the lace in half to determine the middle. Then we pass it through the third upper pair of holes so that a straight line appears in this area;
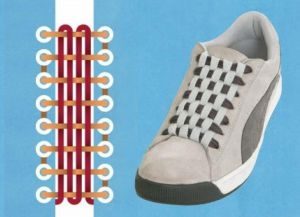
Method number 4. Chess
This technique is effective looks good if you choose 2 bright laces of opposite colors. As an example for description, consider a variant of a black and white chess set:
 a black cord is threaded through the lower holes. We lift the left segment up, and pull the right one through all the loops. The result of these actions is straight horizontal stripes along the entire lacing area;
- We carefully pass the white lace, without creasing or twisting, through the black thread (through one). These stripes will be vertical;
- On top, the remaining ends are tied into a loose knot on the wrong side.
 a black cord is threaded through the lower holes. We lift the left segment up, and pull the right one through all the loops. The result of these actions is straight horizontal stripes along the entire lacing area;
Interesting lacing only at first glance seems like a boring and monotonous job. But this statement is not always true. It is worth trying each of the proposed techniques 2-3 times to understand how it is done. Then the process will go easily and naturally.
 0
0