What is a bandana?
This name originally appeared in Spain and was used by shepherds to refer to a headscarf used for protection from sand, dust and wind.
A little later, this headdress became popular among American cowboys. It was worn as a scarf around the neck, as a headdress, or as a bandage on the face. This detail has become simply an irreplaceable distinctive feature of the cowboy style.
But the bandana gained particular popularity among hippies. Since then it has been a very common headdress and a very popular accessory. Everyone wears it - children, adults, men, women.
There are many options for wearing a bandana. The models of these hats are varied:
- Bandana with visor;
- On strings;
- Model - headscarf;
- Transformer (buff);
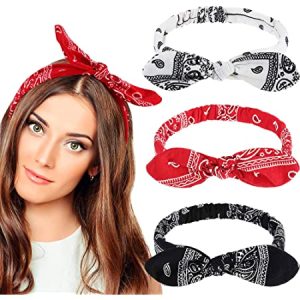
- On an elastic band;
- Bandeau model.
All these varieties can be sewn yourself.
First you need to decide on the choice of material. Based on the main function of this product - protection from sunlight, the ideal solution would be to choose cotton or linen fabric.Sometimes calico and chintz are used.
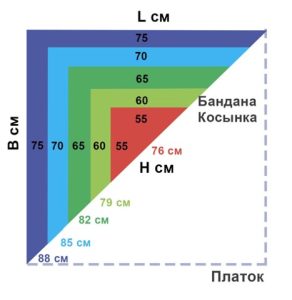
A classic-style bandana is a square of fabric, the sizes of which differ depending on its owner:
- For men – 70 centimeters x 70 centimeters;
- For women – 60 centimeters x 60 centimeters;
- For children – 50x50. If the Buff model is sewn, the length is 50, the diameter is 22 centimeters.
In this article we will look at how to sew bandanas for girls with our own hands. The pattern of a scarf-shaped bandana for a girl is very simple:
- Cut out a square of cotton fabric measuring 50 x 50 centimeters.
- Fold it diagonally.
- Cut off the triangle.
- We hem the edges, turning them twice by 0.5 cm and the bandana - a scarf, the pattern of which makes it possible to make two identical bandanas - is ready.
A do-it-yourself children's and women's bandana can easily be made from an unnecessary knitted T-shirt.
Master class on sewing a bandana
We offer you a master class on sewing a bandana with an elastic band for beginner needlewomen.
- We rip out all the seams on the T-shirt.
- Cut out 2 rectangles from the base of the product. One should be slightly larger than the other (for folds).
- On a large rectangle, we fold or sew zigzag seams along the long sides. We tie the short sides of the large triangle with a thread into an accordion.
- On a small rectangle, determine the middle of the short side and mark it with a pencil.
- We prepare an elastic band of the required length, sew a tube from the fabric, slightly larger in width than the elastic band + seam allowance. We make the length 1.5 times longer than the elastic band. We turn the tube inside out, insert the rubber band, and assemble the tube with an accordion. Secure with stitching on both sides.
- We fold two rectangles face down and stitch them together by inserting an elastic band inside on one short side onto the mark we made earlier. On the other short side we leave an unstitched area for turning the product inside out.
- Turn the bandana inside out.
- We insert the elastic from the unstitched side, adjust it to size and stitch the remaining piece of the rectangle.
Such a headdress stays tightly on the head and does not fall off - this is its main advantage.
There are other models of bandanas that are more difficult to sew and for which it is necessary to create more accurate patterns. But for beginning craftswomen it is quite acceptable to limit ourselves to these.
Hats can be decorated with various appliqués, beads, embroideries, sequins, and stripes sold in specialized stores.
Make your bandana unique!
 0
0