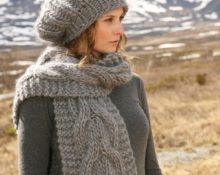
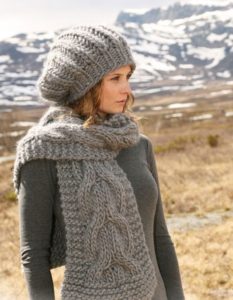
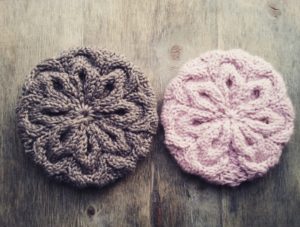
 Knitted items are not only becoming fashionable this year. Among them, a special place belongs to products made from thick yarn. After all, how sweet and charming their owner becomes in such things. A woman wearing a beret made of thick yarn looks fragile and very charming. This article contains a detailed description with diagrams of a very fashionable new product - a beret called “pink snow”.
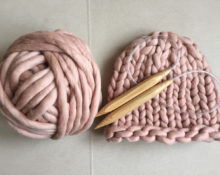
We take a responsible approach to the choice of yarn
 Yarn for a beret should be very soft and at the same time thick. Therefore, it is better to look at skeins with acrylic and merino wool for the “pink snow” model. Very beautiful and neat and most importantly, even threads. You should not purchase prickly varieties, even if everything suits both color and thickness. Such a beret will not become the first thing, but will remain gathering dust in the closet.
Selecting suitable knitting needles
For thick yarn, you need to choose knitting needles according to size. It is inconvenient to knit with thin ones, and the thread can be easily damaged if you grab half the thread.Therefore, it is better to listen to the advice of the seller and the corresponding instructions for the skein.
What patterns are needed for knitting a beret from thick yarn?
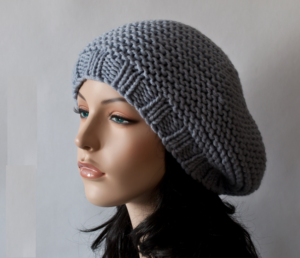
Creating a beret with knitting needles using thick yarn is not so difficult. Even the simplest designs can make a beautiful product. For example, a 1*1 elastic band can create such an interesting hat.
How elegant the simple underside of a beret looks.
We knit a beret from thick yarn “pink snow”
A worthy model of a headdress “pink snow” simply won the hearts of needlewomen. It's so difficult to find a good description for a product you like. Not in this case. Here is a beautiful beret and then an equally wonderful description of how to quickly knit it with knitting needles.
To work you will need:
- merino wool and alpaca yarn;
- knitting needles number 7 and 9.
Beret knitting pattern
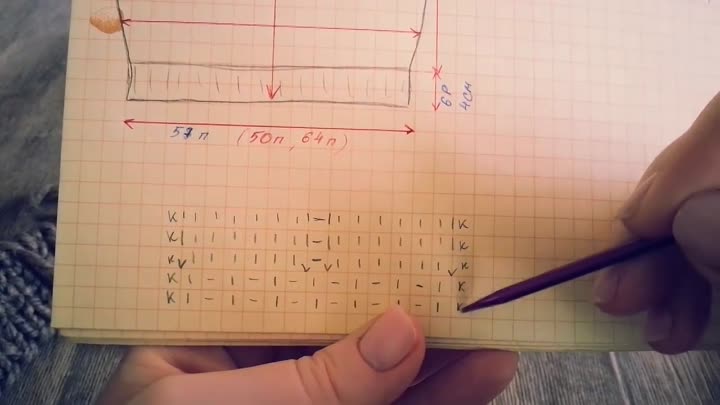
Two schemes were used in this work. The first is a 1*1 elastic band for the bottom. The second is beautiful braids, which make a very charming flower. The beret ends with a simple front piece.
Base diagram
The base pattern is actually eight paired braids. This is a total of 16 braids. The width of each braid is 6 loops. As a result of the reduction, a flower like this is obtained. And the sides of each braid are flower petals. One rapport equals two braids. One has a cross to the right, the other to the left, and then a repeat of such rapports in a circle. There are 8 such rapports in one circle. The distance from one cross to the second is 8 rows. The braids fit tightly in pairs and therefore, when crossed, a small pocket is obtained. Good decreases were made for the top of the head and that is why the pattern on top looks so much like an unusual flower or even a snowflake.

Step-by-step description of knitting
Stage: elastic band
The model starts in an elastic band.Therefore, we use knitting needles to cast on the number of loops for the elastic band. It is advisable to knit a sample to accurately determine the loops for each corner.
Knit 6 rows with an elastic band. This corresponds to 4 cm. Next, go to the main pattern.
Stage: foundation
For the main pattern, use the rows from the diagram, as shown in the provided figure. Please note that all sizes are provided for sizes 56–57. It is better to measure the depth of the cap in advance. It is measured from the lobe of one ear to the lobe of the second ear. Only the line must intersect the line of the crown in its most distant place. This indicator must be divided by 2 and added 3 cm (since this beret has such instructions). Additions are necessary to ensure that the ears are well sealed as the elastic may rise slightly.
Stage: crown
To reduce the crown of the head, make cuts first in the purl loops between the braids. Next, cut the braids in the front loops and in the very last rows of decrease, gradually make up to 7 loops in a row. This will make the top of your head very flat. There will be 15 loops left and collect them into one loop. Pull the thread tightly and tie. Throw it over to the wrong side and secure it here so that the product does not fall apart. It is better to wash a knitted product and starch it a little so that the loops know their place and immediately take a good shape. It is necessary to dry only on a jar with the same head circumference as the model.
Important! If you dry a hat on a jar whose circumference is several cm larger than the circumference of the model’s head, this will destroy the product and the threads will overstretch. The pattern may shift, and wearing such a product will be uncomfortable. It will simply become big.
How to decorate a beret made from thick yarn
A product made from thick yarn can be decorated with a million different techniques.
 Embroidery with voluminous ribbons looks very appetizing. Beads also remain popular. Different patterns from flowers to mesh and different laces.
- You should use large beads for a headdress very carefully, since the product turns out to be very massive even without it.
- It's rare to see sequins on knitted items. For such a beret, you can try sequins, but it is better in combination with small beads.
- An elegant satin ribbon can also complement the beret and even serve as a small bow. It is worth choosing not shiny, but, if possible, matte and dark ribbons.
- A silver brooch for a knitted hat would be cute and appropriate.
 Embroidery with voluminous ribbons looks very appetizing. Beads also remain popular. Different patterns from flowers to mesh and different laces.
These are some interesting ideas for decorating a voluminous headdress. You shouldn’t give up on a beautiful new item, but rather study the proposed patterns and try to knit such a product, better yet, again and again.
 0
0