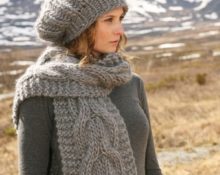
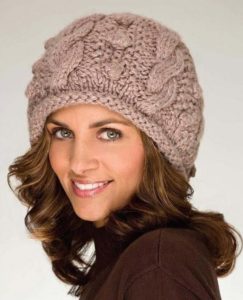
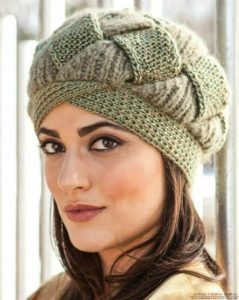
 Have you chosen a chic coat in the store and are now thinking about a headdress? Knitting is a great solution to this problem. A beautiful beret can be knitted using knitting needles by choosing the appropriate yarn. This is how they create beautiful images with coats.
Perhaps this idea will allow you to create a whole set: a stole, mittens and even leg warmers or mitts.
This article will reveal all the secrets of a stylish knitted beret. For each model there is a description, diagrams and other tips.
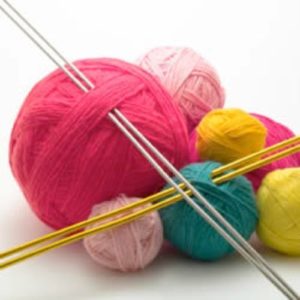
Selection of yarn and knitting needles
Many types of yarn are suitable for berets. If this is a summer beret, then it is better to pay attention to thin cotton.
Spring fashionable berets can be knitted from baby pekhorka or a similar yarn composition. Volumetric products will look more impressive.
 As for winter, you need warm yarn and the more wool there is, the better and warmer it is. Some berets (French hats for women), despite the thick fibers of the yarn, are proposed to be knitted in two threads.
 Beret knitting needles are required the following: firstly, suitable in thickness to the yarn, and, secondly, circular or stocking. In fact, many patterns are made by knitting in the round.
 There are also those that require regular knitting needles (that is, straight knitting needles), but there are very, very few such models. After all, a seamless product is easier to create and more comfortable to wear; nothing gets in the way.
Determining the size for knitting
Although the beret looks loose, it is not dimensionless, so you will have to take measurements. There is a size chart for hats. It looks like this.
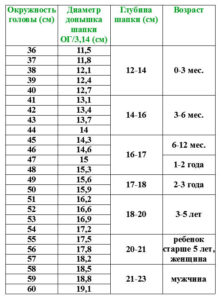
size table
It contains two main indicators:
- Head circumference;
- depth.
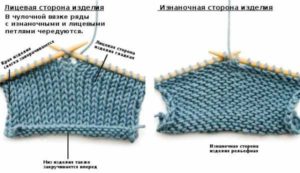
Self-measurement of head circumference is carried out using a measuring tape. The measurement line runs along the forehead in front and along the occipital protuberances in the back. This is a very important indicator for a beret, so that the elastic band securely holds the knitted product.
Important! Since the knitted product stretches well, 2-3 cm should be subtracted from the size of the head circumference so that the beret fits more tightly to the head.
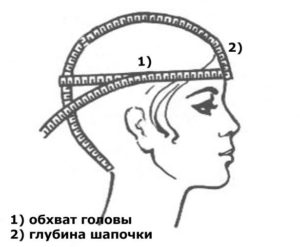 You can either look at the second size in the table or measure it yourself. To do this, a measuring tape is passed from the lobe of one ear to the lobe of the other. The ribbon should cover the top of the head. Then divide the figure by 2 and add centimeters for the beret, depending on the model.
 We calculated each size, only the number of loops is again another calculation. It will help you count the sample. You will need to knit a small rectangle.
For beginners, the picture shows how to cast on the first stitches on 2 knitting needles placed together. Then we take out 1 knitting needle and start knitting a sample; you can immediately take the repeat (part of the pattern) as a basis to see it on the yarn and choose the right knitting needles and knitting density.
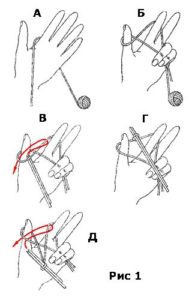
Set of first stitches for 2 knitting needles
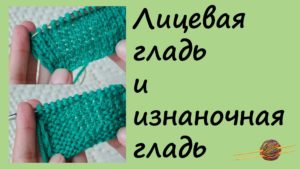
Using knitting needles, cast on 20 loops and knit a little more than 10 cm in height. Next, use a ruler to determine how many loops and rows a 10*10 cm square contains. This will be the density of the fabric.
Important! Very often the model also includes an explanation of the knitting density - this is a very important indicator.
 Even if you purchased the yarn indicated in the description and knitted on the same knitting needles, the knitting density will be different.
 The thing is that we pull the thread along the index finger with different forces. This determines what kind of knitting should be done - tight or loose. That’s why it’s important to count everything for your product and your hands.
Step-by-step instructions for knitting a women's beret
It is more convenient to knit with knitting needles from larger to smaller. It's easier to make decreases than additions. And the additions will always be noticeable.
Therefore, you need to start knitting a beret with an elastic band. Then, accordingly, the base goes into the crown with typical crown decreases. Let us dwell in detail on each type of new beret models below with diagrams.
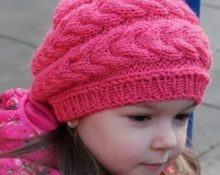
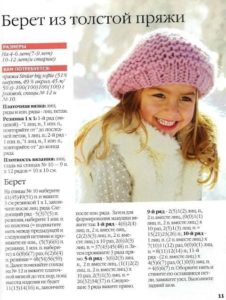
Pink warm beret
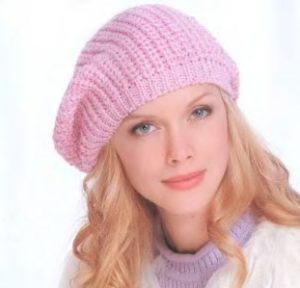
Pink beret_1
A beret made of soft yarn with a small addition of wool looks very charming. This model can be useful for winter. Made using regular and English elastic bands.
To work you will need:
- pink yarn 100 g (180 m per 100 g, viscose 67% and acrylic 33%);
- stocking needles No. 3;
- knitting needle;
- elastic thread (spandex).
The sample density of this pattern is 10*10 cm=11 stitches*15 rows. It is proposed to knit your sample and determine your density, plus, if necessary, immediately make adjustments.
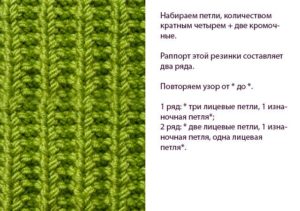
Cast on 92 stitches on the knitting needles and knit with a 1*1 rib in a circle to a height of 3 cm. Then move on to the main pattern of the fabric - this is an English rib.Reach a level height of 18 cm from the point of the elastic band, and begin decreasing.
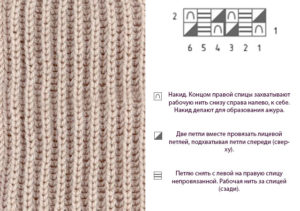
Pattern for a pink beret in English. rubber
To prevent the pattern from becoming askew, decreases should be made using the following method: create three loops together, purl one and make sure that everything follows the pattern of the fabric. Next, knit three rows using an elastic band 1*1 and bind off all the loops in the fourth row. And so pull the necessary thread and fasten it to the product from the wrong side.
Additionally, you need to pass an elastic thread under the current loops from the previous row and also tighten it. This beret fits size 56.
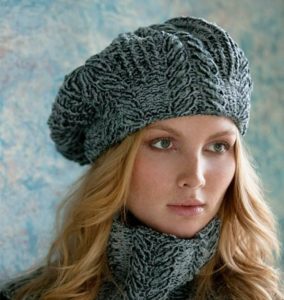
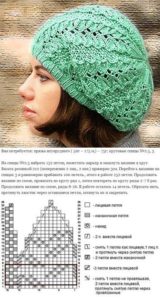
Gray beret with leaves
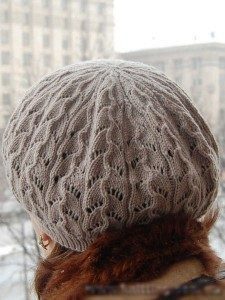
Gray beret with leaves
Charming thin, but quite warm beret. It will be possible wear in spring (autumn) time. With a jacket, coat, raincoat and cardigan.
To work you will need:
- fine wool yarn;
- knitting needles number 3.
This model corresponds to size 56. The knitting density of a sample of this model is for 10 * 10 cm = 24 loops per 36 rows. It is better to calculate your density for more accurate work.
The set for the size, as a result of the indicated density, turned out to be equal to 162 loops. Therefore, we use knitting needles exactly as much as we got when counting and begin to make an elastic band for the beret. This is a 1*1 elastic band (knit/purl loops). You should knit no more than 9 rows. So that the elastic is not too wide and not too narrow.
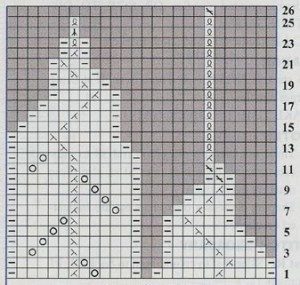
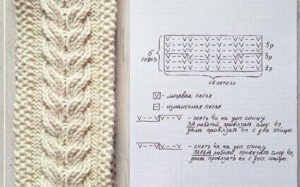
Pattern for a gray beret “leaves”
After the elastic band, you should move on to the next pattern and knit to the appropriate depth. The diagram shows decreases and therefore it will be easier to create your ideal beret. If you wish, you can make it a little longer. Just pull off the last loops.
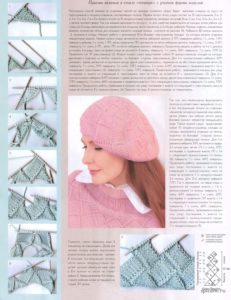
Beret motley
Excellent The winter beret model will fit under a coat and even a sheepskin coat. A lady can consider herself a real fashionista in it.
Motley beret_3
To work you will need:
- yarn of two colors 200 g;
- knitting needles No. 3;
- additional knitting needles for braids.
For a 56 cm model, 106 loops will be enough. Since the thread chosen for the beret is thick and plus the knitting takes place in two threads.
Braid pattern for a motley beret
The model traditionally begins with an elastic band. This is a combination of pattern number 3 (braids) and garter stitch. Knit this way for about 3 cm. Then make a false English elastic pattern between the braids.
Description and photo of “false gum”
Knit until the height from the elastic is 17 cm.
Then start cutting the loops according to the fabric pattern, after which make 3 rows without cutting and bind off all the loops. Pull the crown tighter and the beret is ready.
Takes a burgundy checkerboard
A stylish beret will add bright notes to your look. This burgundy and even wine color is very popular this season. Not only jeans can be burgundy, but also berets. Let's try to connect with the stylish trend right now.
Burgundy beret_4
To work you will need:
- Viking Alpaca burgundy yarn 2 skeins;
- circular and stocking needles No. 3 and No. 3.5.
- The knitting density is 10 cm wide - that's 23 loops.

Scheme_4 “checkerboard” for a burgundy beret
Cast on 120 stitches with knitting needles for size 52 cm and knit with an elastic band 3*3 approximately 3 cm. Purl the next row with additions of one loop every three loops.
Go to checkerboard pattern and reach a height of 22 cm. Start decreasing as follows:
- two loops together and two in the pattern (so until the end of the row);
- knit a row according to the pattern;
- one loop according to the diagram and two loops together according to the diagram;
- knit according to the pattern;
- repeat the last two rows – 2 times;
- two loops together according to the pattern;
- repeat last 4 rows (until there are 10 stitches left on the needles).
Then trim the thread and tighten the loops with this thread. The beret is ready and you can decorate it with a small emblem.
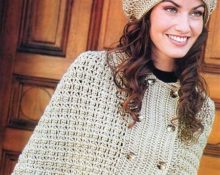
Patterns for women's berets
Pink beret for winter
Green openwork beret
Original pink beret “cubes”
Like these ones lovely models will help to dilute the look and make winter warmer, and autumn and spring more beautiful. We are trying to knit the model we like now. Good diagrams, useful and very clear description. Inspiration will also help you make quick, high-quality new things.
 0
0