Probably everyone is familiar with the situation in which a person who is going to spend time under the scorching rays of the sun (whether it’s renewing his tan on the beach or hilling potato beds in the garden) leaves the hat he had stored in advance lying alone on the nightstand in the hallway.
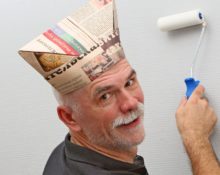
If for adults such an oversight can only result in a burnt nose and tips of the ears, then for children under 10 years of age, being in direct sunlight is fraught with heat stroke, which can have serious consequences. You can protect yourself and your child from sunstroke with the help of a cap, which can be easily made from landscape or newspaper paper.
Quick ways to make a paper cap
So, if you got to the beach and realized that you forgot to take a Panama hat or a hat, but did not forget to grab a few old newspapers or crosswords, you will have to make a choice in favor of health and remain without leisure.The newspapers stored for reading will become the material from which you can make a sun cap for yourself or your child.
Attention! For a children's cap, a landscape sheet (Az format) is suitable; for an adult's head, more material will be needed - a newspaper spread.
You can make a headdress of this kind very quickly, the main thing is to remember the sequence of actions:
- The paper is folded in half to form a rectangle.
- Next, the corners from the fold line are symmetrically tucked, resulting in a large and wide strip remaining at the bottom.
- The edge, consisting of different parts of a newspaper spread, is lifted on both sides (turning it outward) and smoothed by hand.
Attention! At this stage, it is recommended to try on the cap. If it is small, it can be expanded by reducing the rectangular margins.
- The resulting cap is unrolled and the lower edges are straightened.
- The protruding ends are bent inside the headdress.
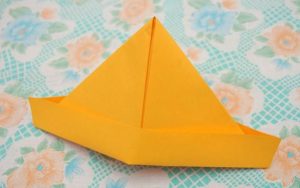
Another option for saving yourself from the sun would be a slightly modified cap with a visor. They do it like this:
- To make the paper headdress hold better, the corners of the newspaper are folded up and the bends are thoroughly ironed on both sides.
- The strip from below is folded twice towards the center to form a rim.
- The resulting sharp upper edge is placed under the rim.
- The future cap is turned over and the sides are folded up to the central fold.
- The bottom strip is folded to the center twice.
- The corners are tucked towards the center and hidden under the rim.
- After this, you can unfold the cap, not forgetting to tuck the top corners under the rim.
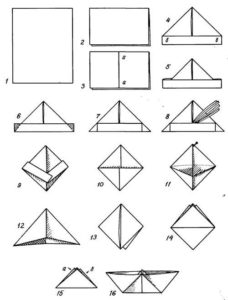
A cap made from newspaper can protect your head from the sun, sand or other small debris that will certainly stain your hair during repairs or cleaning the yard. The square shape of the headdress makes it a universal item, the manufacture of which requires a minimum of time and materials. Step-by-step instruction:
- Take a newspaper spread and bend one of its corners to the opposite side.
- The strip remaining at an angle is bent upward, after which the paper is straightened to its original position.
- The corner opposite to the one that was just bent is wrapped in the same way.
- The paper is straightened out again and turned over to the other side.
- The free strip formed on the opposite side is bent and the opposite edge is placed on it to ultimately form an envelope.
- The newspaper is unfolded again and the sheet is looked for for traces of the fold lines that intersect in its center.
- Using your index finger, lightly press the point in the center and fold the sides of the newspaper in pairs so that an isosceles triangle appears with a wide strip of paper underneath it.
- The triangle is folded so that its corners can lie on top of each other.
- If you expand the triangle again, you can see the center of its base.
- Equal angles of the triangle are folded towards the center with a slight grip.
- The paper structure is turned over to the other side.
- The loose paper is folded inward by 1-1.5 cm.
- The left and right sides are bent towards the center of the cap, while tucking the lower corners into one another.
- The upper corner of the cap is bent in the center.
- Taking the layer of paper located at the top corner, they slowly unroll the structure, which in the end turns out to be a real square cap.
If the weather conditions change sharply, and the sky is covered with gloomy clouds, a paper cap will help keep children's and adults' heads and shoulders from getting wet. You can do it in the following way:
- A sheet of paper or newspaper is folded in half.
- The upper corners are folded towards the center.
- The bottom edge of the top sheet is folded over the triangles so that it fits flush against them.
- The remaining edge is left unfolded so that it can cover the shoulders and neck of someone caught in the rain.
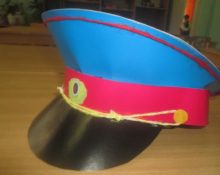
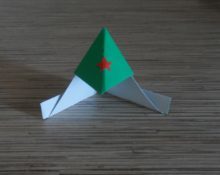
How to make a Budenovka cap from paper
Sometimes it happens that the need for a paper cap arises when preparing a children's carnival or themed costume for an adult. We are talking about events dedicated to the holidays “Defender of the Fatherland Day” and “Victory Day”.
If you can’t find a real soldier’s cap, and there is no time left for sewing, a cap folded from paper according to a pattern can be an excellent replacement. It is slightly different in appearance from the model that is supposed to protect from the sun, so before starting work you need to read the step-by-step instructions.
Before you begin the process of making paper caps or budenovkas for a children's party or work in the yard, you need to take on board a few tips from masters of the arts and crafts of origami:
- The thicker the paper, the harder and longer it will take to work with it. On thick sheets, folds are poorly made, and the folds are not clearly visible.
- Sheets that are too thin can also ruin all your hard work by tearing from one wrong move.
Attention! A budenovka made from a landscape rectangular sheet will have a pointed appearance. To create a headdress with a flat top, you need to choose a square-shaped sheet.
To make a budenovka with your own hands you will need a sheet of white or gray colored paper, PVA glue and a pointed star cut out of paper. Step-by-step instruction:
- Place a sheet of paper in front of you on the table so that the narrow side is at the top.
- The upper corners are bent until they meet in the middle.
- The resulting angle is slightly bent down.
- The corners and folds are ironed and the budenovka is turned face down.
- The corners are folded back to the middle.
- The bottom strip of paper, which remains free, is cut in half and folded upward twice to form two sides, like on a real revolutionary budenovka.
- A star is glued onto the resulting budenovka.
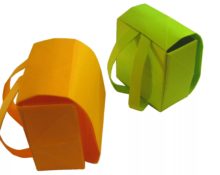
DIY soldier's cap made of paper
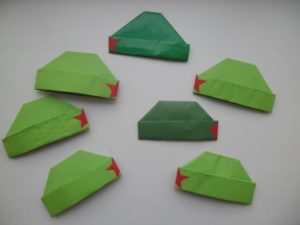
This option is perfect for boys and older guys who got the role of soldiers to participate in themed school performances. For girls, who in most cases portray nurses, you can also make a paper headdress that resembles a medical cap.
The following step-by-step instructions will help you make a rounded soldier’s cap:
- The newspaper spread is divided into two identical rectangles using scissors or a stationery knife.
- The resulting rectangles are added together.
- The larger side of the paper is bent 1.5-2 cm along the edge on one side and the opposite side. The fold should not exceed the length of a paper clip.
- Then the sheets are not completely removed from one another and are connected with paper clips on both sides.
- The paper structure is folded in a circle and one sheet is inserted into the other.
- The last thing to do is to secure everything well with paper clips.
How to make and decorate a cap from a newspaper: step-by-step instructions

Making a cap out of paper turned out to be quite simple. You can try to make such a simple headdress with a small child who has reached three or four years of age. Such activities improve motor skills and help develop the child’s creative abilities and are an excellent alternative to computer games and watching TV.
For the first time, it is better to try to make a cap out of paper, which in its appearance resembles a cheerful chef's cap. After mastering this model, you can safely take on more complex budenovkas, caps and nurse’s hats.
Important! In order for the child to better understand what exactly he needs to do, the adult himself must fold exactly the same cap.
It is best to do everything with four hands, following the instructions step by step:
- Landscape paper is folded in half on both sides, marking the main fold line.
- Then the paper is unfolded and the corners are bent along the line on one side and the other.
- Two rims are folded from the bottom on both sides, which makes the paper cap very similar to a chef’s hat.
You can decorate this hat with anything. Here are some interesting ideas:
- white paper can be painted with fancy patterns and ornaments using felt-tip pens and pencils;
- using PVA glue and colored paper, you can lay out colored appliqués in the form of flowers, animal figures or letters on the cap;
- just like on a real headdress, a paper cap may have buttons and clasps that are attached with glue or tape;
- glitter gel pens will help make a paper cap into an almost designer item that can be kept as a keepsake or gifted to a grandparent;
- Using shiny decorative tape, you can put the name of the kid who made it on the cap.
Advice! When working with a child, it is important not to forget to tell him what caps are used for and when they first appeared. You can learn a short poem and recite it with your child after the cap is ready. A video master class in which the entire process will be clearly demonstrated and clearly explained will be an excellent assistant.
Design and decor options for a paper cap

Those caps that are made by children during classes in kindergarten or labor lessons at school need additional decoration and decoration with accessories. To do this, you will need any paints, felt-tip pens, pencils, glitter, buttons or ribbons. You can paint the paper both before and after the headdress is made from it.
Budenovki, soldier's and medical caps do not need any additional details, especially if they are to become part of a themed costume. They are made from pre-prepared green, gray or white paper, or the finished product is painted in the desired color.
 0
0