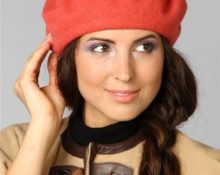
The papakha, as a type of men's headdress, is an integral part of many nationalities around the globe, as well as one of the elements of military uniform. It is usually made from sheep skin or astrakhan fur. It has the shape of a cylinder or hemisphere with a flat or concave bottom. You will learn how to sew such a thing yourself from our article.
What will we sew from?
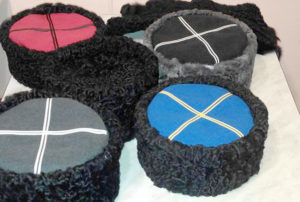 The Cossacks call it Kubanka. For them, this piece of clothing has been considered a symbol of culture and honor since the First World War. There are two varieties that differ in height. It's directly itself kubanka - about 10 cm, and papakha, its height reaches 19–20 cm. We will sew the Kubanka. There are several ways, but we want to offer you the simplest one. To do this you need to prepare:
- sewing machine;
- overlock;
- scissors;
- roller knife for cutting;
- Tsigeiku fur (natural or artificial astrakhan fur, black);
- red cloth (drape, leather, felt);
- narrow silver braid (about 1 cm wide);
- non-woven adhesive to reinforce parts;
- cotton braid;
- lining, preferably with padding polyester insulation;
- patterns from thick paper;
- threads;
- pins;
- measuring tape;
- ruler;
- tailor's chalk;
- marker.
Hat pattern
We will create a pattern for size 58 with a height of 12 cm. If you have sewing experience, you can draw directly on the fabric. We advise beginners to do it on paper first. So…
 Draw a rectangle 58x14 cm.
- Set aside 2 cm along the top edge on both sides. And from the bottom 2 cm on the side parts.
- Find the center, draw a line. Connect all the dots and we get a rounded part.
- In the upper part, along the central straight line, step back 1.5 cm and also connect all the dots. This will be the side.
- Now, in order to make the bottom, you just need to draw a circle with a diameter of 16 cm.
Important! When cutting, do not forget to leave the necessary distances on each side for seam allowances.
Lay out the fur fabric on a flat surface so that the direction of the pile is to the left. We already have an allowance of 2 cm at the bottom, but we should add 3–5 mm at the top and sides. On the wrong side of the fur, trace the pattern with a marker. Trace the red scrap and lining details with chalk or soap. From the lining fabric, cut out the pieces with 1 cm allowances except for the bottom edge.
Attention! Fur parts should be cut only with a blade or a sharp scalpel when a special tool is not available.

Sewing technology
Let's start collecting the parts. If you have a lining without insulation, you need to connect it with padding polyester and machine quilt it, setting the interval length to maximum. But it’s better to buy a ready-made one, it will save time and make the work easier. So…
 We sew both rectangles from the main and lining fabric from the wrong side.
- We sew the seams. If you don't have an overlocker, use a zigzag stitch.
- On the front side we make a decorative stitch, stepping back from the seam in both directions by 2-3 mm, so that it turns out to be pressed. Important! When working with fur parts, make sure that it does not stretch or fold. Otherwise, the thing will turn out skewed, deformed.
- We sew the round piece into the side part, first chipping it, and then sweeping it away.
- We put a piece of non-woven fabric on the wrong side to give the product a more dense shape.
- Align the seams and sew by hand using the needle-forward method, while laying down the dimensional cotton tape.
- We fold the bottom of the hat and sew it to the non-woven fabric, at the same time lightly grabbing the skin.
- We carry out all operations with the lining fabric in the same sequence.
- Iron the seams.
- Turning the base and lining inside out, pin together along the bottom. And we also manually sew over the edge, carefully combining it to cover all areas.
- We turn the hat inside out. We lightly run a damp hand over the fur so that it lies in an even layer, and then go through it with a brush. Remove any lint caught in the seams using a needle..
- Place it on a pan to let it dry. After this, comb again. Our Kubanka is ready.
Features of sewing a Cossack hat with your own hands
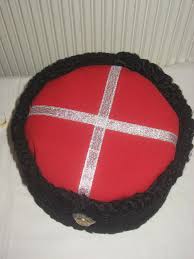
To sew this product, natural or artificial astrakhan fur, rough sheepskin or refined fur are usually used.. At the bottom of the hat there must be stripes in the form of a cross. Previously, it was believed that this carried a semantic affiliation with the Orthodox faith. But some historians argue that there is no specific hidden meaning to this.This is simply a tribute to traditions and original culture.
Important the color of the top matters. On the territory of the Russian Federation there are about twenty varieties of Cossacks, depending on the place of residence, which have their own differences. For example, Kuban Cossacks wear red, Terek Cossacks wear blue, and Astrakhan Cossacks wear yellow.
All of them are fans of morality and ethics, they believe that you have to earn the right to wear this headdress. To achieve this, competitions are held to demonstrate physical strength and hand-to-hand combat skills. Theoretical knowledge of history, mastery of military weapons and the ability to work in a team are tested.


 Draw a rectangle 58x14 cm.
 We sew both rectangles from the main and lining fabric from the wrong side.
 1
1
