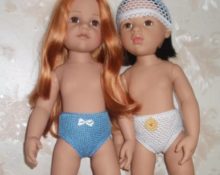
Probably every girl played with a doll as a child, and sometimes not a single copy. Often the doll suffered from a lack of accessories for play. In such a situation, a cap made independently at home from foamiran, for example, looks ideal. It will not only be an excellent addition to the doll, but the young princess will also really like it. You just need to make a suitable template.
How to make a cap pattern for a doll
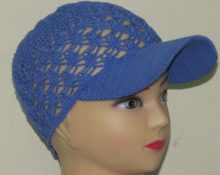
First, the pattern is created on a sheet of paper and then transferred to the fabric. On paper you need to draw six figures resembling a drop, but trimmed at the bottom. The length of the drop is equal to half the distance between the forehead and the back of the doll’s head, and the width at the edge of the drop should be equal to a sixth of the circumference of the head. Also, in addition to this, you need to add two arcs to the paper, which in the future will become a visor for the cap. The length of the visor should be equal to the width of the forehead. The drop can be replaced with a pentagon; it will not appear critically on the cap.
There is another option for creating a top hat.The pattern for it is noticeably different and, in addition to the necessary materials, will require the creation of a frame to maintain its shape. For a hat, you need to draw two circles, one of which should be located in the other, and a strip, the width of which will be equal to the height of the cylinder, and the length will be the length of the smaller circle. The length of one of the circles should be equal to the circumference of the doll's head, the other can be chosen arbitrarily, but it is better not to take too much so that the hat does not look too big.
Next, you can transfer what is depicted on paper onto fabric ready for use. To do this, it is better to use soap, chalk or pencil, depending on the color of the fabric. After preparing the fabric, you can start cutting. In addition, you will need to cut a strip of fabric equal in length to slightly larger than the circumference of the doll’s head, and in width - any length, but not less than two centimeters.
What you need to create a cap with a visor for a doll
You will need the following:
- A sheet of paper and drawing supplies;
- Scissors;
- Fabric (corduroy would be a good option);
- Lining (cotton works well);
- Scissors;
- Pins;
- Cardboard or other material capable of holding its shape;
- Free time;
- Just a little bit of a good mood.
How to make a cap for a doll
The process includes the following steps:
- Working with a pattern. One of the most important parts of the work, because incorrectly created parts can ruin the entire work or significantly spoil the appearance of the cap. But don’t be afraid, the work is not particularly difficult, you just need to be a little careful. The pattern is first drawn on paper and then transferred and cut out onto the fabric. The wedges are also cut into the lining fabric and will sit inside the cap;
- Working with the main part of the cap.The wedge of the cap is attached to the cut strip from the inside using pins and then sewn together. Following this, using pins, another wedge is attached to the wedge with the strip and sewn together. The same must be done with the remaining parts for the main part of the headdress. At this stage, you should check the size of the cap in relation to the toy's head. If they are smaller, you can trim them a little, and if they are larger, it is better to sew in an elastic band;
- Visor. The visor elements cut out earlier should be attached to the cardboard in a shape identical to the cut out parts and the rounded parts should be sewn together with the cardboard. This will give density to the visor, which is a necessity for every cap, even those intended for toys. Cardboard can be replaced with any other material that can hold its shape or a canopy can be made from felt of the same quality;
- Lining. Now it's time to work on the inside of the cap. All actions are exactly the same as in the second point, but with fabric for the lining. Then you need to put the lining into the main part of the cap. Important! The main part and the lining should face each other. All lining wedges must be stitched and after that the visor can be sewn on. In general terms, the cap is ready, all that remains is to decorate it in an interesting way;
- Decoration of the headdress. Here everything depends on the author’s imagination; the headdress can be decorated in various ways. The range of options may differ from standard trimmed buttons or flowers, to rather unusual flowers sewn to the cap or similar options.
Some options for decorating a cap:
- Various rhinestones, sparkles, stones and similar small decorations;
- Sewn to the headdress, flowers, bows, pom-poms;
- A non-standard option would be cat leaves made of cardboard, covered with fabric or other creation options;
- Feathers, chains and similar options;
- Any badges, pennants or emblems;
- Ribbons and knitted elements (for example, flowers, butterflies, etc.).
Reference! A good option would be both the above options and those invented by the creator. The main thing is to give free rein to your imagination, try a little, and the created toy headdress will turn into a fashionable designer product.
A cap for a doll is a great way to create something not only useful, but also beautiful. And the best part is that you can make it at home with your own hands. The creation process is not very complicated, but if you apply even a little effort and imagination, the headdress will noticeably transform and become a pleasant attribute for the doll, the future princess. The clothing attribute will definitely please the child, as it will decorate the doll well, as well as the parent, as it will make the child happy.
 0
0