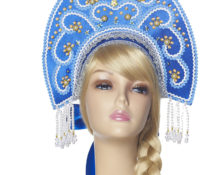
The Snow Maiden costume is one of the most popular outfits for the New Year holiday. Many girls dream of trying on the image of the granddaughter of Santa Claus. The main attribute of such an outfit is a beautiful kokoshnik. Making it with your own hands is not as difficult as it might seem at first glance.
What is needed for a kokoshnik
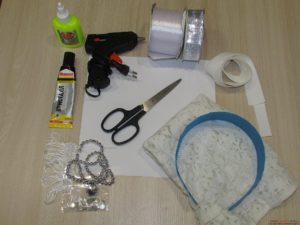
Kokoshnik can be made in various ways. Therefore, the list of necessary materials is varied. In most cases, the following materials and tools will be required:
- Paper and cardboard. An ordinary newspaper can also be used as paper for creating a layout. Cardboard is selected depending on the type of decorations with which the product will be decorated;
- A piece of blue fabric. Guipure with New Year's patterns is good;
- Hoop. You can use a regular wide plastic hoop;
- Pencil, eraser and scissors;
- Metal strips or wire of different lengths.It can be given the desired shape, in addition, it holds its shape well;
- Satin ribbons of various widths;
- Glue or glue gun (PVA, Moment and others);
- Decorative elements (rhinestones, beads, sparkles, beads, etc.;
- Candle or lighter;
- Foam rubber.
Important! The cardboard must be prepared and straightened in advance, because... Some types of cardboard are stored rolled up. We need to give him time to rest under the influence of the load.
General recommendations for making the Snow Maiden's kokoshnik
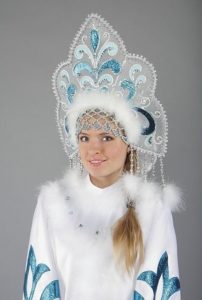
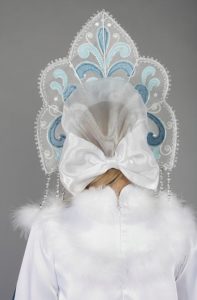
First you need to decide on the shape, size and design features of the future product. To do this, you need to look at the Snow Maiden’s outfit in specialized literature or on thematic websites. The kokoshnik can have the shape of a classic dome, a flower and the edge of a snowflake. Ultimately, much is determined by the author’s imagination and personal preferences. Even if you have a ready-made pattern, the kokoshnik will still have to be adjusted to fit your head or your child’s head so that it fits perfectly and holds well on the hoop. Therefore, the most important point is the process of making a pattern and fitting the resulting workpiece.
Attention! Carefully consider the size of the future kokoshnik, because... first of all, it should be comfortable, light and not create discomfort during the event.
How to make a Snow Maiden kokoshnik with a hoop
When all the necessary materials have been prepared, you can begin making the outfit. Let us consider step by step the process of making one of the popular types of kokoshnik with a hoop:
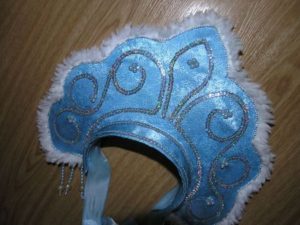
- First you need to model the shape of the future product. To make it symmetrical, the paper should be folded in half and the outline of the kokoshnik should be drawn.You can make several options and choose the most suitable one;
- The resulting workpiece must be unfolded and the rim attached to it. The outline of the rim should be marked with a dotted line;
- We cut a hole for the head and adjust it to the required parameters by fitting. It should be cut a little larger, because... in this case the product will be attached to the hoop. You can also measure the workpiece on an already worn hoop;
- The strip where the rim will be attached is cut into equal sections 2 cm long;
- The resulting pattern should be transferred to thick white cardboard;
- Cardboard can be wrapped in elegant blue fabric or painted;
- When pasting with fabric, you need to cut out two parts according to the shape of the template. One of the elements should be 1 cm larger. After gluing, the fabric should dry thoroughly. We also glue the allowance on the back side. In the future, decorative finishing will disguise it;
- We are preparing a hoop. To do this, we wrap it with a narrow ribbon and grease it with glue in places;
- By bending the remaining teeth on the kokoshnik, we glue it to the inside of the hoop;
- The headdress is ready and you can start decorating it.
Reference! Instead of a hoop, you can use a strip of foam rubber. It is glued to the front and back of the product. In this way, the kokoshnik will be securely fastened and will not cause unpleasant or painful sensations. They should be beautifully decorated.
We create various versions of the Snow Maiden's kokoshnik with our own hands
There are other ways to make a kokoshnik. Let's look at the features of making a kokoshnik with an artificial braid. You will also need white satin, an elastic band and a false braid. To sew a product, follow the step-by-step instructions:
- After making the main part, you need to start making the cap on your forehead. It is necessary to measure the distance from the base of the product to the middle of the forehead, as well as the length of the rim;
- You should consider a dart so that the part fits better on the forehead;
- The outer part of the product is decorated in various ways;
- The resulting part is connected to a kokoshnik and a hoop;
- Next, you should prepare the braid. It is better to sew it onto a piece of material exactly the same as the headdress and secure it to the back of the product;
- Cut out the back of the craft. To do this, we cut out a semi-oval, having previously measured the distance between the ears and from the beginning of the kokoshnik to the shoulders;
- The edge of the back hat is folded and an elastic band is inserted into it for ease of dressing and a better fit of the product on the head;
- Next, the back part is attached to the kokoshnik;
- You should make blanks for bows. To do this, cut out a rectangle measuring approximately 60x40 cm and a strip of 60x10 cm, bending the edges. A bow is made from these parts. It can be made in any other convenient way;
- The bow is attached to the base of the braid;
- The headdress is ready. All that remains is to decorate it, if possible hiding the seams from connecting the parts.
You can also make a headdress without a hoop. To do this, you need to prepare a beautiful ribbon two or more centimeters wide. The wider the tape, the better. It is sewn to the kokoshnik and tied at the back of the head. This method is universal and the product is suitable for any head. Also, in addition, the kokoshnik can be attached to the head with invisible ones.
How to decorate the Snow Maiden's kokoshnik
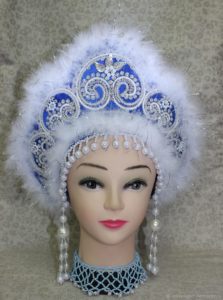
When it comes to decorating a product, the craftswoman can have complete freedom. Various decorative elements are suitable. Many of them can be taken from old or unnecessary things and decorations.The most common kokoshniks in museum collections are richly decorated with pearl mesh. At the same time, strings of pearls descend onto the cheeks of the snowy beauty. You can repeat this pattern yourself by adding regular ones with white pebbles. Let's consider one of the simple ways to decorate a kokoshnik blank with fabric. Follow these steps:
- The cardboard blank can be wrapped in a piece of tulle. To do this, cut out a kokoshnik from paper or thin plastic. Next, we wrap it in fabric;
- Let's start sewing on the machine. The first line is made without affecting the workpiece. The second line is laid along the outer contour, moving the workpiece towards the first line;
- Next, we cut out the resulting part along the edge, leaving allowances of 1 cm on each side of the outline;
- Patterns must be applied to the resulting part. If you used transparent plastic, you can first draw patterns on a piece of paper. Then place it under the plastic and simply trace the patterns with gold glue along the finished markings. If a sheet of paper is covered with tulle, then the patterns can be applied using stencils or randomly;
- Next, add additional decorations.
Reference! The kokoshnik should be beautifully decorated both on the outside and on the inside.
To make the top edge of the craft look impressive, a thread of beads is sewn to it. It is better to sew beads, seed beads and glass beads rather than using glue. You can glue the fringe along the bottom using a special heat gun. The places where the parts are attached are decorated with white tinsel or other elements. You can make spectacular petals using the kanzashi technique. To do this you will need to do the following:
- To make them you need to take two ribbons of white and silver color.We cut out squares with a side of 2.5 cm from silver material, and from white with a side of 5 cm;
- We bend each square first diagonally, and then in half and in half again;
- We hold the resulting element with tongs, cut off a couple of millimeters from the tip and scorch it until it is completely glued using a candle or lighter;
- We also cut off the lower part of the petal and cauterize it, thereby protecting the tissue from possible scorching in the future;
- Do this with all the cut out squares. Next, silver petals are glued inside the white ones;
- You can leave the white petals separately and glue beads to them;
- Next, we begin to decorate the kokoshnik with the resulting elements. You can place a large flower in the central part, and two small ones on the sides. You can come up with a composition yourself;
- It is better to place large, visible beads in the middle of the resulting flowers.
Important! It is better to place petals using the kanzashi technique on the product in a checkerboard pattern. In this way, you get a peculiar effect of drowning each next row between the petals of the previous one.
For decoration, foil, pieces of brocade and other spectacular fabrics, Christmas tree rain and other decorative elements are suitable. You can use lace stripes. Of course, snowflakes cut from fabric or paper will look impressive. You can buy ready-made snowflakes in the store, and also paint them with acrylic paints. Often a beautiful addition to the kokoshnik of Santa Claus's granddaughter is a light web shawl or silk ribbons.
You can make an exclusive kokoshnik for the Snow Maiden with your own hands. Do not forget about the manufacturing standards of this headdress, so that it is as close as possible to the models from fairy-tale illustrations and films.By following simple recommendations, you can do it yourself in one evening.
 0
0