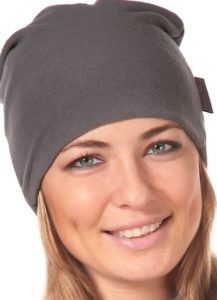
 Thin and dense synthetic fabric, pleasant to the touch, warm, remaining dry even in damp rainy weather - that’s what fleece is. Due to its properties, this fabric is good for a hat for changeable spring or gloomy autumn. You can sew this product yourself. There are many models that are not too complicated to make and are perfect for fleece.
Models of hats for men, women, children
Nowadays, hats made from this material are in fashion - on the street, in magazines there are countless options. Looking at them, you will notice that men, women and children have different fleece hats.
- The strong half of humanity prefers to wear simple tight-fitting models without unnecessary decoration with a lapel or its imitation. At the same time, men usually try to stick to a restrained color scheme, giving preference to black, gray, dark blue, and beige.
- Women and girls feel more free in choosing colors and styles. Bright berets, turbans, hats with pompoms, tight-fitting headdresses with colored appliques - all this is acceptable. Although more discreet options are invariably in demand.
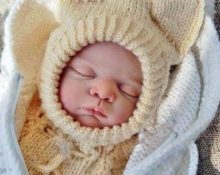
- Children they love colorful things, and wear green, blue, light blue, yellow, and red hats with pleasure. Very popular now models with ears - like a cat, a fox or a bear, to choose from.
Important! There are universal styles that suit everyone, regardless of gender and age.
These are, for example, sports models that fit tightly to the head; beanie hats. They are quite neutral and easier to combine with other wardrobe items.
We sew a fleece hat
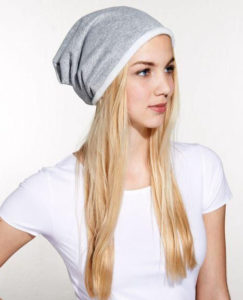
By following simple instructions, you can independently recreate almost any style you like. We will look at some of the simplest, most common options that you can sew with your own hands.
For an adult
The most popular headdress, suitable for any gender, is currently a stocking cap, which is also called a “beanie”.
To sew one yourself, you need to stock up on: fleece, scissors, a ruler, fabric chalk, pins, thread, a sewing machine, a pattern. You can build it on paper using a model yourself. This will be the first stage of work.
Pattern
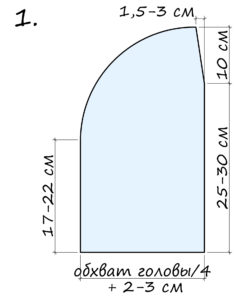
Important! The larger the height parameter, the more voluminous the hat will look.
For those with a narrow, triangular face, it is better to take this value lower.. The rectangular shape of the chin, on the contrary, is combined with voluminous headdresses.
Transferring the pattern to fabric
Take the fabric, fold it in half from the bottom up, so that the front, more fleecy part is on the inside. And then in half again, this time from left to right.
After this, place the pattern on top of the piece of fabric so that the folds of the fabric coincide with the bottom and side edges of the paper.
Pin the template to the fleece and carefully trace the outline with a special chalk. To do this more accurately, you can use a ruler.
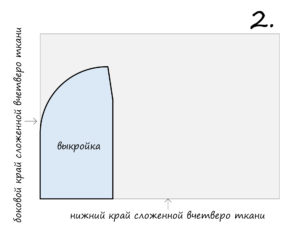
Take the same pattern and turn it over, as if mirroring it. And attach it to the outline outlined on the material so that the right line drawn in chalk coincides with the left edge of the paper. Pin and trace the template again.
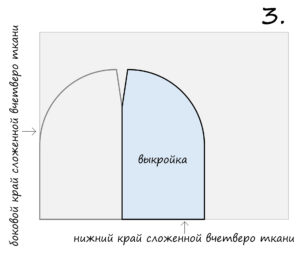
Cutting the workpiece
Remove the pattern; you won't need it anymore. Take scissors and carefully cut out the resulting shape from the fabric. Then unfold the matter completely.
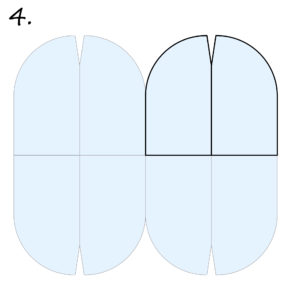
Sewing a hat
Rotate the piece 90 degrees and fold it in half again, so that the front of the fleece is inside. There will be a fold of fabric at the bottom. And at the top there will be an edge along which you need to sew the first seam. It will subsequently become the rear one. The third and fourth seams, similar to the first, must be made in the lower part of the pattern, on its curved sections.
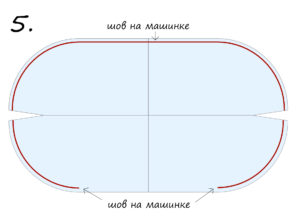
Let's sew the last seam.
Turn the workpiece right side out. Then fold it in half so that the part that is supposed to be on the outside is still on the inside. In this case, the back seam should be located at the back, at the bottom of the future hat, strictly in the center.
Bring the unstitched edges together at the top and carefully pin them to each other. And sew along the contour of the last seam.
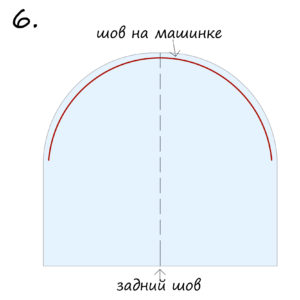
And the women's fleece beanie hat is ready! All that remains is to turn it right side out.
With strings
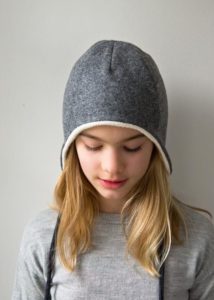
Another popular model is a headpiece with ties that covers the ears. It is an elegant and comfortable solution for all ages.
A hat of this style is made as follows.
Constructing a pattern
To do this, you will need to measure the circumference of the head and its height from the bottom of the jaw to the top of the head.
Important! To make the correct pattern, you should add 2-3 cm to all the obtained dimensions. This is the allowance for the seams so that the fleece hat fits well.
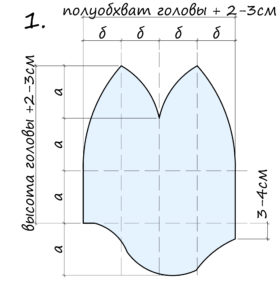
Completing of the work
Once you've created your pattern on paper, it's time to transfer it to fabric. To do this, take the selected material and fold it in half. The front part should be inside. Align the fold of the fabric with the left edge of the paper template. Then circle it and cut out the outline of the future hat along the resulting line.
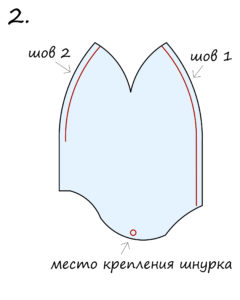
Now you need to sew the workpiece along the right edge - this will be the back seam of your headdress. On the left, it is also necessary to make a seam in the place where the contour of the product follows an arc. It's time to think about laces. They are sewn at the bottom of the “ears” of the hat.
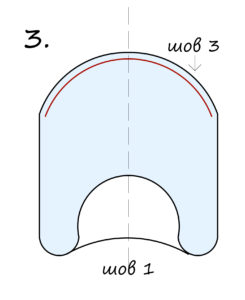
Turn the product over so that the back seam is on the bottom, strictly in the center of the workpiece. Carefully align the top edge of the hat, pin it together, and machine stitch it.
All that remains is to turn your creation right side out.
Important! Single-layer fleece hats are rare. Taking into account the peculiarities of our climate, hats are often made with a one- or even two-layer lining.
In this case, each layer is made according to the same pattern, following the above procedure.
Hat with ears for a child
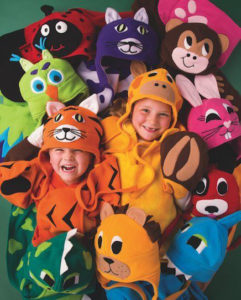
Based on the model with ties that cover the ears, a huge number of funny children's variations are made.
The main difference from the more “adult” version of this children’s hat is the decorative elements of the ears, antennae, eyes, and mustache. What is your imagination enough for?It is recommended to add these elements at the last, third, stage of sewing the hat, before sewing the final seam.
Hat-helmet for a child
This wardrobe element, covering the head on all sides, is very suitable for girls and boys.
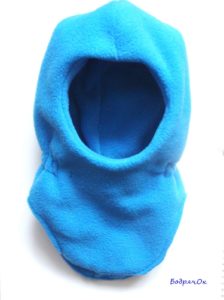
This children's hat is easy to sew by following the instructions.
Constructing a pattern
First, you need to draw a pattern on paper, taking into account the circumference of the head and the height from the bottom of the jaw to the top of the head.
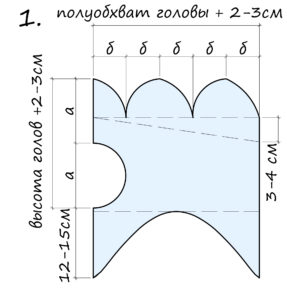
Please note that at the top of the pattern you need to cut a wedge, marked in the picture with a dotted line. And then glue the paper template together as if this triangle did not exist.
Cutting the workpiece
The same procedure applies as in the cases already considered. The fleece must be folded in half so that the fold is on the left. Then place the pattern on it so that the left edges of the fabric and paper blank coincide. Trace the pattern along the outline and cut out the resulting shape from the fabric.
Sewing
Now you need to sew the main seam that holds the right edges of the product together.

The most technically challenging task is stitching the top edges of the hat. Do this very carefully, connecting the edges of the wedges to each other in pairs.
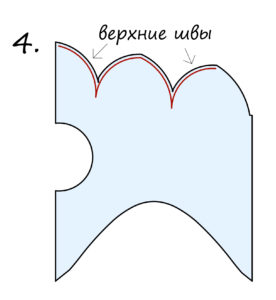
After this, the finished hat can be turned right side out. It is appropriate to decorate a children's item with pom-poms or appliqué - do not be afraid to give free rein to your imagination in this matter.
Useful tips for sewing fleece hats
- To create a truly comfortable and beautiful thing, you must always carefully think through the sewing process before starting work.
- Select materials and threads to match the color, think over the style, and carefully draw out the pattern. And then you are doomed to success.
- Fleece is relatively easy to work with.It is easy to cut, does not crumble, does not require special threads or complex sewing machine settings. A regular seam with a stitch length of 3-3.5 mm will work fine.
- Since this type of fabric has good elasticity, the edges must be pinned together before sewing them on a machine.
- Experienced craftswomen sometimes advise finishing all the seams with an overlocker. Then they will turn out more accurate.
A smart fleece hat will come in handy in any wardrobe.


 0
0





Hello.
A person has two jaws, lower and upper.
The bottom of the upper jaw in front is located approximately between the teeth.
The bottom of the lower jaw approximately coincides with the chin.
From the bottom of which jaw should we measure?
It would be nice to depict this clearly in the “side view” figure.
Hello.
Tell me, is the bottom of the jaw a point under the ear or under the tongue?