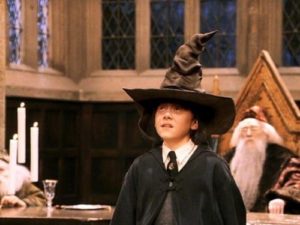
 The Sorting Hat plays an important role in the Harry Potter books. She sorts students by house at Hogwarts School of Magic. Before making a choice, she analyzes the qualities of the freshman: his temperament, character, personality orientation, abilities, intelligence, emotionality, self-esteem. After weighing all the pros and cons, she chooses a suitable faculty where the child can achieve maximum knowledge and skills.
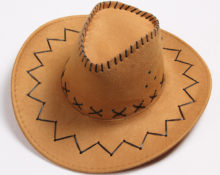
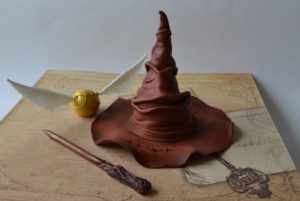
Now the hat has become an attribute of many holidays (New Year, Halloween). And it is also an indispensable part to complement the image of Harry Potter. After all, films about the boy with the scar are so loved by children from all over the world. Let's try to make magic props with our own hands.
Important. Be sure to measure your child's head circumference before you begin.
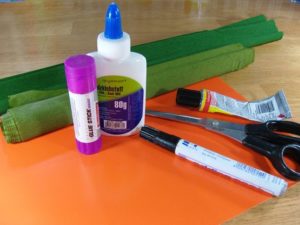
What you need to make a magic hat
Let's look at three ways to make a Harry Potter hat with your own hands. But first you need to prepare everything you need.
What can you make a hat from?
Depending on the option chosen, the hat may need cardboard, black denim, felt, and lining material.
In addition, an umbrella and newsprint will be useful for your work.
Tools for work
You don't have to look for complicated tools to get the job done. Enough with scissors, wire cutters, a glue gun, and a ruler.
How to make a Harry Potter hat with your own hands
Method 1 - from cardboard and denim
Tools
- Three-layer cardboard.
- Unnecessary black umbrella.
- Denim.
- Accessories for sewing.
Step-by-step instruction
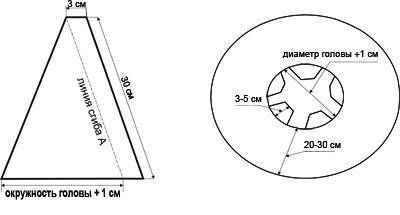
- Draw two circles of 10 and 20 cm on cardboard and cut out the resulting circle.
- We remove the fabric from the old umbrella and cut off two elements. One is in the shape of a triangle, the second is large, for winding the brim of a hat, the shape is slightly larger than a semicircle.
- Cut out 2 more triangles from denim. Place the three triangles together and sew along the edge. You will receive three cones that will make up the center of the cap.
- To make the brim of the hat, take a large shaped element that was cut out from an umbrella.
- Remove all the corners so that the outer edge looks like a circle.
- We cut a strip of fabric from the inner central part, we get a line of 25 cm. We sew the edges and get a circle.
- We fold the fabrics against each other, connect the edges of the ring and stitch everything.
- We insert the made cone into the hat and hook it with pins.
- We attach the base ring to the cone and wrap it with black material. Make sure that the fabric completely covers the cardboard.
- Let's lower a little fabric at the top along the seams to give the tip some curvature.
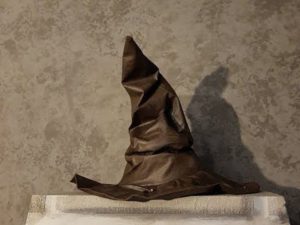
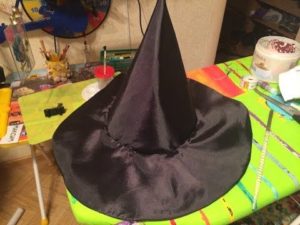
The headdress is ready!
Advice. Make tucks in the center of the hat (mouth and eyes) to enhance the resemblance to the real thing.
Method 2 - from wrapping paper
Sorting hat, which can be made from wrapping paper, newspapers (papier-mâché).
What you need
- Cardboard.
- Scissors.
- Scotch.
- Glue.
- Newspapers.
- Black paint.
- Felt or black fabric.
Step-by-step instruction
- Draw circles on cardboard, step back from the margins by 7-10 cm.
- Cut out two circles from thick cardboard.
- Mark the hole for the head and cut off the excess.
- Make a cone out of cardboard and secure it to the bottom with tape.
- Next, proceed using papier-mâché technology. Apply glue to the hat and cover it with pieces of torn newspaper. To start, you can attach several layers of newspaper with tape. Then the cylinder will be denser, and you will not spend so much time.
- Next, layer by layer, apply pieces of newspaper and give the garment the desired shape. The hat should resemble a wrinkled bag. Don't forget to make indentations in the shape of the mouth and eyes.
Important! The components must dry very well before proceeding to the next step.
- Take black paint and paint the entire headdress. If you don't want to use paint, you can take felt or fabric and cover the hat with it.
Enjoy the result!
Method 3 - made of fabric on a wire frame
What to prepare for work
You will need the following materials.
- Scotch.
- Scissors.
- Thick cardboard.
- Hot glue with a gun.
- Thick wire and wire cutters.
- Black and lining fabric.
Step-by-step instruction
- We form a cone from cardboard. We fix it with glue. The cone should be wide near the head and not very high.
- We seal the joints with additional tape.
- We use wire to move the cone. Cut the required length, approximately 15 cm, and fold it in half. We insert it inside the hat and pull it out from the very top. It turns out to be a loop on a hat, like for clothes. Fix it very well with hot glue.
- Take the lining fabric, cut strips and wrap the cone from top to bottom, securing everything with glue. Make the layers quite voluminous. In the middle, start adding the second type of fabric.
- Cut a square of black fabric to cover the base.
- We are making harvest fields. We lay out the square and place the finished cone on it. Take the wire and lay it out like a circle. Be sure to ensure that there is enough fabric to attach it.
- Secure the wire with tape. Now, using hot glue, we bend the fabric under the wire. You can use a sewing machine. The fields are ready.
- Glue the cone and fields together. Cut a hole for the head and sew the edges with thread for strength.
Once the work is completed, you can attach the eyes to the hat.
Useful tips
- For comfort use hot glue gun, so you will complete your work faster.
- You can use foam instead of cardboard. This will make your product more voluminous.
- The finished work can be decorated with beads, ribbons and other decor.. Your imagination is already at work here.
Good luck in your endeavors!
 0
0