Any person who studies Wing Chun would like to have his own wooden dummy in order to be able to conduct classes not only in the gym, but also at home. But, the cost of high-quality Wing Chun made from wood is very high. Therefore, there is a good opportunity to prepare a wooden mannequin at home.
Next we will consider: how to make a wooden Wing Chun mannequin using a minimum number of materials and the most common tools.
Preparation of material
 Wood is the most sought-after and popular material for doing Wing Chun with your own hands, because it has many advantages when used.
In addition to a significant number of advantages, this material also has a number of disadvantages: it can dry out over time, warp, and also crack. Therefore, when wood is used to make Wing Chun, the mechanical characteristics of this material must be fully taken into account. These parameters mainly depend on the type of wood used.
The main physical characteristics of wood that need to be taken into account are gloss, thermal conductivity, color, as well as shrinkage and moisture characteristics.
Important mechanical parameters of wood that need to be taken into account are elasticity, as well as fragility and strength.
Drying wood
General drying method. In order to make Wing Chun as efficiently as possible, you will need to properly dry the material used for this work. If you purchase a log that has already been dried, then there may be some problems and difficulties with this material, so you need to know exactly how to dry a certain type of wood.
The simplest commonly used method of drying wood is atmospheric drying, which is quite simple and effective. Outdoors, wood can dry to 16-19% humidity. After this, it is possible to dry the material at some distance from the heating equipment.
Another way to dry wood – bury the workpiece in shavings, sand or dry soil. This will result in more even drying, reducing the risk of cracking.
Listening on a cemented floor helps the product dry out; the concrete surface is able to absorb moisture. Place the workpiece on the cement floor, unfolding it so that the main part is in tight contact with the floor on all sides. The better you dry the workpiece, the better the quality of the mannequin.
Scheme
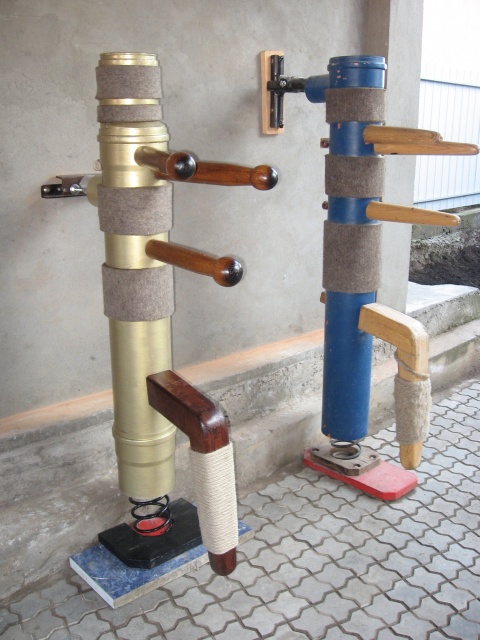
A Wing Chun mannequin is a cylindrical pillar, which is made of a certain type of wood, usually from 140 to 195 cm in height and from 25 to 30 cm in diameter. The main details of this product are considered to be: two “arms”, which are located at the top and the so-called torso, the next “arm” is called the middle one and is located under the upper “arms”.
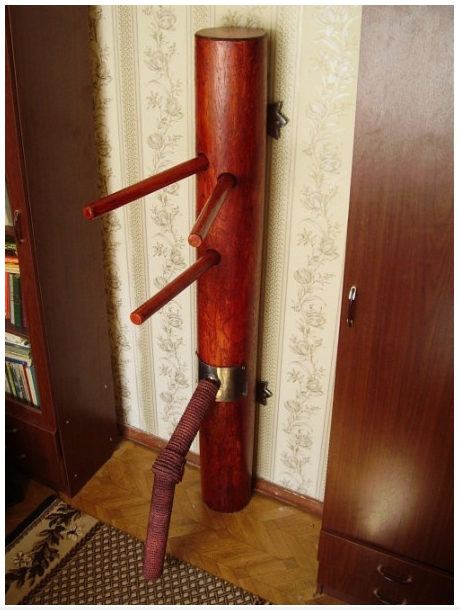
These details create the “body” of the mannequin. It is recommended to securely fasten it to the floor or to special bars. They are installed on two reliable pillars, which are called persistent. In the presented photo you can clearly see what a fully finished wooden Wing Chun will look like.
Creating the foundation will require a lot of effort from you. The most important task is to produce the required log shape (cylindrical shape). Step-by-step instruction:
Get rid of the bark and cut off the branches. The noticeably protruding surface is removed.
Using an appropriate tool (plane, jointer), build a log in the shape of a cylinder. Don’t make a mistake with your measurements, use a strong template. Preferably plastic or cardboard. Remove the back of the product if your idea is to be mounted on the wall.
Rough hide (grain 40-60) the barrel is thoroughly sanded. If possible, sand using vibrating or belt sanding devices.
Thinner sandpaper (grain 100 or less) Completely clean the log. After completing the work, wet the workpiece and wait for it to dry. Dry the surface of the log, polish it with a cloth.
 When making the arms, follow the same pattern as when making the base of the mannequin. If the workpieces are square in cross-section, give them an octagonal shape, and then a circle shape. The length of the mannequin's arms is equal to the length of the forearm with a clenched fist. From the knuckles to the elbow. The thickness is selected independently. The creation of the leg depends on the design chosen. They should be thicker than your arms. One of the most important moments is the placement of the subject’s hands. Taking an opposite position and bending your legs, the ends of the higher sticks should be aimed at the shoulders, and the lower one should be aimed at the navel area.
Common Mistake – a large horizontal angle between the higher hands.The ends of the upper arms must have the same height. In this placement, they certainly intersect inside the mannequin’s body. The holes need to be drilled one above the other, but not horizontally, but at an angle. The hand on the left side is attached above the right, tilted down, and its opposite side, on the contrary, is tilted up. The lower part needs to be fixed in the horizontal position. Make holes with a thin drill, then insert the wire into them. This will ensure that the angles are correct.
Having made all parts of the mannequin, processed and polished, cover them with varnish and stain. Once dry, it is treated with felt, assembled and installed.
 0
0