 Athletes and people leading a sedentary lifestyle may experience the same problems. Both categories of people are at risk for diseases of the musculoskeletal system. Inversion boots have proven themselves to be an effective preventative and therapeutic agent against spinal pathologies.. How to make them yourself?
What are inversion boots?
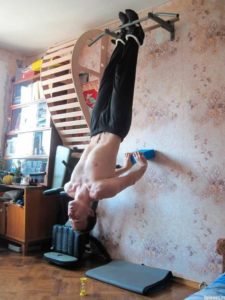
Second name: gravity boots. It is a shoe, sports equipment and support device at the same time.. Using them, you can catch on a hook, wall or turnstile and hang upside down. The property is interesting to bodybuilders and people practicing inversion therapy and chiropractic.
These areas of medicine insist that the use of inversion boots allows you to:
 relieve pain in the spine and head;
- reduce pressure on the skeleton and organs;
- make adjustments to the blood flow and the functioning of the cardiovascular system;
- reduce the severity of neurological pathologies that have developed against the background of problems with the spine;
- remove the load from the spinal column (including the one that affects fans of weightlifting).
 relieve pain in the spine and head;
Important! Another name for gravity boots is moon boots.
How to make inversion boots yourself?
Studying the elements of lunar shoes will help you understand what you need to strive for and what should be taken into account to create truly safe sports equipment.
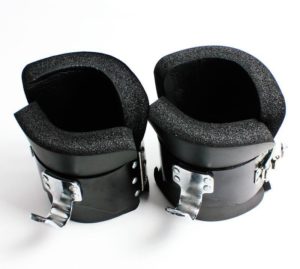
Design features and recommendations:
 the right shoe must be completely identical to the left (especially it is important that the hooks are located at the same distance and have the same angle of inclination relative to the surface of the shoe);
- the additional lining should be soft and flexible to protect the leg from injury, but not slippery;
- the outer side is made of a rougher and tougher material that holds its shape well;
- the place where the hooks are attached needs to be further strengthened;
- metal inserts must be solid, without traces of welding.
 the right shoe must be completely identical to the left (especially it is important that the hooks are located at the same distance and have the same angle of inclination relative to the surface of the shoe);
Before creating inversion shoes, it is worth considering the place of application. The diameter of the crossbar is of key importance in this case.. You need to strive to ensure that the shoe holder fits perfectly on the horizontal bar. If it is too wide, it may cause you to slip and fall during intense workouts. Using an overly narrow hook may result in you simply not being able to unhook and end up hanging upside down..
Important! For fear of being hung upside down for long periods of time, some people make their boot latches easy to unfasten. However, homemade inversion boots should not have this quality.When choosing between the ability to unfasten shoes with one hand and the strength of the fixing element, you need to give preference to the latter.
What is needed for production?
The following items will be needed:
 Leg straps. The part must withstand very heavy loads, not tear or stretch. An example of such a thing is a collar for large breed dogs. Buy the widest one possible. It will compress more softly and last longer.
- Lining Ideally he should be soft, fit the foot well or imitate its shape and be tightly attached to the base of the shoe. That is, it will have to be attached to it or stitched (it’s definitely not possible to glue it, no glue will withstand the loads accompanying inversion therapy). It turns out that as a basis you should take something that can be stitched on a machine, or at least stitched by hand using an awl or drill. An example of such an item is a felt boot.
- Fasteners. They are made from metal plates 4 mm thick. When choosing a material for plates, consider ductility. The lower this property, the safer the part will be, but the more difficult it will be to achieve the desired shape. The fastener blank should look like a “T”. Its central part will bend and become a hanging hook, and the sides will lie on opposite sides of the boot and become the basis for attaching the straps.
- Threads for stitching. Suitable for fishing.
- Base (outer side). The widest athletic leather belt, which is used to secure the back and support the lumbar region, will come in handy. Don't wear a fabric athletic belt. What you need is leather.
- Belt lugs. They are made from the same material as the fasteners (an alternative: take pipes, flatten them and bend them into ears).You will need 4 of these parts in total, 2 for each gravity boot.
 Leg straps. The part must withstand very heavy loads, not tear or stretch. An example of such a thing is a collar for large breed dogs. Buy the widest one possible. It will compress more softly and last longer.
During the work, the need will arise not only for materials, but also for tools. A grinder, a drill (a 0.5 drill is required), a gypsy needle, a vice, and a hammer will come in handy.
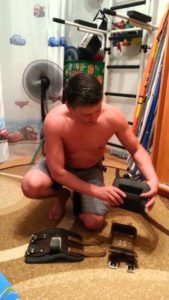
Step-by-step instruction
- Using a grinder, we cut out the blanks for the fasteners (should look like a "T");
- cut out the lining from felt boots;
- We bend the side parts of the fasteners according to the shape of the lining;
- bend the ends of the curved edges upward so that they do not dig into the leg;
- then we bend the middle part of the “T” so that we get a hanging hook;
- We connect the side edges of the “T” to the belt ears by welding;
- cut out the base of the boots from an athletic belt;
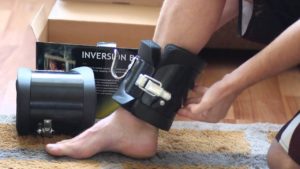
- we fasten the base of the boots with a fastener, fix the dog collar on top;
- Next, glue the felt boots to the resulting structure;
- Using a drill (0.5 drill bits), we make through holes along the edges of the boots;
- we stitch and thereby securely connect the lining-felt boots and the base-belt.
 Using a grinder, we cut out the blanks for the fasteners (should look like a "T");
To reduce the pressure of lifting your leg while suspended, shape the bottom of your gravity boot into a cone.
 0
0