Laces can act not only as a fixing element, but also become the main decorative component of the image. Some people, in order to achieve a similar goal, buy options that contrast with the main color palette of the shoes. Others adopt unusual lacing methods. So,
How to tie shoelaces beautifully?
There are a huge number of ways. Let's look at the most interesting ones. And to begin with, it’s worth repeating the most elementary and common type of tying.
Traditional lacing method
 The lace is threaded into the 2 lower holes and brought up (inserted from below, brought up). Then its ends are crossed and the movements are repeated from the very beginning (the ends always go from bottom to top). The advantages of this technique are obvious: the usual sequence of actions takes a minimum of time, and the resulting pattern is not disturbed after adjusting the tension, weaving in the upper or lower part. In addition, this option tightens the boot, but the leg does not suffer if done correctly.
The method has only one drawback: routine. The “grayness” of the bow is completely fixable, you just need to put in a little effort and use more unconventional lacing options.
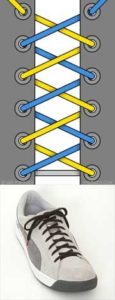
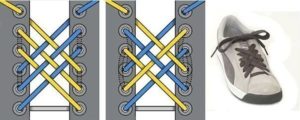
With crosses above and below
This option is based on traditional lacing. Only the method of bringing out the ends changes. They take turns going from bottom to top, then from top to bottom.
Without a bow
Method No. 1. Hidden knot suitable for short laces:
 Insert them into the lowest holes so that the longitudinal strip is on top and the ends of the laces are on the bottom.
- The left lace (A) goes into the 3rd left hole, 3rd right, 5th right, 5th left and so on.
- The right one (B) is threaded into the 2nd right hole, 2nd left hole, 4th left hole and 4th right hole (an even-odd relationship is visible in the distribution of holes between the tips).
- The knot is tied on the inside of the shoe.
- To make it convenient to do this, the top two or even four holes are left free.
 Insert them into the lowest holes so that the longitudinal strip is on top and the ends of the laces are on the bottom.
Important! In this method, you need to thread it from the inside.
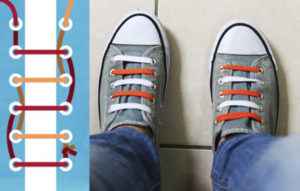
Method No. 2. Display:
- We pass the lace through the holes so that the ends come out from the bottom.
- The left one goes into the 2nd right hole, then into the 4th left, 6th right, etc. (we go up only along the even holes, without going to the odd ones).
- The right one is threaded through the odd-numbered holes.
- After threading the last pair of holes, the laces will be under the tongue, tie them there with a knot.
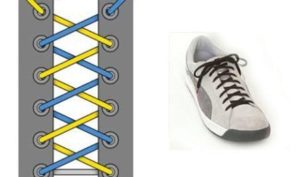
Cyclist lacing
The knot is located on the side, making it safer. There is less chance of laces coming undone and getting wrapped around the pedals. Algorithm of actions:
 Thread the lace into the bottom pair of holes so that the ends are on top (pull them out from the bottom up).
- The left lace (“A”) goes into the 3rd hole from the bottom on the left side. Then it is thrown over to the right side and threaded into the 3rd hole on the right side. Then the right hole is threaded into the 5th hole, and then it is thrown over to the left side and the left hole is inserted into the 5th hole.
- Repeat the pattern until there is 1 hole left in front of the lace (look and count from the top).
- Thread the right lace (“B”) into the 2nd right hole, then throw it over to the left side and insert it into the 2nd left hole, then it goes into the 4th left, and then into the 4th and 6th right.
- Repeat the pattern until lace “B” is inserted into the last, topmost hole.
- As a result, “A” should end up under “B,” if not, then flip one of them to the desired side, and then tie it with a bow with a double knot.
 Thread the lace into the bottom pair of holes so that the ends are on top (pull them out from the bottom up).
The bow itself will turn out upside down, vertical, and not horizontal. In this pattern, in the central part of the shoe, above the tongue, the laces will not cross. On the sides you will get “strokes” creeping onto each other. It looks beautiful only with a large number of holes. That is, this technique is intended primarily for boots with high tops.
Like in a store
Insert the lace from top to bottom (pull it out from the bottom). Immediately send the left end into the upper right hole. Using the right “snake”, go around all the remaining holes. Tie a nice big bow.
Cobweb
Shoes with a wide tongue and thick laces (you can also use flat ones) are best suited for this method. Sometimes the method is called differently, its second and third names are “world wide web” and “network”. Step-by-step recommendations for lacing:
 pull the lace through 2 holes (the second from the bottom, not the first);
- then go back and thread from top to bottom into the first holes in order (thread from the second hole into the first, you get a vertical “stitch”);
- then the left tip goes into the 3rd right hole, and after threading, a turn is made around the lace coming out of the hole located below (we brought the end out of the 3rd hole, and wrap it around the 2nd hole);
- repeat exactly the same with the right lace;
- insert the lace that came out of the 3rd right hole into the 4th left one and make a loop around 3;
- mirror the actions with the second end;
- stick to the plan until the very end.
 pull the lace through 2 holes (the second from the bottom, not the first);
Butterfly
 First, you should count the number of holes on one side. If the number is odd, then the first “stitch” should go to the top, if it’s even, to the bottom. Then the laces, without crossing each other, are threaded into the second row (along the half of the shoe that is hidden from view). Afterwards they are rebaptized.
This pattern is repeated until the last 2 holes. Having threaded the ends through them, start knitting a bow.
Military style
 Pass from the outside to the inside so that both ends face the inside of the shoe. Make sure that both the right and left laces are equal in length to each other. Then cross them, and then thread them from the inside up into the second row of holes. The result should be a cross hidden from view.
Next, the ends are threaded vertically (that is, into the holes that are located above), then they are crossed again and all previous steps are repeated.
Double reverse lacing
Insert into the first bottom holes so that the ends come out. Cross yourself. Repeat.
By train
 Threads from bottom to top. Then comes a vertical “stitch” (the left end goes into the second left hole, the right end into the 2nd right).Then the ends cross and the left lace again falls into the second right hole, and the right one into the 2nd left one. Afterwards there is a vertical “stitch” again, crossing and re-threading into the same hole.
Important! This the method is absolutely not suitable for thick and flat laces. It only works on very thin but durable ones. The latter quality is also necessary, since weaving requires tension and constant tugging of the ends to align them.
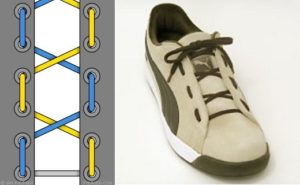
sawtooth
 Insert from top to bottom (the ends will go into the inside of the boots, closed from view). Send the left end into the 3rd right hole (count from below). Then to the 3rd left. And so on in a circle (odd holes are for this tip, even numbers do not need to be touched). The right lace is threaded into all remaining holes.
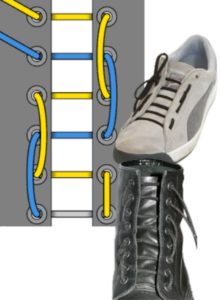
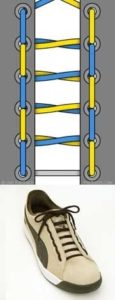
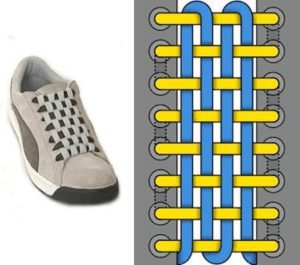
Lattice
Option requires 2 different laces. You can take either the same color or contrasting ones. One of them, the one that will be knitted vertically, should be longer than the first.
The essence of the method is similar to a table toy, in which vertical colored inserts are threaded through fixed horizontal strips. As a result, a drawing is formed. Only we will take a simpler option: we will have a few short vertical sections, but only 1, but a long one.
Sequence of steps:
 insert the first short lace into all holes (from bottom to top, first into 1 left, then 1 right, 2 right, 2 left, 3 left and so on until the very end);
- secure the end after the last threading (any knot will do, it will still have to be tied eventually);
- thread the second long lace into the lower right corner of the shoe so that almost all of it is on your side;
- tie the other end with a knot (the tip that is behind the tongue);
- now weave the free long part vertically into the horizontal base (in those transverse lines that formed the first short lace);
- watch the tension, otherwise the lattice pattern will not work (if necessary, tighten and adjust the lace using the non-pointed end of a pencil);
- when you reach the top, wrap the free long cord around the secured short one, this way you will move to the second row of the lattice;
- ideally, at the end you need to come to the place where the first lace is tied in a knot and simply tie their ends together;
- If the lace breaks earlier, you will have to extend it with others or even pull it out of the weave and use a longer one instead.
 insert the first short lace into all holes (from bottom to top, first into 1 left, then 1 right, 2 right, 2 left, 3 left and so on until the very end);
Economical grille
Option #1. If 4 holes:
Pass from the inside. The tips will point up, not down, towards the shoes. Cross yourself. Insert into the last 2 top holes. Send down. Thread through the first pair of holes on the bottom. Then repeat the movement from top to bottom, just step back a little closer to the middle each time.
Method No. 2. For 6 holes:
Algorithm of actions:
 thread from the inside (the end goes up), cross, thread from above through 2 empty holes (skip 2 holes, insert into the third);
- send the left lace into the left hole located above it;
- do the same with the right one;
- insert the left lace into the hole that was missed in the first step;
- repeat the same with the other end;
- then insert each lace from the inside into the second missed hole (it will be third from the bottom);
- send the ends up along the inconspicuous inside of the shoe, thread them into the last 2 holes, and tie with a bow.
 thread from the inside (the end goes up), cross, thread from above through 2 empty holes (skip 2 holes, insert into the third);
Zip-zip
This method is based on traditional techniques.The only difference from it is that after inserting the end into the hole, a circular loop is made. The name was given to it by an ordinary zipper (weaving vaguely resembles it).
- Bring it from the bottom up and wrap it around a horizontal line.
- Then cross the laces.
- Having taken them out of the hole, wrap them again (this time the end is wrapped around itself).
- Cross.
 Bring it from the bottom up and wrap it around a horizontal line.
How to lace boots with one hand?
Insert 1 end into the upper left hole and the other into the lower right. Pass the last edge of the lace with a snake through all the holes. The result is a diagram in which the extreme points do not have to be connected to each other.
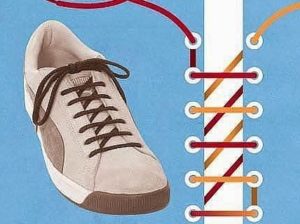
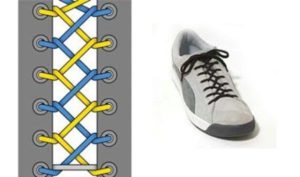
Method for racers
 The main feature is the knot is not located at the top of the shoe, but in the middle. With very long boots, such lacing looks interesting, but only if the lace is properly tensioned. There is no need to tighten or tighten too much. And don't forget to stock up on very long laces. The short ones simply will not meet each other due to the weak tension of the weaving.
Insert from top to bottom (the ends will go towards the shoes). Send the left lace into the upper right hole. Walk it to the middle of the boot. Move with the right towards the left. Tie a bow in the middle.
Important! With this lacing you can get a bow on the side. To do this, simply re-thread the lace into the hole located on top of the one from which the other end comes out.
 1
1