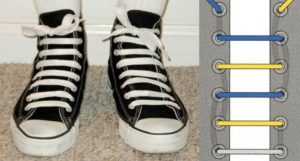
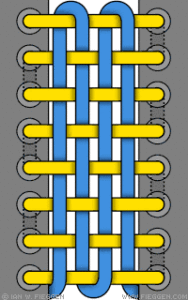
 Correctly selected lacing not only decorates the sneakers, but also plays a functional role. It provides a comfortable fit to the foot and slows down wear.
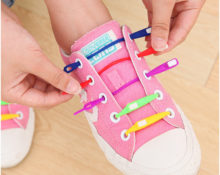
Looking for new ways to tie your shoelaces? All you need is patience and your favorite pair of shoes. We'll tell you how to lace up your sneakers beautifully.
Traditional methods
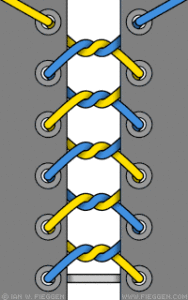
Classical
The most common method used to tie shoelaces.
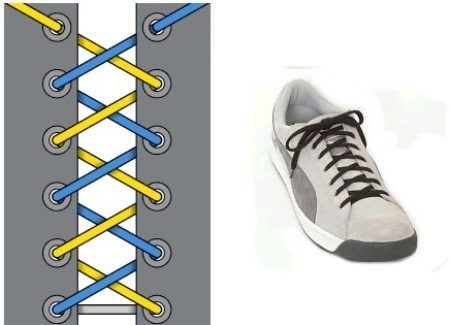
Execution technique. Both parts of the lace are threaded from the inside out, aligned in length. Then each end, crossing, is threaded diagonally into the opposite hole.
Important! Holes for threading laces (eyes, eyes) are numbered starting from the toe area of the shoe.
The toe is considered the lowest level of lacing. Accordingly, the pair of holes from which the lace comes out is the top row.
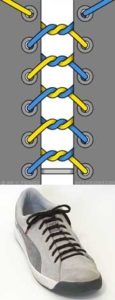
Showcase
The lace extends from the outside to the inside and is easily hidden behind the sides or in the cavity of the sneakers. This weave is easy to loosen but difficult to tighten.
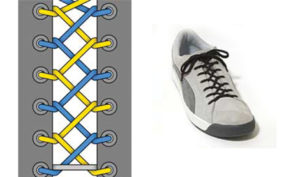
Reverse lacing
Consists of alternating crossings at the external and internal levels. On shoes with even pairs of eyelets, threading begins from the outside. For odd numbers, the first horizontal jumper is located inside.
On the second pair of holes the diagonals are located on the outside, on the next pair on the inside. The alternation is maintained until lacing is completed.
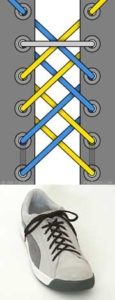
European
The lace is threaded into the first pair from above. The left end emerges from the second opposite eye and forms a straight bridge. The right one comes out along a steep diagonal from the third eyelet of the left bar and is threaded from the outside into the right one.
The actions are repeated in the next pairs.
Important! For European lacing on shoes with 5 and 7 pairs of holes, the left end of the lace should be longer than the right.
After the first pair has been threaded, you need to trim the ends, then extend the left part to a length along the width of the horizontal jumper.
Men's and women's lacing sneakers
For women
In women's fashion, decorative patterns reminiscent of openwork patterns are especially popular. They are generally non-functional because the tension cannot be changed or the knot undone to maintain appearance.
Technique for making the star pattern. Threading begins with an outer straight jumper, which is passed through the holes in the middle of the row. For an even number, the first jumper is threaded into the lower center eyelet.
The left edge runs along the inside of the ruler and exits through the top eyelet on the left side, the right edge on the right.
Then crossing diagonals are made on the opposite side. The lace is threaded from the outside into the free pair of eyes lower from the center.Next, the ends are again passed vertically along the inside along their row and crossed diagonally, emerging from the upper free pair. The result is a beautiful lacing that women like.
It should be taken into account that with this method, the lengths for tying are one third longer than the standard. Another version of the star, in which instead of vertical transitions diagonals are made on both the outer and inner sides, allows you to noticeably shorten the lace.
The simplest technique of lengthening one of the parts at the beginning of lacing allows you to move the knot with a bow to the outside of women's sneakers.
Important! The length of the laces is set taking into account traditional lacing methods. When using non-standard flights, the risers may be longer or shorter.
For men
The technique used on the top two pairs of lugs is called a “lock.” It is suitable for men's sports shoes.
When pulling the lace through the penultimate pair, vertical loops are made. The edges are then crossed and passed through, creating additional fasteners for the tight knot.
Lacing by number of holes
For 4 holes
Lacing with 4 pairs of holes does not carry a large functional load and is used in summer collections. All traditional methods look good on such shoes, but you can introduce a fresh note by making the following pattern.
- The first jumper is the outer horizontal one.
- The ends cross on the inside and are brought out through the second holes.
- A vertical external jumper is made on both sides.
- The laces come inward from the third loop, cross and come outward from the last pair.
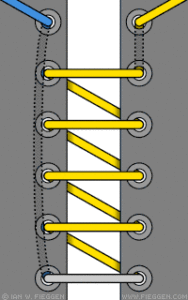
For 5 or more holes
Sneakers with 5 or more holes can be laced with different types of straight and cross lacing. But some methods look neat only with an even number of pairs. For example, the “stripe” pattern is used more often on shoes with 6 and 8 pairs of eyes.
- The first jumper is external.
- The left side of the lace is threaded vertically from the inside into the next eyelet. A horizontal jumper is made in the second row.
- The right lace is threaded through the third eyelet from the bottom and a straight jumper is made.
- Lacing in the next rows continues according to the same principle.
Elements of a straight strip can be diversified with cross diagonals on the last pair of holes. The combination according to the X-I-X-I- pattern is called Roman lacing and looks good on rulers with 5 and 7 loops.
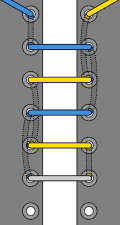
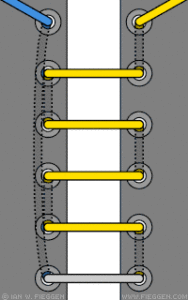
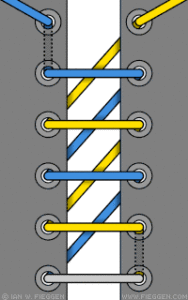
Different types of straight lacing
Straight horizontal lines along the entire length of the lacing help hide the knot, as well as emphasize the shape of the shoe and the texture of the lace.
Straight
The first jumper is external. The left tip is drawn vertically from the inside and threaded into the holes of the 2nd row with an external horizontal jumper.
Both ends, located on the right ruler, run vertically from the inside. Each of them is brought out with one hole missing. Transverse jumpers are made at two levels.
The action continues until both parts are on the inside of the top row.
On a ruler with 4 and 8 holes, the hidden knot will be on the left, with 6 holes on the right.
Odd line
Skipping one pair is the simplest technique for lacing without a knot on an odd ruler.
- The first cross is internal, then the diagonal cross is external. Next - according to the scheme, as for even lines.
- The second jumper runs across from left to right along the top, then from right to left along the bottom of the lacing.
- The jumper of the second row is made with the right and left ends together.
Long straight
Starting with the first outer jumper, it allows you to shorten the loose parts of the lace.
- The left edge runs vertically from the inside, exiting through the top left eyelet. Fixed at a length convenient for tying.
- The extended right is vertical from the inside and comes out of the penultimate eye from the top, creating a bridge.
- The right edge is drawn from the inside to the penultimate bottom row. Another jumper is made.
- After all the horizontal lines are made, the lace is brought out from the inside to be tied.
Extreme Straight
Offers the optimal solution for broken cords. It can be made using half or a third of the standard length.

- A limit knot is tied at one end of the lace.
- The free end is threaded into the first lower eye from the inside out and tightened until it stops.
- A horizontal jumper is made.
- All the following pairs have a vertical internal transition and horizontal jumpers.
To tie a knot at one end, you need to make an additional internal jumper and bring the lace out. The end is threaded under the outer jumper and a loop is made. Then a second air loop is placed on the finger, which must be threaded into the first and tightened.
Sports lacing
For racing boots
Technique for performing special lacing for racing boots with relaxation in the ankle joint area.
- The ends of the lace are brought out through the lower left and upper right eyelets, creating a long diagonal.
- The lower end is raised along the ruler by horizontal external bridges and diagonal transitions at the internal level. The upper end is threaded in the same way into the next lower pairs.
- The ends for tying are brought up in the middle of the ruler, the knot is made in the narrow part of the ankle.
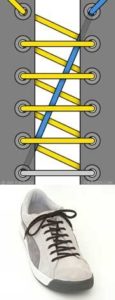
For running
Lacing methods with different pressure zones allow you to choose the best option, taking into account the characteristics of the foot, which helps eliminate pain and swelling during running and physical activity.
- The first jumper is the outer horizontal one.
- The ends go vertically from the inside, then come out of the holes of the 2nd row. An external vertical jumper is made on both sides.
- Both ends cross at the internal level and are brought out through the 4th pair of holes.
- A cross is made from the outside to the inside, the ends for tying are brought out in the last pair.
For cyclists
The lacing technique for hiking and cycling is an inverted version of the stripe. Horizontal jumpers are located in the internal plane. The vertical ones go outside along the ruler with holes. The pressure is evenly distributed over the foot area. Eliminates the risk of the outer loops getting caught on rocks or plants while hiking.
If the horizontal lines at even levels are drawn by the left half of the lace, odd ones - by the right. The tying ends with 6 pairs of holes are located on the outside. The knot is tied on the side, between the 5th and 6th rows. This method is most convenient for cycling.
Original lacing
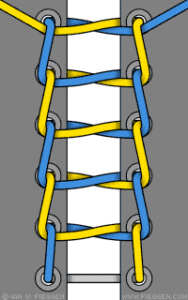
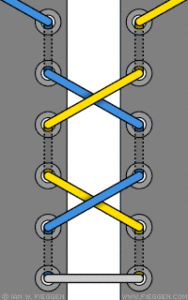
Double reverse
Provides even pressure throughout the foot. This is done as follows.

- A transverse external jumper is made in the second pair from the top.
- The ends cross diagonally and are inserted from the outside in a downward direction, skipping one pair of holes.
- From the lowest pair, two internal diagonals are drawn to lead out through a free pair of holes.
- Next, crossing occurs through the missed pairs. The ends are brought out from the inside out all the way to the top row.
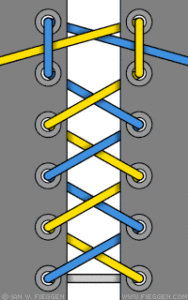
"Butterfly"
Especially liked by those who have high-top sneakers. On shoes with an even number of pairs, threading begins from the outer horizontal jumper. Then there is a hidden vertical transition to the second row. Two outer diagonals lead to the third row, and then follow the same pattern.
Lacing of rulers with odd pairs begins with an internal horizontal jumper, the ends are crossed and threaded into the second row, a hidden vertical transition is made to the third, then an external cross and then according to the pattern.
sawtooth
Creates two levels of compression and can correct ill-fitting shoes.
- The first jumper is the outer horizontal one.
- The left end is passed hidden vertically, then through the second pair it forms a horizontal external jumper.
- The right end extends on the inside diagonal from the opposite eye of the third row and creates a horizontal outer bridge.
- The next internal diagonal goes from the second row to the fourth. An external straight jumper is created. Then the same pattern goes from the third to the fifth pair.
Important! Asymmetrical patterns are made in a mirror manner.
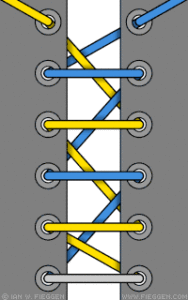
Diagonal
Performed on sneakers according to the following scheme.
For odd pairs. The lace comes out of the lower left hole. Creates an outer long diagonal and extends from the upper right eyelet to a length sufficient for tying. The second end along the hidden vertical is threaded through the second row.Then it is threaded diagonally into the right hole of the first row and hidden vertically into the second row. Using the same pattern, the next rows are connected by diagonal outer jumpers that go over the first long diagonal.
For even pairs. The first jumper is the internal horizontal one. The left end is threaded along the outer diagonal into the upper right hole with an allowance for tying. The right end is threaded diagonally into the left hole of the second row, making a hidden vertical transition. Then - diagonal to the next row.
Knotty
Decorative reef knots can be created on any row of cross lacing.
One of the ends needs to be folded into a loop, and the other end should be grabbed over the loop. Then tighten the loop with the bottom grip evenly on both sides.
Another version of knotted lacing is created by simply weaving in two turns at the joints of cross lacing.
Reverse loop
The first jumper is a hidden horizontal one. The left end forms a half-width loop. The right end is threaded through it, then the left end dives in and out of the left eye of the second row. Right - in the same way from the right. Repeats until the top pair.
Lightning
Lacing with a zipper firmly fixes the jumpers on each pair of holes, and creates an original decorative pattern.
- The ends are brought out in the first row, creating a hidden straight jumper.
- The left end dives under the straight jumper and is brought out diagonally from the inside to the outside through the second right eye. The same is done with the right end.
- Both ends dive under the diagonal and are brought out to the opposite hole of the next row.
The tension must be adjusted at each lacing step.
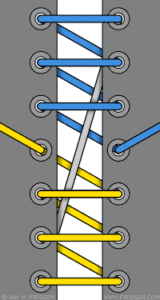
Cobweb
Gossamer lacing can be done with at least 6 pairs of eyelets.
- The lace is threaded into the first pair using a hidden straight jumper.
- The left end with a gap in row 2 fits from top to bottom into the right eye of row 4. The right end creates a diagonal in the same way.
- Both ends emerge from the second row along a hidden vertical line and create cross diagonals emerging from the eyelets of the fifth row.
- A diagonal jumper from the fifth to the second row, then hidden verticals on both sides to the third row.
- From the third row - diagonally to the sixth row.
When lacing 8 pairs of eyelets, skip 3 rows after the first step.
Checkers
Using two laces of a contrasting color, you can create a decorative checkerboard lacing. The first lace is secured to the left in the bottom row, then a stripe pattern is made with successive straight outer and vertical hidden jumpers. The end is brought out and secured to the shin.
After securing the second lace in the bottom row, it is threaded under and over the horizontal jumpers, after wrapping the last one on top of the jumper, weaving continues in a checkerboard pattern.
Various two-color patterns can be achieved using regular lacing patterns, using even and odd pairs of holes for each color.
 0
0


Why are you so beautiful!!! I'm lacing up my Adidas sneakers.