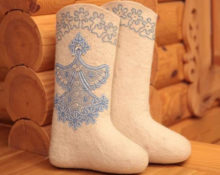
 Modern felt boots are distinguished by their special colors and designer decorations. However, these shoes can quickly deteriorate under the influence of rain, snow, mud, public transport and other negative factors. To extend the life of felt boots, it is necessary hem correctly. It is best to make soles for them immediately after purchase or manufacture.
We'll tell you how to hem felt boots with your own hands.
Tools and materials for work
The process of hemming felt boots is not particularly difficult. The main thing is to prepare all the necessary materials in advance and follow a certain sequence of actions. The work will require the following materials and tools.
- Sole material. The selected material is one of the main criteria for the reliability of the future sole. Most often, rubber, leatherette, leatherette or tops from old felt boots are used.. In construction stores you can purchase ready-made soles.
- Awl. It can be made from a nail or a piece of wire. This tool makes it easy to make holes.
- shoe hook.
- Knife. It must be well sharpened and have a sharp end of the blade.
- A thread. It must be durable and strong, and can be made from any materials.
- Scissors, paper, chalk and other auxiliary materials.
The thread should be prepared with special care. You can buy a special thread in construction stores, or you can make it yourself. To do this, you need to twist a pair of gray or silk threads together. They should be waxed with soap, wax or paraffin. It is necessary to pull the thread through the selected material. In this case, the thread passes through the edge of the material, is pulled along the formed groove and is covered with a protective layer.
Advice. It is not recommended to cut two blanks for the sole at the same time, since the felt boots in the pair are different.
The size of each sole is selected individually for a specific product.
Step-by-step instructions for hemming felt boots
When all the tools are prepared, you can begin the main work of hemming shoes at home. Follow the following sequence of actions.
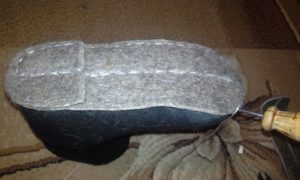
- First you should trace the outline of the felt boot on paper and cut out the resulting pattern with a small margin at the heel.
- Trying on the resulting pattern. You must ensure that the dimensions are correct and make any necessary adjustments.
- Mark on the pattern the place for the heel.
- Cut out the sole with a small margin a few millimeters.
- Cutting out the heel.
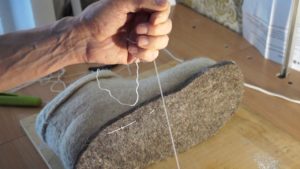
- Next we follow prepare the thread. It should take 4 times longer than the future line. The thread must be prepared in advance.
- We connect the sole with the felt boot and begin the sewing process.
- To begin with they do several stitches on the heel and toe. This allows you to check whether the sole is seated correctly. This operation is one of the most responsible, because...the correctness of the further process depends on it.
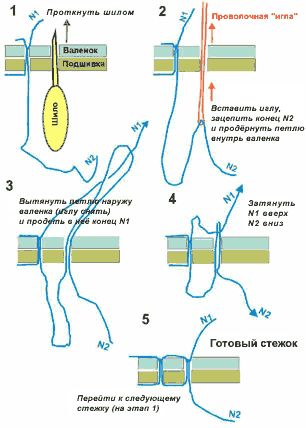
- Sew the sole over the entire surface. A prerequisite is to pierce the felt boots and soles with an awl from the outside inwards. Next, we put the thread into the hole of the hook from the inside. We pull out the thread so that two segments of equal length are formed. One of them remains in the product, and the other outside.
• After 5–10 mm, we pierce the sole along the cut and pull out a small loop. Next, we pass the outer thread into this loop and tighten it so that the threads connect in the center.
Important! Stitches should be kept short. The shorter they are, the stronger the connection between the two materials.
Useful tips for hemming felt boots
There are some tips and tricks that need to be followed when hemming felt boots.
- Certain safety precautions must be observed. To avoid injuring the skin when tightening the thread, some fingers should be covered with electrical tape or adhesive tape.
- The craftsman's left hand is placed inside the product, and there should be a skein of thread in it. It is more convenient to take the hook in your right hand. If necessary, both layers to be sewn are pierced with an awl and then sewn together with a hook.
Important! There are craftsmen who prefer gluing the insole to the foot with a slight overlap on the toe and heel. This method is less popular, despite the fact that it is much faster. A hot glue gun is required.
- The threads connecting the sole to the felt boot can become frayed. To prevent this from happening, an incision is made in the sole in the direction of the future seam. To do this, you need to draw a stitching line. The sole is cut slightly along this line. The seam thread will be hidden there.
- For greater strength, the seam can be stitched again. To do this, two cuts are drawn and cut.This operation must be done before connecting the sole to the product.
You can protect your favorite felt boots from rapid wear and give them additional strength with your own hands. To do this, it is worth studying simple technology and purchasing the required materials.
 1
1