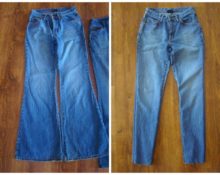
_1-300x200.jpg) Today, the world is promoting the fight against excess weight and healthy eating. Many women really began to think about this: they began to lead an active lifestyle, adhere to various diets and proper nutrition systems. Centimeters and kilograms go away, but in their place new problems appear - clothes that hang on the body and look like they came from someone else’s shoulder.
Today, the world is promoting the fight against excess weight and healthy eating. Many women really began to think about this: they began to lead an active lifestyle, adhere to various diets and proper nutrition systems. Centimeters and kilograms go away, but in their place new problems appear - clothes that hang on the body and look like they came from someone else’s shoulder.
Of course, you can regularly go shopping and update your wardrobe, but, unfortunately, not everyone can often buy and wear new things. Therefore, one of the options for solving this problem is to sew the clothes yourself with your own hands. This is quite possible to do at home, having basic skills in working with a sewing machine. Let's look at the nuances.
How do you know if pants are 1-2 sizes too big in the waist?
If it is difficult to determine “by eye” how big the trousers have become at the waist, you can use the size charts, which are abundant on the World Wide Web. All you need to do is take a measuring tape and measure your waist circumference from yourself and from the product and see what size the measurements correspond to. If there is a difference of one or two sizes, it is possible to do without re-cutting by stitching in some places.
Do they need to be redrawn and how?
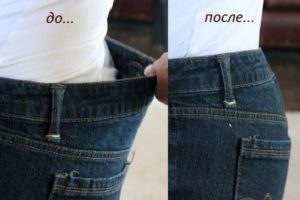 If you need to reduce your pants by 3 or more sizes, you will have to cut them again. Before you start, you should soberly assess your strengths so as not to spoil the thing. If you have the slightest doubt, you shouldn’t take risks; it’s better to trust the professionals and take your panties to a tailor.
A reduction of 3 sizes is carried out at the waist, hips and groin. The first step is to carefully rip the product open using a ripper, nail scissors or a blade. First, the lining of the belt in the area of the seat seam, the seat seam itself and the crotch seams are ripped off to the level of the hips. Remove threads from edges and iron. Mark points:
- the ends of the belt, in accordance with the measurement of waist circumference;
- rear width along the step line;
- width of the back along the hip line;
- connect the resulting points with one line using chalk. It will duplicate the cut line. Place basting stitches along the chalk line. Try it on. If it fits well, then stitch along all the edges. Iron well;
- straighten the lining of the belt and hem it to the edge in the area of the seat seam;
- iron everything.
When a product needs to be sewn in 4 or more sizes, the trousers are completely recut. That is, they rip out all the seams completely, get rid of the threads, iron them, re-cut them, cut off the excess and grind them down in the same way as during the initial sewing.
Is it possible to reduce the waist of trousers with your own hands?
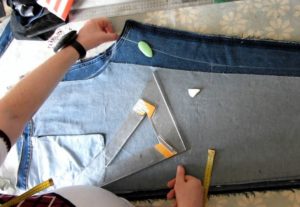 It is recommended for a beginner to sew up trousers on their own if they are made, for example, of denim or knitted fabric.You should not take on “complex” fabrics that are too thin or dense, as there is a very high risk of ruining the product. Reducing the width of your pants at the waist by a couple of sizes without first cutting the entire product is even easier. This can be done in several ways:
- adding a few new darts, or altering existing ones, this method will be the most successful, with a slight decrease;
- sewn in from the sides, used in the absence of side pockets;
- sewing up the middle seam, a universal method, is suitable for reducing the size of any type of trousers, including those with side pockets.
We sew different places in trousers
The stages of work are usually identical, and differ only slightly:
- Before using the sewing machine, you need to turn your pants inside out and put them on inside out.
- Then, depending on the chosen method of decreasing, use pins on one pant leg to pin the places of decrease.
- To decide how to sew in trousers, you can pin up the darts on one leg, and the side or middle seams on the other, and see in which case the product fits better. It is important to control so that there are no constrictions.
- Regardless of the method chosen, first rip off the lower part of the belt. Pants are always sewn from top to bottom.
Features of sewing in the waistband of trousers with an elastic band
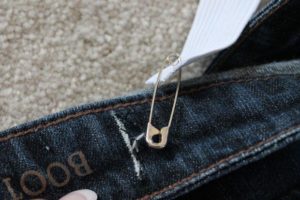 To sew pants with an elastic band, use the same methods as for regular trousers, except for adding darts. They are practically not made on such pants. That is, you can either sew in the sides or the middle seam. Let's look at how the belt is sewn. If it is sewn from the front and back, then it is more advisable to sew along the middle seam, and if the belt is sewn from the side, along the side seams. To do this, you don’t need to rip it off completely, just rip it in two places. To keep it intact and more elastic, you need to tear off the entire element. So…
Sew up the side seams
We tear off the belt on the right and left sides, 2-3 cm from the side seams. We rip the side seams to the hip line on the outside and inside. We remove the threads, iron them, turn them inside out, try them on, and use pins to mark the decrease. We lay a basting line, including along the waistband, and try it on. If it fits well, mark the same decrease on the second leg. We try it on, trim off the excess material, process the edges, and sew with a machine seam in the direction from the edge of the belt to the bottom. Let's iron.
Sewing the middle seam
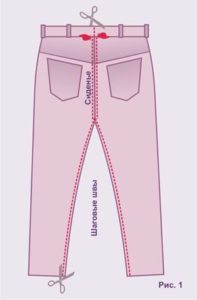 We rip off the belt at the front and back 2-3 cm from the middle seam. We turn it inside out, try it on, and secure the excess with pins. We rip the middle seam, remove the threads, and again lay a basting line, including along the waistband. Let's try it on. Copy the decrease to the second leg. We cut off the excess, process the allowances, grind. Let's iron.
In both the first and second cases, you can first completely undo the belt and undo the connecting seam on it. Cut the elastic and re-stitch it to new measurements. Reduce the length of the belt itself; it should correspond to the waist circumference of already sewn-in pants. Then close the side or middle seams and sew the waistband back on. Press seams.
Working with the “sides”
When decreasing the size, both sides of the trouser leg need to be sutured - both the inner (step) and outer (side). Some side seams are sutured only if it is necessary to reduce the width at the hips, but at the same time the product fits well at the waist.
We carry out the preparatory operations: we tear off the lower part of the belt, turn it inside out and put on the trousers, pin the side seams, the crotch seams and the belt in those places that we want to reduce. We first perform this operation on one pant leg. We lay a basting line. Turn the pants inside out. Before making a machine seam, you should sit down, walk around, and see how comfortable it is. If everything is fine, we make the same decrease on the second leg. Let's try it on again. So, the trousers fit well, which means you can cut off the excess allowance, process it using an overlocker or a zigzag stitch, and sew the side and crotch seams. The last step is to iron the seams and sew on the waistband.
Remove excess along the middle seam
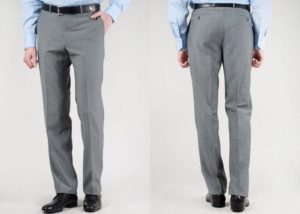 We tear off the belt and cut it in half on the back, above the seat seam. We turn the trousers inside out, try them on and mark with pins how much the middle seam needs to be narrowed. We lay basting stitches along the resulting line, including along the belt itself, connecting its two halves. Then we turn the pants back inside and try them on. If the product fits the figure, cut off the excess fabric, process the seam allowances, sew down the middle seam, moving from the trouser leg to the waistband, and iron the entire product.
How to sew the belt itself?
It happens that trousers or jeans fit well on the hips, but the belt itself puffs up on the back. In this case, use the following reduction technique:
On the back inner part of the belt, at the same distance from the middle, two vertical holes 2-3 cm high are made with a ripper or blade. A wide elastic band is inserted into them using a regular pin. Its length should be a few centimeters less than the distance between the holes. The edges of the elastic are machine stitched to the waistband. Ready. Now the back of the waistband is elastic and will not form large folds.


 0
0