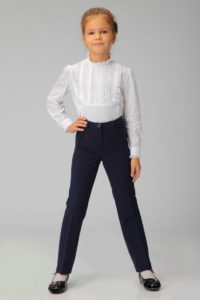
 Probably, trousers are the most practical clothing for any age. However, they are not always available in stores for children in the appropriate size. Therefore, it is better when the mother sews herself, knowing the parameters of her child. There are many pattern options, but we will look at the simplest one.
How to make a pattern for school trousers for a girl
First you need to prepare for work. You will need:
- threads;
- tape measure;
- needle;
- scissors;
- ruler;
- a simple pencil;
- textile.
How to take measurements for sewing children's trousers for girls
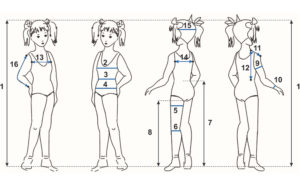 To take measurements correctly, follow the rules presented.
- The most important measurement is the length of the trousers (db = 82). To find out, you need to use a measuring tape to measure the distance from the waist line to the desired length. It is best to do this vertically from the side. It is advisable to take measurements in underwear, and wrap the tape tightly around the child’s body.
- Half waist circumference (St = 30). You need to find the narrowest place at the waist.Moreover, write down the measurement divided by two.
- Half hip circumference (Sb = 36). It is necessary to measure horizontally and also take into account the half size. To do this, wrap the tape around your buttocks. Be aware of possible abdominal bulge.
- Seat height (Vs = 21). Ask your child to sit down and write down the entire measurement from the waist to the chair.
- The length of the trousers is to the knee (Dbk = 44). From the waist to the middle of the kneecap, find out the distance and record the measurement completely.
- Width of trousers at the bottom (Shbn = 20). This means that it is defined in finished form.
REFERENCE!
In parentheses there are symbols and an example of a value in centimeters to explain further work.
Making a trousers pattern for a girl for school with your own hands: a step-by-step algorithm
We present a step-by-step algorithm for creating the correct pattern with your own hands. Following it, you will be able to create a pattern with high accuracy (taking into account the correct taking of measurements), and sew good trousers for a girl for school.
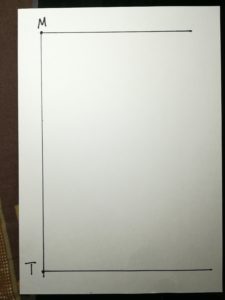
Arranging the length of the trousers on paper
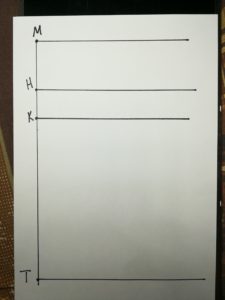
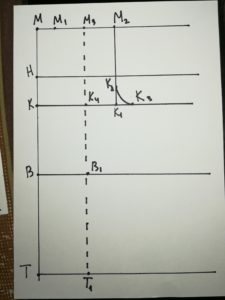
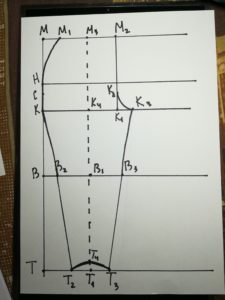
To do this, put a point M on the paper in the upper left corner and draw a right angle so that this point is its vertex. Let’s set aside the dB measure from it and a new point T appears. In our case it is 82 centimeters, but you may have a different number. It turns out that Db = 82 = MT.
- Step line.
To build it, you need to put a measurement down the point M, namely the height of the seat (Vc), and put the letter K there. From it to the right we draw an arbitrary ray of any length. MK can be calculated by the expression: 1/2 Sat + (from 2 cm to 4 cm) = 36: 2 + 4 = 22 cm.
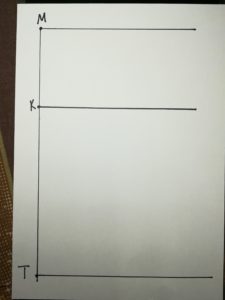
- Lay out the line of the hips.
We will conditionally divide the MK segment into three identical parts. Let’s carry out some easy mathematical calculations: MK: 3 = 22: 3 = 7.3 cm. But let’s mark only the last point of separation with the letter H. That is, NK = 7.3 cm.
- Let's mark the line of the knee.
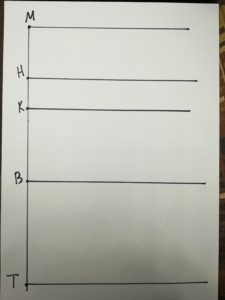
From point M we will set aside Dbk and make point B, then we will draw a horizontal straight line to the right. In our case it will turn out to be MV = 44 cm = Dbq.
Arranging the width of the trousers
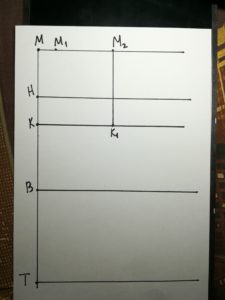
For all sizes, set aside 2 centimeters from point M and place point M1. Now, using the formula, we calculate the width: 1/2 St + 3 cm = 30: 2 + 3 = 18 cm. From point M1 itself, set aside 18 cm and designate point M2. Next, you should lower the perpendicular from it to the step line and put the letter K1.
- We show the line of the middle cut.
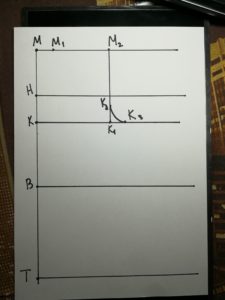
From point K1 we raise up a line that will be equal to 1/10 Sb and designate a new point K2. Now from the same K1 we will do the same actions, only to the right, where we will place K3. In our case, it will look like this: K1K2 = K1K3 = Sat: 10 = 36: 10 = 3.6 cm. Next we simply connect K2 and K3.
- Don't forget about the ironing line.
To find point K4, you should divide the segment KK3 into two equal parts. Now from K4 we lower the perpendicular so that it intersects the waist and bottom lines. Let us denote the intersections by points M3 and T1, respectively. IN
ATTENTION!
M3T1 is the ironing line.
- Let's outline the width of the bottom of the trousers.
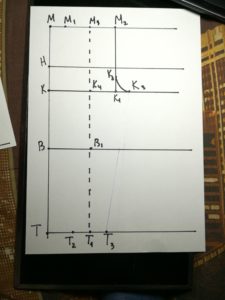
Based on our approximate measurements, the width of the trousers is 20 cm. The width of the front half of the trousers is distributed as 20 - 2 = 18 cm, and the rear half is 20 + 2 = 22 cm. The total width is not required for further work. In the meantime, from point T1 we set aside 8 cm to the right and left and place T2 and T3. (That is, T1T2 = T1T3 = 8 cm).
- Draw a bottom line.
To complete the design, we will set aside approximately 0.5 - 1 centimeter from T1 and place T4. Now you need to connect T2, T4 and T3. We get the bottom of the front half of the trousers.
- Let's add a side cut line.
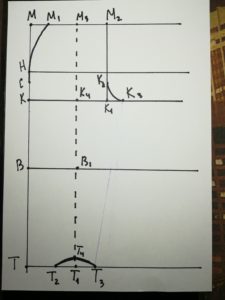
From point M we will put 17 cm down and place an additional point C.Next, from M1 we draw a smooth line to C, and from it we draw a straight line to K.
- Set aside the width along the knee line.
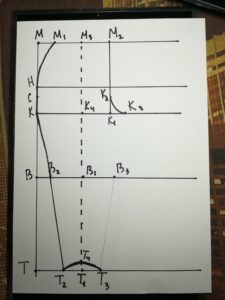
Let’s assume that the child’s knee width is 18 cm, then the width of the trouser half is 18 – 2 = 16 cm. Now from point B1 to the right and left we set aside 16: 2 = 8 cm and denote B2 and B3. We connect K and B2 with an arc and a straight line from B2 to T2.
- We determine the width along the side and step lines.
From K3 we draw a concave line to B3, and then from B3 to point T3, only this time it’s straight.
A few tips on how to make it easier to create a pattern for school trousers for girls
Pay attention to the advice of an experienced seamstress to help you create the right pattern.
- don't forget about raises;
- if you want to make tapered or straight trousers, then their width at the bottom will be slightly smaller.
REFERENCE!
You should check the basic pattern, for example, try sewing it first from inexpensive fabric.
By following the presented algorithm, as well as the tips, you will be able to sew the perfect trousers without ruining the fabric.


 0
0


Where next?
Where is the next connection, where is the back?
How to build the back half?