 It’s so nice to sew something new for your child with your own hands. For example, such a necessary thing after swimming as a robe with a hood.
Sewing such a robe for a boy yourself is not difficult. We'll tell you how to make a pattern that will help you make a cute piece for your baby's wardrobe.
Measurements required for the pattern
First you need to remove everything necessary measures.
- Neck circumference (NC).
- Shoulder length (HL).
- Back length to waist (BW).
- Front length to waist (accident).
- Product back length (DI).
- Armhole depth (HD).
- Armhole width (W).
- Hip circumference (H).
- Sleeve length (SL).
- Circumference height of head.
The quality of your work and the convenience of new clothes for your child will depend on the accuracy of the data in the future.
How to make a pattern
Let's consider the stages of completing the drawing required for cutting a children's robe.
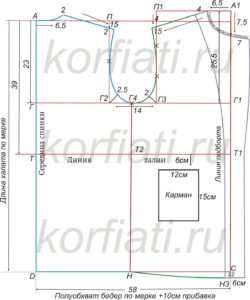
Base for back and shelf
Reference: The construction of the back and front is done in the same way at first, so you can draw the patterns for the front and back at once.

- On the paper along the edge we measure the DI and put points A and B. You need to measure so that there is at least 5-10 cm from the top edge of the paper to A.
- Divide the OB measurement by 4, then add 2 cm to the result.
- We measure the resulting number on paper from A and B perpendicular to the edge.
- We draw lines and put points B and D, respectively, we get segments AB and BG.
- We connect B and D using a ruler. You should get a rectangle.
- We add 0.5 cm to the DTS measurement and put the resulting value on the segment AB from A. Here we put point T1.
- The GP measure, having previously added 2 cm to it, must also be measured on the segment AB from A. This will be G1.
- From G1 and T1 we draw lines perpendicular to the segment AB to the segment VG and, accordingly, put G2 and T2.
- Then we divide the SH measurements by 2 and put the resulting result from G2 to G1G2 and call the point G3.
- Next, from G3 we draw a line parallel to segment AB to AB. We call the connection point the letter P.
- Divide the resulting segment G3P in half and place point P1.
- We connect P1 to G2 with a smooth concave line.
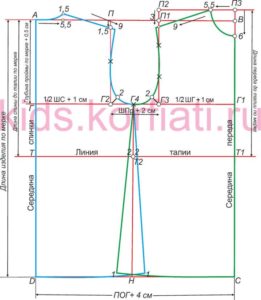
Further, the construction of patterns for the back and for the shelf differs.
Building the back
- To construct the back neckline, we will need an OSH measurement. We divide this measurement by 6 and then add 1 to the resulting number.
Important! Remember the obtained value, it will be useful to us when constructing the front neckline.
- We put the resulting value from A to AB and call it Ш1.
- From Ш1, perpendicular to line AB, measure 1-2 cm and place point Ш2.
Important! The size of the perpendicular depends on the child for whom the robe is sewn. The smaller the boy, the shorter this line.
- The segment Ш1Ш2 should not be inside the constructed rectangle ABCD, but on the outside.
- We connect Ш2 with A using a smooth concave arc.
- From P on segment PG3 we measure 1.5 cm and put P2.
- From Ш2 we draw a straight line through P2.
- Then we add 3 cm to the DP measurements and measure the resulting value on the line Ш2П2, starting from Ш2.
- We call the resulting point P3. P3 should be located after P2. We connect P3 to P1 with a smooth concave arc.

Building a shelf
- From T1 to A we set aside the road accident measurement, after adding 0.5 cm to it and call the point Ш3.
- If you measured everything correctly, then Ш3 will be located above A outside the rectangle ABCD.
- Next, from Ш3 we draw a parallel AB line.
- On this line we lay down the segment Ш3Ш4, equal to АШ1 (back pattern).
- From Ш3 down past A we measure 6 cm and place point Ш5.
- We connect Ш5 with Ш4 with a smooth curved arc.
- We draw a line further towards Ш4 along the segment Ш3Ш4. We also draw a line upward along the segment G3P. The lines must cross. We call the intersection point P4.
- From P4 down P4G3 we set aside 3.5 cm - it turns out P5.
- We connect Sh4 and P5 along a ruler and continue further from P5.
- On this line from Ш4 we lay a segment equal to Ш2П2 (back pattern) and put point P6.
- We connect P1 and P6 with a smooth curved arc.
Construction of the sleeve

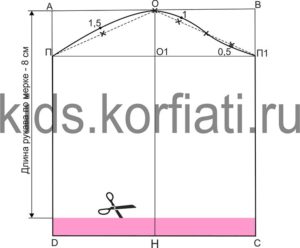
- Add 3-4 cm to the OP measurement for a loose fit.
- Put the resulting value on paper, calling the segment P1P2.
- From P1 and P2, draw parallel lines down, equal to the DR measurement. Name the segments P1H1 and P2H2. The result will be a rectangle Р1Р2Н2Н1.
- We divide P1P2 and H1H2 in half and connect the division points to each other, calling them O1 and O2. You should get a segment O1O2 parallel to P1H1 and P2H2.
- From O1 down to O2 we measure the height of the sleeve rim - O3. We take this measurement from the back and front patterns. On the back, you need to measure the distance from P3 to the line G1G2, parallel to the segment PG3.And on the front, the distance P5 to the line G1G3, also parallel to the segment PG3.
- We add the resulting measurements together and then divide them in half. The resulting value will be the height of the sleeve edge.
- From O3 we draw a line parallel to the segment P1P2 to the right and left until it intersects with P1H1 and P2H2 - O4O5.
- We connect O1 with O4 and O5. Divide O1O4 in half - O6.
- From O6 towards P1 we set aside 1 cm and through this point we draw a curved arc from O1 to O4.
- Divide O1O5 into 4 equal parts and set aside 1 cm up from the first division point and 0.5 cm down from the third division point.
- Connect O1 to O5 through these points with a smooth convex-concave arc, intersecting the straight line O1O5 through the second point.
Construction of the hood

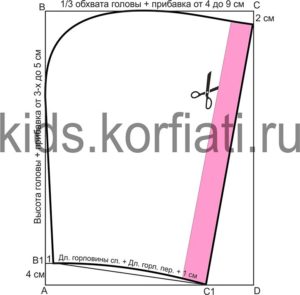
The hood pattern is based on head circumference + an increase of 4–8 cm and head height + an increase of 3–5 cm.
- You need to construct a rectangle using these measurements. In it, head circumference + increase will be horizontal lines, and head height + increase will be vertical lines.
- In the back right corner you need to put 2 cm down, in the bottom left corner up - 4 cm.
- Connect the resulting points with a smooth curved arc, touching the top and left sides of the rectangle.
- Measure the length of the necks on the front and back patterns, fold them and add 1 cm.
- Place the resulting value from a point on the left side of the rectangle, raised by 4 cm, to the bottom line of the rectangle.
- Connect these dots together.
- Also connect the newly obtained intersection points on the bottom side with the right side.
The pattern is ready! Have fun sewing your boy's robe!


 0
0


