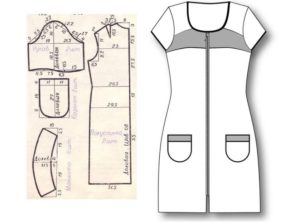
 An unusually convenient wardrobe item is a robe with a zipper. There are several options for how to sew a robe: you can take a pattern from the Internet or a magazine, you can also make patterns with your own hands or take patterns from an old robe, but we will take measurements from an old T-shirt.
Choosing a robe style with a zipper
Before we start sewing, we determine the style of our robe. It is necessary to decide what length it will be, what silhouette it will be, with or without sleeves, whether the robe will have a hood, collar or not. Decide on the type of pockets, because it is much more convenient when the robe still has them. Let's figure it out how to cut and sew a robe with a zipper with your own hands.
A house robe requires freedom of movement, so the most comfortable straight or trapeze silhouettes can be made into a fitted robe. The ideal option for summer would be a sleeveless robe or a short classic sleeve. For colder seasons, it is better to make a robe with long sleeves or three-quarter sleeves.
A very interesting and simple option would also be one-piece sleeve “Dolman”, the construction of which will not take much time.
 It’s also good to immediately decide what will decorate the neck of the product. You can make a hood or turn-down Peter Pan collar“, but even without all of the above, a robe with a zipper will look great.
The most convenient pockets for gowns are patch pockets with flaps or without them. In addition, such pockets are made easier and faster than others.
We take measurements and prepare patterns
For that to quickly take measurements for our future robe, we take a regular T-shirt. The main thing is that it is free and does not restrict movement. If you have already purchased fabric, then all actions can be performed directly on it. If you haven’t decided on the fabric yet, you will need tracing paper, newspaper or other paper. This method is good if the robe fits perfectly and is easy to use, because you will always have a ready-made pattern at hand!
Advice! Please note that if you decide to leave the neck empty, you can give it any shape - from round to square!
 Let's start making patterns:
- Fold the ironed T-shirt in half, folding the sleeves down along the seam line.
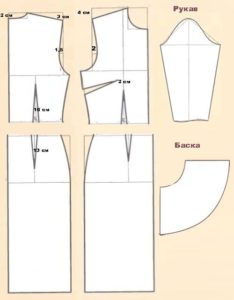
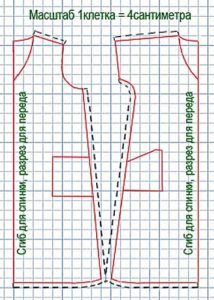
- We put the T-shirt on paper or fabric, whoever has something at hand, and pin the edges with safety pins. We transfer all the contours onto paper or directly onto fabric, determine the length of the product, give an increase in freedom of fit, if necessary, and a stitching allowance of approximately 1.5 cm. We do all the manipulations first with the back, then with the shelf.
- If you choose one-piece sleeve “Dolman”, then there is no need to tuck the sleeve of the T-shirt, we outline its upper part and continue the line to the desired length.We determine the width of the armhole that is convenient for us and the width of the sleeve at the bottom in order to outline its bottom line and smoothly draw it out from the side seam.
 We make edging patterns - details for processing the edge of the middle line of the shelf of the product to give greater strength to the fastener. We need the hems in order to attach the zipper to the product.. In order to make them, you need to cut out a rectangular part equal to the length of the shelf from the neck to the bottom and 6-8 cm wide. Immediately cut out 2 more similar parts from non-woven fabric.
- If you decide to do hood, then here you can also cheat and take an old thing with a hood, turn it inside out, fold it in half and trace the contours of the hood. If desired, you can make it larger or smaller in size. The main thing is to adjust its lower part to the size of the neck of the garment; this will be easier to do after the upper seams of the robe are sewn.
- Further cut out pockets. Patch pockets can be of a fairly arbitrary shape or standard rectangular, it all depends on desire and imagination.
- Let's move on to the sleeves. You can take the easy route and rip off the sleeves of the T-shirt from which the patterns were removed and simply trace them. Or you can take and build a sleeve from scratch:
- To begin with, measure the armhole in the already stitched product.
- We draw a horizontal line, in the center of which we put point O1 and put upward a segment equal to the length of the armhole divided by three and minus 5 cm, and put point O.
О1О= Dpr/3 – 5cm
- Next, from point O on the horizontal to the right and left, we lay down lines equal to 1\2 Dpr and put points OP (on the left) and OP1 (on the right).
- We draw a horizontal line through point O, equal to the segment PP1, from the ends of which we lower perpendiculars down to connect with points P and P.
 We divide the OP in half and from the resulting point upward we put a perpendicular of 1.5 cm.
- We divide OP1 into three equal segments and from the top of the resulting points we put a perpendicular of 1 cm up, and from the bottom down 0.5.
- We connect all the resulting points with a smooth curve.
- From point O down through O1 we continue a line whose length is equal to the desired length of the sleeve. We do the same with the side lines. The sleeve can be left straight at the bottom or slightly tapered.
- Don't forget to put a center line on the cut sleeves.
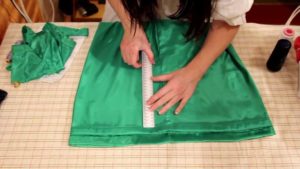
Important! If you are going to work with the fabric right away, then you need to iron it, fold it in half with the right side inward and bend it, adjusting it to the size of the back and front, taking into account allowances. We start working from the back, since it is more convenient to make it one-piece.
Assembling the elements of the robe
Once all the details of the robe are ready and cut out, you can begin assembling the product:
Important! Do not forget to place control marks on the facing in its center.
 We cut out the facing for the neck, if it is suggested by the model. To do this, take the back and shelf parts and pieces of the remaining fabric. We also fold the fabric in half and pin it together. We apply the fold of the back to the fold of the material, and draw a line for the neckline, then from which we lay several sections down 4 cm each and connect everything with a smooth curve. We do the same with the shelf, you should get 2 parts due to the zipper. Allowances are needed only for sewing parts together. But if there is enough fabric, then you can make the facing one-piece. We cut out the facing and duplicate it with non-woven fabric.
- Stitch and overcast shoulder seams products with double stitching.
- We measure the length of the neckline if there is a need to adjust the hood. We sew in the hood and process the cuts using an overlocker or zigzag.
- We connect the armhole to the sleeve, not forgetting to align the control mark with the shoulder seam. We sew in the sleeve. Next, you can sew the side seams of the robe and the bottom seam of the sleeve.
 We glue the lining parts with non-woven material, to do this, we apply the rough side of the non-woven fabric, aligning the edges, to the wrong side of the main fabric and iron it through the natural material. We grind the part along one edge using an overlocker or zigzag.
- Take the lightning and place the front side of the shelf with the teeth facing towards itself, place the lining face down on top of the zipper and grind all the details.
- Turn it inside out and add another line 0.1 cm from the edge. We do the same on the other side.
- On the front side of the robe, turn the hem inside out, match the bottom lines and stitch 0.5 cm, cut the corners and turn them back inside out.
- We process the bottom of the robe and sleeves in a convenient way, for example, with bias tape or a hem seam.
- We sew pockets to the shelf.
Iron the product. All is ready!


 We make edging patterns - details for processing the edge of the middle line of the shelf of the product to give greater strength to the fastener. We need the hems in order to attach the zipper to the product.. In order to make them, you need to cut out a rectangular part equal to the length of the shelf from the neck to the bottom and 6-8 cm wide. Immediately cut out 2 more similar parts from non-woven fabric.
 We divide the OP in half and from the resulting point upward we put a perpendicular of 1.5 cm.
 We cut out the facing for the neck, if it is suggested by the model. To do this, take the back and shelf parts and pieces of the remaining fabric. We also fold the fabric in half and pin it together. We apply the fold of the back to the fold of the material, and draw a line for the neckline, then from which we lay several sections down 4 cm each and connect everything with a smooth curve. We do the same with the shelf, you should get 2 parts due to the zipper. Allowances are needed only for sewing parts together. But if there is enough fabric, then you can make the facing one-piece. We cut out the facing and duplicate it with non-woven fabric.
 We glue the lining parts with non-woven material, to do this, we apply the rough side of the non-woven fabric, aligning the edges, to the wrong side of the main fabric and iron it through the natural material. We grind the part along one edge using an overlocker or zigzag.
 0
0


