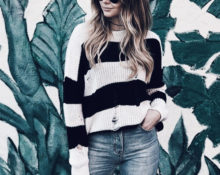
Fashion constantly dictates changes and throws up new words. One of them is a bomber jacket. What is this? Initially, this is a short jacket with wide elastic inserts and thick cuffs for men.
 Modern designers have revived the fashion for bomber jackets, adding their models to their collections since 2013. The latest design discovery was a knitted bomber jacket.
Knitting a bomber jacket
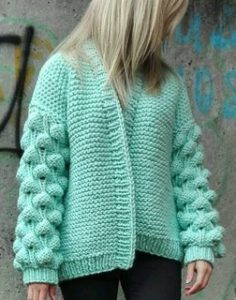
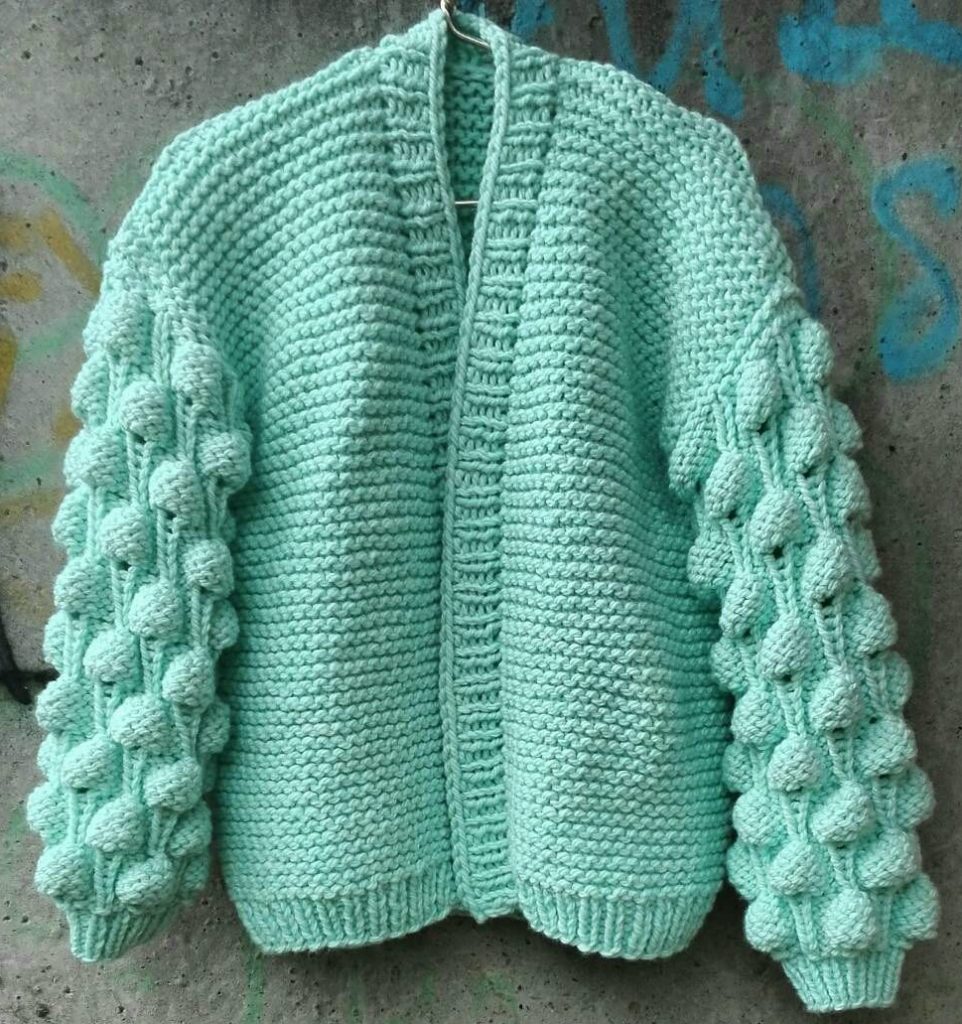
A knitted bomber jacket is a voluminous jacket, otherwise it is also called a “short cardigan”. In the cool season, such things are indispensable in any wardrobe.
Attention! You should be careful when choosing a model. Since voluminous bomber jackets will make a full figure appear even more bulky, it is better to choose a smaller pattern for curvy ladies. Girls whose clothing size fits into 40–46 can easily wear such oversized products with a voluminous pattern.
This product is knitted from thick yarn on needles larger than number 9. It is absolutely easy to do such a thing even for a beginner. Fortunately, there are now a lot of master classes that will help you figure out the details.We will look at one of these master classes below.
Do-it-yourself youth women's bomber jacket with a raspberry pattern
The bomber jacket is considered a type of cardigan, and this is one of the most necessary things in a modern wardrobe. The main purpose of this clothing option is considered to be the ability to protect the owner from the cold. But there are also simply stylish bomber jackets, the main task of which is the ability to decorate the image and make an impression.
Modern knitting organically combines old traditions and new interpretations in needlework. The variety of possible patterns is very multifaceted: they can be more voluminous or less conspicuous. The main popular patterns are:
- Arans. The pattern, which cannot leave anyone indifferent, includes intertwining plaits and braids.
- Braids. It is enough to read the diagrams describing this pattern several times and try it out in practice once in order to remember it forever.
- Openwork. This pattern is best used by experienced craftswomen who have a good feel for their knitting density.
- Rubber. This option is worth mastering in any case if you are a beginner. They are very simple to perform.
- “Bumps” or “raspberries”. A simple three-dimensional pattern, both a beginner knitter and an experienced knitter can handle it.
Important! When choosing a pattern for a product, it is very important to carefully read the description of the work process. This will greatly simplify the further process and help imagine the amount of work and complete it successfully.
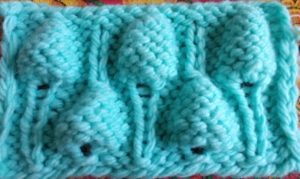 Three-dimensional patterns have recently become increasingly popular, for example, such an option as “raspberry”. It belongs to the category of simple knitting patterns. Now it is gaining popularity in adult products, although previously it was popular exclusively in children's items. In large knitting, “raspberry” looks interesting and quite bright. For a bomber jacket, the “raspberry” pattern can be both the main one and a decorative element of some details. For example, they can decorate sleeves.
Knitting materials and tools
If you decide to knit a bomber jacket yourself using the “raspberry” pattern to you Necessarily you will need:
- Yarn Pekhorka “Autumn”.
- Knitting needles on fishing line number 10.
- Knitting needles on line number 8.
- Additional knitting needle pin.
To make the bomber look more interesting, it is better to take bulky yarn. We chose the Pekhorka “Autumn” material, where there are 150 meters in 200 grams. It is also important to consider the composition of the yarn. If you want to knit a warmer product for the cold season, then it is better to take yarn that contains more than 50% wool.
Calculations for knitting
Before you start needlework, you need to calculate the density of your knitting. How to do it? To begin, you need to knit a swatch using the pattern you want to make and the yarn you plan to use.
For example, we will knit our bomber jacket in garter stitch and only use a different pattern on the sleeves - “raspberries”. Such a product will be quite easy to repeat for a beginner.
Bomber model
Let's start with the calculations. For the sample on needles No. 10, we cast on 14 stitches and knitted several rows. In our sample, 14 loops turned out to be 17 cm. In order to determine the density of your knitting, you need to divide the number of loops (14) by the length of the product (17 cm). We got 14/17 = 0.8 cm. That is, the knitting density is 0.8 centimeters.
Reference! It is recommended to knit a sample of at least 10*10 cm, then wash and dry it in order to understand how much the yarn shrinks when washed.
Next, you need to calculate the number of cast-on loops. To do this, you need to measure the chest circumference (CH) and multiply it by the knitting density. For example, for a volume of 95 cm you will need to cast on 76 loops (95*0.8=76). This means that the width of our product will be 95 centimeters.
Making a voluminous product usually requires more yarn. Therefore, we recommend taking yarn with a reserve of at least 1 thousand grams. For the above calculations, this amount of material will be sufficient.
Stages of knitting a bomber jacket step by step (detailed description)
To adjust the size of the bomber jacket to suit you, use the calculations above. And you will succeed!
- We will knit the bomber in one piece: both the back and front parts are fronted. Since the number of loops is 76, we divide them into front and back. To do this you need 76/2, you get 38 loops. For a loose fit, transfer 2 loops from the front to the back. That is, the back will have 42 loops, and the front shelves will have 17 loops each.
- To start working on creating a bomber jacket, you need to cast on 76 stitches using #10 knitting needles. Remember that there is no need to connect the fabric! The next step is to knit our loops with a 1*1 elastic band so that the bomber jacket holds its shape. Thus, we knit 5–6 centimeters.
- Next, we begin to knit the main fabric of the product. To do this, we knit the front and back sides using stockinette stitch, the so-called garter stitch. We knit this way until the armholes.
Attention! To determine the armhole, the easiest way is to try the product on yourself and understand what length you want the product to be. In our case, we will knit 48 rows so that the length of the product is hip-length.Next, we need separators and previous calculations.
- Returning to the calculation of the number of loops, remember that the first 17 loops are the front part of the product. We knit 17 loops, turn the product and continue to knit the first front in garter stitch until 34 rows are reached.
- Similarly, we need to knit the second front and back. To do this, remove the loops of the first shelf onto an additional knitting needle and leave them out of work. We attach a thread to the back loops and continue to knit in garter stitch until 36 loops are reached. We knit the second shelf in the same way, attaching a thread.
- Thus, the number of rows from the armhole along the front shelves will be 34 rows, and on the back 36 rows.
- Next, you need to assemble the shoulder seams of the product. One of the best options is the loop-to-loop method. It will be invisible on the product, so it fits best.
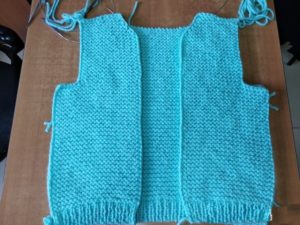
At this stage, the main part of the bomber is ready. Next, you need to attach the sleeves. To do this, we thread the knitting needles into the armhole of the product, you should get 36 loops. The stitches should be cast on between the grooves of the front rows. After 36 stitches have been cast on, we knit 6 rows in garter stitch and move on to the interesting “raspberry” pattern.
The pattern for this pattern is quite simple:
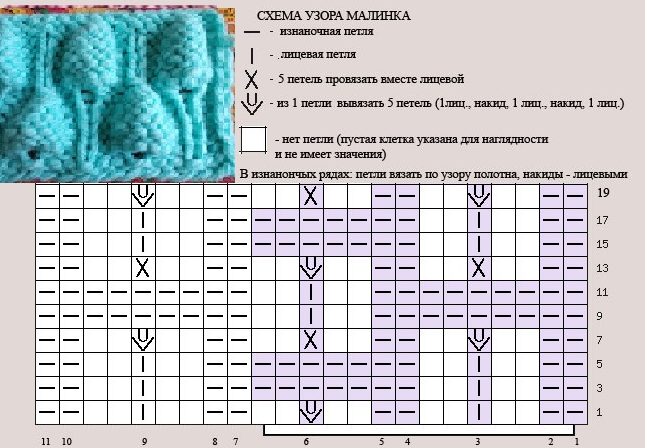
The report is only 6 loops.
Important! Please read the diagram carefully before starting work.
- Having knitted 4 reports in height according to the pattern, that is, 8 “raspberries” in a checkerboard pattern, we move on to the cuff. You definitely need to close the last row of “raspberries” without making any more increases.
- In order to knit cuffs, it is better to take smaller knitting needles, for example No. 8. We make decreases in this row so that the cuff fits as tightly as possible to the arms. We knit a 1*1 elastic band, as at the very beginning of work, 6–7 centimeters long.Afterwards, we just close the loops of the sleeves with a crochet hook and knit several rows of the strap of the product - this is the part that frames the front shelves and collar.
A warm and cozy bomber jacket is ready! Wear it with pleasure.
 0
0