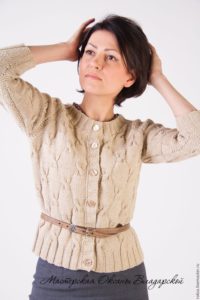
 A knitted sweater is very practical and comfortable. It does not wrinkle and does not restrict movement. It can be worn for a walk or a party, it will come in handy while relaxing in nature, and will be appropriate in the office.
And what could be more original than something made by yourself! The main advantage of handmade work is the ability to create a model in accordance with your own desires.
Knitting a women's sweater: useful tips
Fashionable color, high-quality yarn and modern style - all this will turn the jacket into a memorable element of the wardrobe of a modern woman.
How to knit a simple sweater for a beginning needlewoman
Handmade work requires a lot of time and perseverance, so you must first accurately determine the color, pattern, volume and decorative elements of the future product.
Beginners should not choose complex options. Therefore, laconic styles and simple designs are ideal.
Calculation of the amount of yarn
If a model with a complete description of the knitting process is selected, then The thread consumption will be indicated at the very beginning of the instructions.
What if other threads are selected? Then we pay attention to the recommended thread length and make an arithmetic calculation.
Example. The description says that to knit the ornament you will need 50 g of yarn. Below in parentheses are the numbers 200m/50g. This means that the pattern will take 200 m of thread. Consequently, they purchase 2 hundred-meter skeins.
The required number of skeins can be determined by the information on their label.: approximate consumption per 10 square centimeters.
It doesn't matter if there are more threads. Agree, if you have leftovers, you can always change the jacket. It’s worth finishing the bottom, changing the shape of the collar, tying a belt or decorating with fringe, and you’ll get a new look!
Preparatory stage

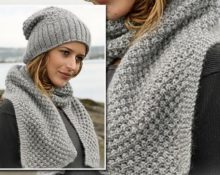
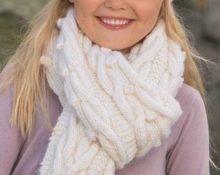
Before starting a complex style, it would be good to practice on something simple. For example, make a scarf with your own hands.
If you get loops of approximately the same size, there are no dropped or “lost” loops among them, and there is no confusion in the pattern, then you can start! Let's try to knit a fashionable sweater.
It’s easy to choose the right style - stylists offer voluminous baggy shapes. This is to the benefit of novice performers - they don’t have to deal with precise adjustment of the finished version to the parameters of the figure.
Although some measurements will be needed. Determine the length. The beginning of the measuring tape is applied to the base of the neck. Let's move on to width. It should not be less than the circumference of the hips. We specify the length and width of the sleeve.
For the first sweater, you don’t even need to make a pattern. It will consist of several rectangular canvases sewn together. Yes, and it is advisable to choose boucle threads. They will hide the shortcomings of the work. At the same time, the item will look expensive and stylish, even if knitted with regular stockinette stitch.
Lack of self-confidence is not the best help. Therefore, first of all, you can watch a video with a detailed master class. So you will be convinced that hand knitting is a completely accessible form of needlework.
Completing of the work
For smooth yarn, the rice pattern is ideal. 1X1 or 2X2.
- The product starts from the back. For the bottom, you will need to knit several rows with a 3X3 elastic band (alternating 3 knits and 3 purls).
- When switching to the main pattern, the number of loops should be increased by about a third. Knit until the fabric reaches the required size.
- For the front, cast on half as many stitches as for the back. The right and left parts should be the same.
- Next we need to work on the sleeves. They are usually knitted from the wrist. Every detail starts with an elastic band. After a few rows, the number of loops again increases by about a third.
Advice. In order not to make a mistake with the sleeve length, you can use clothes of a suitable size as a kind of pattern. Knitting is applied to it and it is determined how many more rows are required.
- For trapezoidal sleeves, you will have to calculate the required number of stitches to cast on and add them to the right and left in every 8th row.
- Then the parts are put together, the neck and clasp are designed. They can be crocheted, trimmed with trim or fabric ruffles. Large buttons fastened with air loops will add an element of play to a simple model. Romantics will add ribbons instead of clasps.
Advice: It is not recommended to iron knitted items, otherwise they will lose volume.
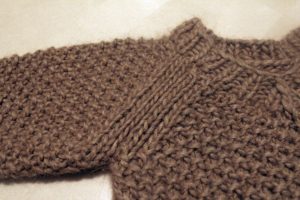
Jacket with dropped sleeves
A dropped sleeve is any sleeve whose seam is below the natural shoulder line.
There are quite a few options for this detail: straight, flared, tapered, long and short.
Their popularity is easily explained: they fit well and do not bunch up under the armpits.
The lowered sleeve can be made in 2 variants: with and without an edge. The last method is suitable for beginners.
A roll is a bevel of the top of the sleeve to better fit it into the armhole. Its beginning should be aligned with the armhole line on the back and front. Sometimes the okat turns out to be larger than the required size. You can unravel and bandage it, or you can lightly gather the upper part of the part. This will give the sleeve additional pomp.
Important: A long knitted sweater with a hood is a great alternative to a fall raincoat.
Product with raglan sleeves, made at the top
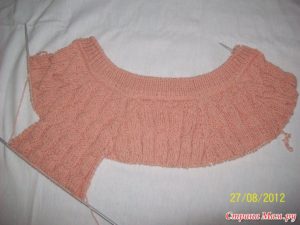
Clothing with raglan is always feminine and elegant. It is better to knit it with circular knitting needles.
The neck circumference is first measured. Make a pattern sample and calculate the required number of loops. It must be a multiple of 6, plus an additional 2 edges. Then they are divided into 5 parts: 2 for the front, 2 for the sleeves and 1 for the back.
For comfort Raglan lines are marked with contrasting thread or pins, because the increase will pass along them. Loops are added in the front rows simultaneously on all parts. From the inside out they knit according to the pattern. The most common method is done with a double crochet. If you plan to make the raglan line barely noticeable, then new loops are added from the broach.
When the fabric reaches the end of the armhole, the sleeve loops are removed using additional threads. The fronts and back are combined and knitted together all the way to the bottom. After which the work returns to the sleeves (they are made separately).
How to make a placket on a jacket
The logical conclusion of the product is the bar.She It can be to match the item, contrasting or knitted from threads of a different texture.
If previously it was believed that it was needed only for fastening, today it is treated as a decorative element.
The strap can be knitted separately and sewn. But details knitted vertically or horizontally look more organic.
The most labor-intensive option is to tie a vertical strip to the shelves. You need to cast on the knitting needles the required number of stitches. On each odd row, pull one stitch over the edge of the front and knit it together with the last loop of the front.
The horizontal method is much easier to perform. For this, loops are made from the edge loops of the shelf or from broaches along its entire length. You can use not only stockinette stitch and elastic, but also beautiful patterns. Lace trims or decorated with braids look very original.
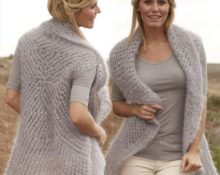
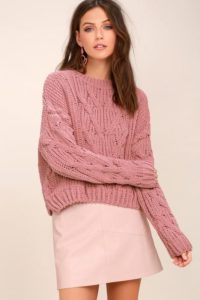
Knitting an openwork sweater
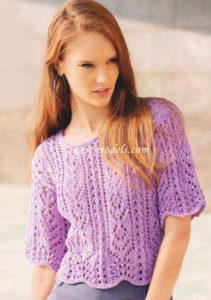
Beautiful blouses can be worn even in summer! And crocheted ones are also suitable for the beach. Light and intricate openwork imitating lace adds expressiveness to even the simplest product.
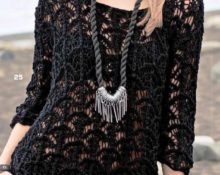
How to crochet a sweater
Crochet makes especially charming products. It has truly unique capabilities. With its help, three-dimensional leaves and flowers are created that bloom on the thinnest canvas.
Advantages of the hook:
- the ability to connect individual elements;
- no need to make darts;
- execution of fitted models, thanks to changing the size of the hook.
It is not necessary to have a ready-made pattern. You can take any suitable style and size from a craft magazine. Tie the sample with the selected pattern and make the necessary calculations using it.
Fashionable wave pattern
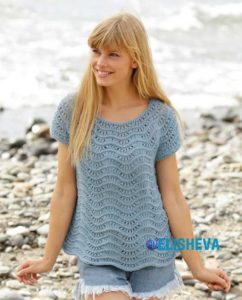
The “wave” or “peacock feather” pattern is always relevant.It can be used as an openwork insert or to decorate the wavy bottom of the product, or it can be used for the whole thing.
A blouse knitted with waves in blue and white tones will look harmonious while walking along the seashore. At the same time, the black model with a metallic sheen is perfect for a holiday party.
The pattern has a lot of options. But they are all built on the principle of alternating wavy rows with smooth knitting.
Classic way
- The number of loops should be divided by 6 + 2 edge loops.
- The first and third rows are purl.
- The second row is the front ones.
- The fourth row is wave-forming. Knit two stitches together 3 times. Repeat 1 yarn over and 1 knit stitch 6 times. Knit two stitches together again 3 times.
- Next, the pattern is repeated from row 1.
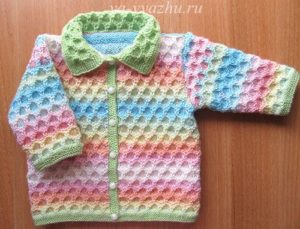
Knitting a children's sweater
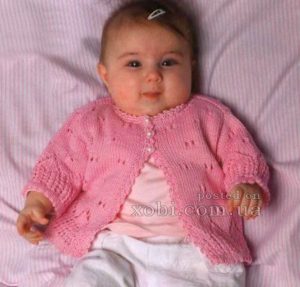
Every mother knows how difficult it is to put something “over the head” on a child. That's why mothers and babies prefer sweatshirts. The fastener does not cause “protest” among children.
How to knit a sweater for a girl using one piece of knitting needles
For a little girl, you should try a children's sweater made from one piece.
First way
The children's sweater is knitted almost like a model with raglan sleeves. The only difference is that you don’t have to create a raglan line. From the neckline, stitches are added evenly in the front rows, simultaneously including them in the pattern. Thus, a round yoke is formed at the top of the sweater.
Second way
Knitting starts from the back.
- The required number of loops is cast on.
- The fabric is knitted straight up to the armhole.
- At the same time, on the right and left, sleeves begin to form. To do this, several air loops are collected on each side. They are included in general knitting. And so on until the width of the product is equal to the span of the child’s arms.
- The whole fabric is knitted up to the beginning of the neckline. For her, the loops are closed in the center of the panel.
- From this moment on, knitting is divided into two parts. One of them is removed onto an additional knitting needle. On the other hand, work continues.
- To decorate the neckline, loops are added in every 3-4 rows until their number is equal to half of those closed on the back.
- A continuous fabric is created before closing the loops for bevel of the sleeve. It is important to ensure that in the end the required estimated number of loops for the shelf remains on the knitting needles.
- For assembly, two seams are made - on the right and left sides. The clasp and sleeves are designed depending on your imagination.
Collar for children's jacket
The collar is knitted after the product has been assembled. This is especially important for children's items. The detail makes it possible to “tighten” a wide neck, and for larger sizes, replace the scarf.
For any collar, pick up loops along the edge of the neckline and knit 1-2 cm with an elastic band. Then they switch to the desired pattern.
- To get the style with stand, continue to knit a few more centimeters with the existing number of loops.
- For a turn-down collar in front rows add a loop every 10-12 stitches.
- Fantasy collar - flounce or scarf - knitted separately and sewn to the finished item.
Knitting is a fun activity for children, and also a great way to save money. The little ones are growing quickly. Therefore, completely new clothes become small. The remaining yarn or yarn that matches the texture will save the situation. With its help, you can lengthen the sleeves with cuffs or increase the size of the product.
It is no coincidence that the hand made style is especially valued by European designers.
This is a way to get a unique item that absolutely fits into a unique image. Don't be surprised if your blouse attracts attention.After this, requests may appear to perform custom work. After all, individuality is always at the peak of fashion.
 0
0