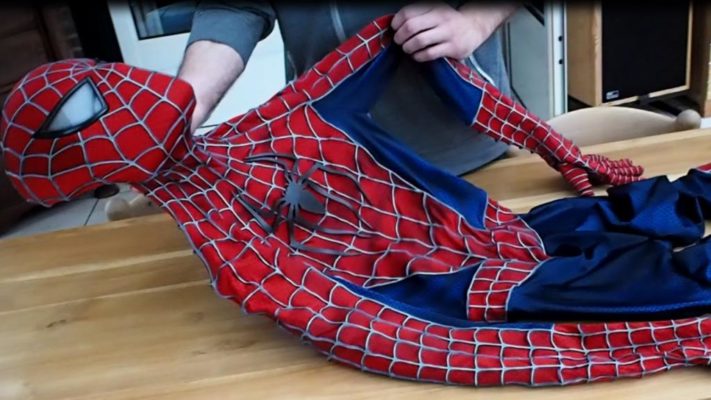
The Spider-Man costume is one of the most popular. Both children and adults enjoy choosing it. To feel like a superhero for one day, you can buy a ready-made costume in a specialized store, or you can create it yourself and be sure that there will definitely not be a second one like it.

Instructions
The main and recognizable details of the Spider-Man image are, in fact, the costume itself and the mask. Before you make a Spider-Man costume, you need to decide what kind of image you want to embody. This could be a black and white version from Secret Wars or an equally spectacular version donated by one of the symbiotes. But most often they choose the most recognizable one - the classic blue-red version.

How to sew a suit from scrap materials
To create a Spider-Man costume, you don’t have to sew it; you can take old things, slightly modify them and add details.
For the costume you will need:
- old blue sweatpants;
- blue long-sleeve T-shirt;
- Red T-shirt;
- a piece of red stretch fabric;
- black marker.

Procedure:
- on a red T-shirt (if you don’t have one, you can cut out the details from the fabric), cut out the sides and back, leaving the shoulders and a tapering stripe in the front;
- Use a black marker to draw a web, starting from the neck. You can additionally stitch with thick black threads. To make the web voluminous, you can carefully glue a black cord;
- sew a red detail onto a blue T-shirt. If the T-shirt is wide, it will have to be sewn in at the seams. The suit must fit snugly to the body;
- hide the joints of the parts by sewing a thin cord;
- draw a spider on the chest. Alternative option: cut out a spider from fabric or a piece of black leather and glue it;
- next step: sewing the pants. According to the canon, they should be tight-fitting, but if comfort is more important than authenticity, then it is better to leave them unchanged;
- cut out boots from red fabric;
- draw a web on them and sew them to the bottom of the legs;
- For the final touch, you will need to sew a red belt, decorating it with a black spider.
The classic Spider-Man costume, as conceived by the character's creators Stan Lee and Steve Ditko, had another original detail - a mesh located under the arms and ending at the belt. You can make the mesh yourself in two ways: weave it from the same lace or cut it from black women’s tights into a large mesh (to prevent the fabric from unraveling, treat the sections with glue). The latter method guarantees the elasticity of the mesh, but it will be more difficult to sew it neatly to the sleeves.
How to make a Spiderman mask
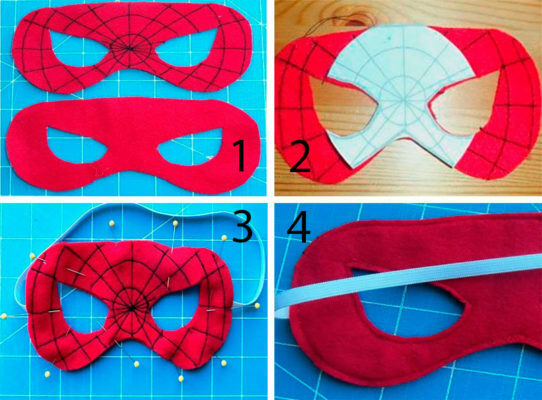
There are two mask options: a classic full-face mask and a half mask. The first one is closer to the character, but it is hot and may be difficult to breathe. A half mask is more convenient, especially if the costume is made for a child.
Half mask: how to make
What you will need:
- cardboard,
- red elastic fabric,
- black marker,
- glue gun,
- elastic band.

Procedure:
- take measurements (head circumference, distance between the inner corners of the eyes);
- draw and cut out the future mask on cardboard;
- cover the cardboard with red cloth, securing the edge with a glue gun;
- when the glue dries, draw a web centered on the bridge of the nose with a black marker;
- secure the elastic band.
Spider-Man fabric mask
This method is more complicated, but the mask turns out very similar to the original one.
What you will need:
- red elastic fabric (knitwear),
- black marker,
- mosquito net,
- a piece of chalk or soap,
- hidden zipper 10-15 cm red,
- any clothing with a tight-fitting hood.

Procedure:
- spread the red cloth on a flat surface;
- fold the hood along the back seam;
- trace the hood on the red fabric with chalk or a piece of soap (if you trace it with soap, it will be easier to get rid of marks on the fabric);
- cut two parts;
- mark and cut out holes for the eyes;
- process all cuts using an overlocker or manually;
- cut eyes from the mesh;
- sew the mesh to the mask;
- sew the parts together by installing a hidden zipper at the back of the head;
- use a black marker to draw a web, centered on the bridge of the nose;
- outline around the eyes with a marker.
Papier-mâché mask
Papier-mâché takes a lot of time, but the process itself is quite interesting. For this method you will need the following materials:
- plasticine (packaging),
- glue, preferably PVA (you can weld a paste),
- rolling pin,
- a lot of old newspapers or a couple of packs of napkins,
- plain white paper,
- red paint and brush,
- elastic band,
- marker.

Procedure:
- Knead the plasticine well and roll it into a layer 1 cm thick;
- try on the face of the future superhero and form the outline of the nose, mark the places for the eyes;
- cut out the eyes and remove excess around the circumference of the face;
- try on the plasticine mask again. Gather excess plasticine into a fold on the forehead so that the mask takes on the voluminous shape of the face;
- cut a wedge on the forehead from plasticine, connect the sections;
- adjust the shape of the eyes;
- try on the mask again, adjust the shape if necessary;
- put in the freezer overnight;
- tear napkins or newspaper sheets into small squares;
- dilute PVA glue with water (two waters for one part of glue);
- moisten pieces of paper in the adhesive solution and apply an even layer to the plasticine blank;
- let dry thoroughly;
- repeat 6-8 times;
- Apply torn white paper as the last layer;
- when the mask is completely dry, remove the plasticine;
- trim the uneven paper edge and color it;
- Use a black marker to apply a spider web and outline the outline around the eyes;
- attach an elastic band.
Of course, preparing a Spider-Man suit takes time, patience and some effort. But if you involve a child, the boring process will turn into an interesting game, and the future little spider will have a legitimate reason to be proud at the future matinee.


 0
0


