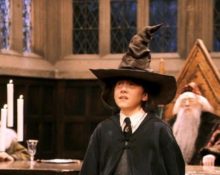
 Books and films about the famous young wizard Harry Potter, who repeatedly defeated evil, continue to win the hearts of young viewers and readers. And of course, many children want to transform into their favorite hero.
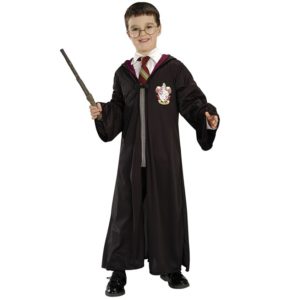
Costume components
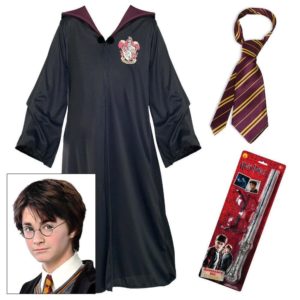 The Harry Potter costume consists of several elements:
- school robe - black with red or burgundy lining;
- uniform school vest;
- classic white shirt;
- black pants;
- badge with the emblem of the faculty;
- uniform tie;
- Magic wand;
- round glasses.
Required materials and tools
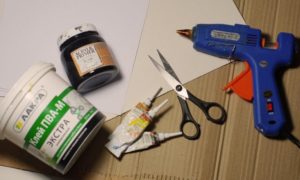 Let's see what we need to make the costume ourselves:
- Whatman paper for creating a pattern;
- pencil;
- chalk or a sharp piece of soap;
- tape measure;
- scissors;
- pins;
- black and red threads;
- sewing machine;
- iron;
- burgundy or gold tie;
- burgundy or gold narrow ribbon (inversely dependent on the color of the tie);
- black fabric;
- red lining fabric;
- dark gray or black vest;
- wood for a stick;
- glue gun and glue sticks for it;
- thick wire or round glasses;
- brown cosmetic pencil.
Tip: gabardine is perfect for a mantle - it is an easy-to-handle, inexpensive fabric. Or, if you want the robe to shine, use satin.
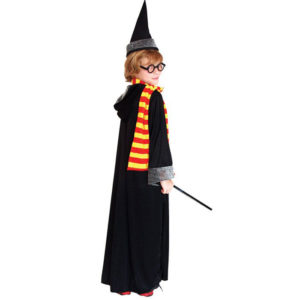
How to sew a Harry Potter costume for a boy step by step with your own hands
 The Harry Potter costume is quite complex and consists of several parts. But if you put in enough effort and time, you can turn your child into a real Harry Potter. If it is difficult to make the entire costume in one go, you can stretch the process over several days.
Mantle
 Now let's get to work. Let's take care of the mantle first; it will take the most time and effort.
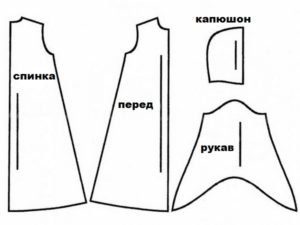
Step 1. Take your child’s measurements and, using them, draw a pattern on whatman paper. You can use the following example:
Don't forget that you will need two pieces of each element: front, back, hood and sleeves.
Tip: the hood does not have to be semicircular; in some Harry Potter films, wizards wear robes with pointed hoods.
Step 2. Iron the fabric. Working with mint will be quite inconvenient.
Step 3. Cut out the resulting parts and transfer them to the fabric. To make it easier to outline, you can attach the paper to the fabric with pins. Remember that in the end you should have two sets of blanks: from black fabric and from red lining.
Important: remember that you must leave 2-3 centimeters of seam allowance.
Step 4. Cut out the resulting blanks. Place them together and pin them in place first to see if you get what you want. First, carefully sweep by hand—separately the future mantle itself, separately the lining.
Step 5. Now machine stitch and iron all the seams.
Step 6. Gather the outer and inner parts together and, placing them wrong sides together, sew them together.
Step 7. Once again, go over the seams with the iron and press the robe itself.
The mantle is ready! Now you need to attach the faculty badge to it. You can either look for it in sewing stores or make it yourself.
Need to find it on the Internet Gryffindor house emblem, print on a color printer, cut out, glue on thick cardboard and stick to the mantle - on the left side, just above the heart. You can also pre-glue the emblem with tape on the front side - this will make it shine and keep its attractive appearance longer.
Harry Potter Vest
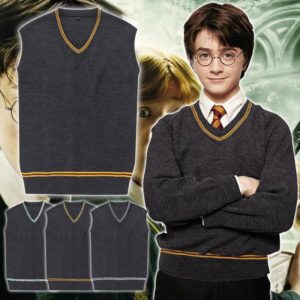 Now let's move on to Harry's vest. Hogwarts wears dark gray vests with a V-neck, but if gray is not available, black will do. If your neckline is round, turning it into a V-shaped one will not be difficult:
- Turn the vest inside out, fold it in half and carefully cut the neckline to a triangular shape; depth - no more than 15 centimeters.
- Fold the edges of the fabric under and sew them to the inside of the vest so that everything looks even on the outside. This can be done either manually or by machine.
Advice: you can leave the vest as is, or you can make it even more similar to the canon one. To do this, take two thin ribbons (maximum 0.5 centimeters wide), burgundy and yellow, and sew or glue them horizontally at the bottom of the vest and along the edge of the neckline.
We are getting closer to the image of the famous wizard. But of course, nothing will work out without a tie in the traditional faculty colors.
Tie
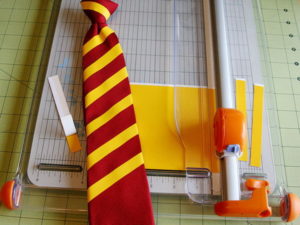 To make a tie, you have two options:
- Find a ready-made burgundy and gold striped tie.
- Take a burgundy tie, cut a gold ribbon into strips 3–5 cm long and sew or glue them to the tie diagonally. Or, on the contrary, take a gold tie and a burgundy ribbon and do the same. On a tie knot, for plausibility, the stripe should be directed in the other direction.
Pants and shirt
Next come the more familiar details of the school uniform: a white shirt and black trousers. You don’t have to sew them from scratch; you can take any that matches the color of your child’s wardrobe. The shirt will fit with both long and short sleeves - they will still not be visible under the mantle.
Finishing touches
And finally, the finishing touches of the image: the hero’s wand, glasses and scar.
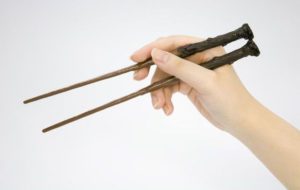 Making a wand is much easier than it seems. You need to take a small piece of wood (for example, a twig from a nearby tree) and a glue gun with hot glue. They can create any desired relief on a piece of wood. Then you can leave it as is or paint it with acrylic paint.
Tip: an ordinary sushi stick is perfect as a preparation.
 Glasses, like a tie, can either be found ready-made or made yourself from thick wire. To do this, you need to twist two rings, arms and a connecting element, and then fasten them together either with the same wire or with black electrical tape (in one of the films, Harry appears before the audience wearing just such taped glasses).
Finally, take a brown crayon and draw a lightning bolt-shaped scar on your child's forehead.
That's all! Now your boy is a real wizard.
 0
0