“Wind, wind, you are powerful, you drive flocks of clouds, you agitate the blue sea, you blow everywhere in the open space...” - this is how the wind sounds and looks like in the words of A. S. Pushkin in one of his immortal fairy tales. After delving a little into your memory, you will find more than one image and more than one association with the wind. Maybe it will be a destructive tornado, or a refreshing sea breeze. The task becomes more complicated when this very image has to be taken from abstraction to concreteness, or rather, to come up with a theatrical costume based on your ideas that would convey the character of the character and help the viewer more accurately identify him. And the task of coming up with such a costume for a child seems completely insurmountable. Recommendations and photos will help you cope with the task.
Features of creating a wind costume for a boy
Of course, it’s much easier to come up with a pirate or Kapitoshka costume for a child than a costume that depicts a natural phenomenon. On the other hand, this is a reason to move away from stereotypes and show remarkable imagination.So, let’s imagine that you read that same announcement in kindergarten in which “all girls are snowflakes,” and you were left alone with the extremely difficult task of making a wind costume.
The first thing we will focus on is to try to understand what difficulties we may encounter and what is worth taking into account:
- The costume should not interfere with the child’s movements and create a danger that he or someone nearby could step on the edge of the panel, fringe or ribbon, trip and fall;
- the suit should not restrict movement;
- the color scheme should be suitable for the boy and for the artistic image that needs to be created;
- you need to think about what materials, fittings and accessories will best help convey air movement and wind noise.
What you need for a wind suit
Take a piece of paper and a pen, imagine before your eyes pictures of the wind in nature and try to write down on the piece of paper first your feelings, the emotions that these ideas evoke in you, and then the images, sounds, textures with which you associate them. The picture will look something like this:
- Confusion, peace, movement, noise, whirlwind, activity, restlessness, restlessness, volume;
- Rustle, foil, transparent material, fabric, tulle, organza, rain, sparkles, sequins, balloons, fringe, long coat;
- colors – blue, blue, silver, grey, white, turquoise.
Now let’s try to select materials for our associative series that will best convey the image of the wind:
- Translucent airy fabric - organza, tulle, tulle; to add density to the image, you can use plush or corduroy;
Important! It is better not to use silk - neither natural nor artificial, because it does not hold volume at all and tends to become electrified and stick.
- rain for Christmas tree decorations, sequins or decorative braid or ribbons decorated with foil or sparkles;
- foil;
- several packs of simple plastic bags with handles (you can use them to make a rustling “fringe”).
How to make a wind costume for a boy with your own hands
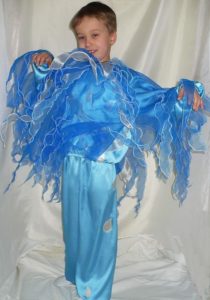
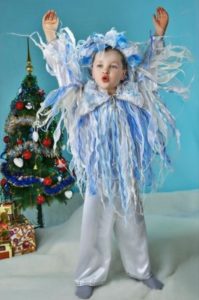
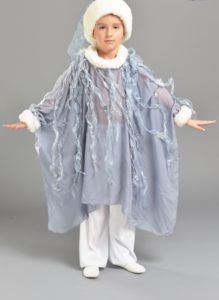
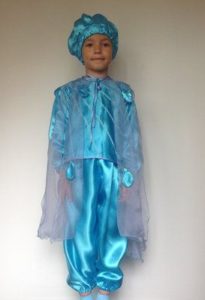
After a long Internet search, it seems that the best option for a wind costume for a boy is pants and a wrist-length raincoat. If everything is clear with panties - you can choose any style, then with a raincoat there are 2 options. You can sew it in the form of a circle with a slot for the head, or in the form of a “musketeer cloak”, and make arm ruffles for the arms, which are then richly decorated with decor. Let's focus on the second option:
- Using a measuring tape, take measurements and transfer them to a cardboard pattern. We will need to measure the length of the trousers from the waist to the ankle, the volume of the waist and hips, the volume of the lower leg with an allowance of 2 to 5-6 cm, depending on the style. For a raincoat, measure the length along the back and along the arm, from the highest point of the shoulder to the wrist.
Important! The stage of creating a pattern should not be neglected - even if it seems to you that “you can handle it anyway,” it is better to play it safe. By transferring your idea first onto cardboard, and only then onto fabric, with the required seam margins, you will get an even seam, symmetrical edges, and the suit will have a solid and neat appearance.
- Using a piece of soap or chalk, transfer the contours of the pattern onto the fabric, leaving an indent for a double fold of the seam.
- We cut out the pattern and sew it with “live” thread. We leave a slot in the cloak for the head, fold the rectangular panel in half crosswise and sweep it under the arms so that the cloak holds on better.
- We process the seams on a machine. The costume is basically ready.
Additional accessories and decor
In order for a suit to make a lasting impression, you need to complement it with decor. What options can be offered:
- Glue or sew an appliqué with stars, the sun or a month on the cloak - you can use golden silk, organza or even foil, decorate with sequins or rain threads.
- The edges of the cloak can be decorated with a decorative border with fringe.
- You can sew a shirtfront with long organza ribbons around your neck and overcast them along the edge - they will acquire an interesting waviness. If you have chosen a circular model of a raincoat, then you can trim it with ribbons along the neckline.
You can sew sleeves on your arms, decorated with organza or foil ribbons. An interesting decoration for a costume can be huge rustling pompoms made from plastic bags, with tied handles, cut into strips.
 0
0