 Every woman wants to please her beloved man. Pattern and sewing of a men's jacket with your own hands, made to individual sizes, will fit perfectly on your figure. The style, length and material for the future product - everything will be selected according to personal preferences.
Stage 1
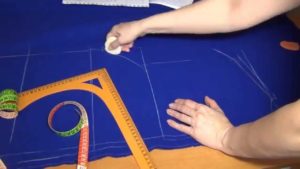
Taking measurements
Measurements must be taken with special care if you plan to make patterns for a specific figure. But also You can sew a jacket using ready-made patterns, which greatly simplifies the entire work process. Nowadays there are many programs for creating patterns.
The following measurements are needed to create a pattern for a men's jacket (some of them are optional, for example, half-waist circumference), since it all depends on the chosen style:
- Height.
- Ssh – semi-circumference of the neck.
- Сг – half chest circumference.
- St – half waist circumference.
- Sb – semi-hip circumference.
- Shg – chest width.
- Lts – back length to waist.
- Shs – back width.
- DP – shoulder length.
- Op – shoulder circumference.
- Dr – sleeve length.
- Oz – wrist circumference.
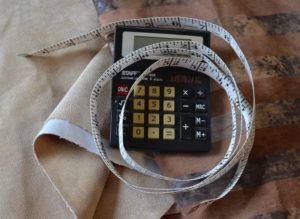
 To sew using a finished pattern, you only need to take six measurements., to accurately determine your size and compare them with table data from magazines:
- Height measured from the top of the head to the feet, standing on a flat surface and without shoes.
- Bust We measure at the highest points of the mammary gland.
- Waist circumference measure over the tape that was previously tied at the waist.
- Hip girth We measure at the most convex points of the buttocks.
- The length of the sleeve measured by a slightly bent arm at the elbow, from the shoulder through the elbow to the wrist.
- Shoulder length – from the highest point of the shoulder to its articulation with the arm.
size table
| Size | cm | 44 | 46 | 48 | 50 | 52 | 54 | 56 |
| Height | cm | 168 | 171 | 174 | 177 | 180 | 182 | 184 |
| Og | cm | 88 | 92 | 96 | 100 | 104 | 108 | 112 |
| From | cm | 78 | 82 | 86 | 90 | 94 | 98 | 104 |
| About | cm | 90 | 94 | 98 | 102 | 106 | 110 | 115 |
| dr | cm | 61 | 62 | 63 | 64 | 65 | 66 | 67 |
| Osh | cm | 37 | 38 | 39 | 40 | 41 | 42 | 43 |
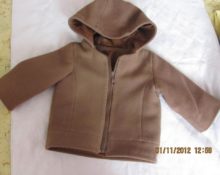
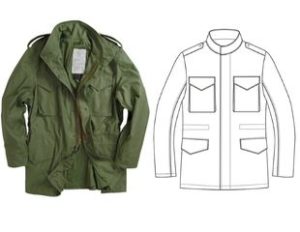
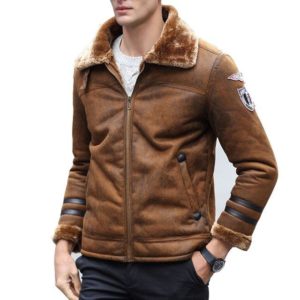
Choice of style and decorative elements
The main styles of jackets and the most preferred types of fabric used for tailoring:
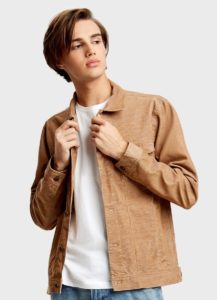
 Bomber - a type of short jacket that was created for bomber pilots. Usually without a hood, with welt pockets. A distinctive element is elastic bands on the waistband and cuffs. The material used for tailoring varies depending on the season, but the initial option is leather. Now there are three types: quilted, classic and sports.
- Leather jacket - a type of short leather jacket with a zipper running obliquely. Sewn from natural or artificial leather.
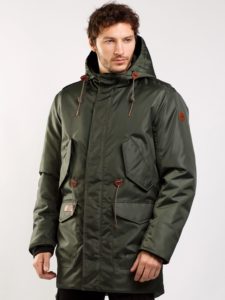
- Parka – a long warm jacket, always with a hood trimmed with fur. Historically, it was sewn with the fur facing out, unlike malitsa. Nowadays parks often use lining made of artificial fur, as well as padding polyester and down. More often, twill or denim are used for sewing. More and more often you can find parkas with leather sleeves.
- Down jacket – jackets of different lengths, with or without a hood.Typically made from lightweight materials such as polyamide, polyester or nylon. Down jackets often have water-repellent properties, so the filling is the down of waterfowl. The weight of a well-made down jacket does not exceed one kilogram.
 Anorak or windbreaker – a loose windproof jacket, which is made of dense material and has a hood. The cut model is quite specific, due to which the anorak is worn only over the head, and the pockets seem to imitate a kangaroo bag. To sew this type of jacket, light but durable types of fabric are used, for example, membrane or raincoat.
- Cahul (raincoat) - a raincoat, usually knee-length and below, made of light waterproof fabric.
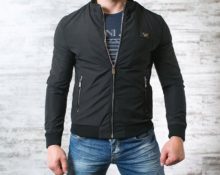
- Harrington - a type of light jacket with an elastic band at the waist. They are usually made from polyester, as well as cotton, suede or wool, and the traditional lining is a checkered material, but can be used with any other pattern or plain color.
- Jeans is a short jacket made of thick denim, which is fastened with rivets, buttons or a zipper, usually having a collar and many different pockets. Traditional jackets have patch pockets with flaps at chest level, and welt pockets at waist level. Denim can be summer or demi-season with a lining, often fur, as well as a collar trimmed with fur.
 Bomber - a type of short jacket that was created for bomber pilots. Usually without a hood, with welt pockets. A distinctive element is elastic bands on the waistband and cuffs. The material used for tailoring varies depending on the season, but the initial option is leather. Now there are three types: quilted, classic and sports.
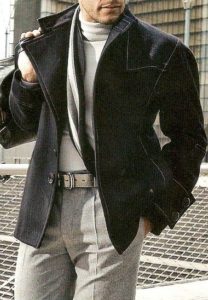 Anorak or windbreaker – a loose windproof jacket, which is made of dense material and has a hood. The cut model is quite specific, due to which the anorak is worn only over the head, and the pockets seem to imitate a kangaroo bag. To sew this type of jacket, light but durable types of fabric are used, for example, membrane or raincoat.
An important factor when choosing fabric for a jacket is the level of thermal insulation, high wear resistance, and moisture resistance.
When choosing insulation for a jacket, you should know that they are divided into three types: synthetic, natural and mixed.
The first type is hypoallergenic, shows good wear resistance and keeps its shape.However, it should be borne in mind that good quality material has these characteristics.
 Despite this, many prefer natural materials to artificial materials, believing that they are safer and warmer. If we consider down and feathers, they will warm well, but this environmentally friendly insulation can cause allergies and is an excellent breeding ground for bacteria and mites.
The lighter the insulation fibers, the more air there is between them, which means that it will be very warm.
Decorative and functional elements are selected based on the selected jacket style. The main thing is that everything is appropriate.
Stage 2
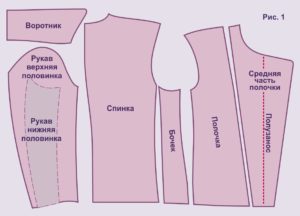
Preparing patterns for a men's jacket pattern
Once all the measurements have been taken, the type of product and its style have been determined, you can begin preparing the patterns. They can be made on special scaled paper, tracing paper, cardboard or X-ray film.
You don’t have to make a pattern yourself or buy a ready-made one, because if you have an old jacket available that you like the fit of, you can make patterns based on it.
 There are two options: either tear it apart, if you don’t mind, and trace everything on paper, or go further and use the method below.
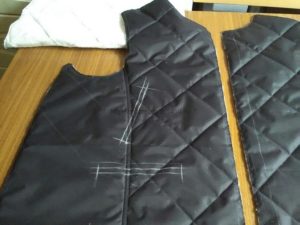
The procedure for removing patterns from the finished product:
- It is necessary to iron the item well, if the type of product and fabric allows it, lay it out on a flat, level surface. Next, we determine the middle of the back and shelf and mark them with pins.
- Then we turn the product with the seams outward and fold it in half, focusing on the control marks in the form of pins. We put tracing paper on top and trace the details with a marker. You should start copying with the largest parts.
- When creating patterns with sleeves, fold them in half, first you need to translate the 1st half, then fold them over, and trace the 2nd half.
- When all the lines have been translated, they must be aligned using tailor's patterns, rulers or any suitable means at hand. It is also necessary to take measurements of all parts of the product and compare them with the resulting patterns.
- It is very important to put control marks on the patterns you create so that the process of assembling the product is not particularly difficult. Such signs are usually placed on the waist, chest, hips, in the middle of the product, in the armhole, etc.
- Don't forget about seaming allowances!
- Now you can cut out all the parts.
Important! Immediately mark on paper which side of the product you removed the pattern from.
 When using a finished pattern, it is also transferred to tracing paper or another more preferable material and cut out. The placement of the pattern pieces is determined by the presence of a complex pattern. With such drawings you will have to adjust.
Placement of patterns on the material and preparation for cutting
Important! Material consumption is determined by its width.
 Calculate the required amount of fabric for sewing the product, taking into account the style, length and decorative elements. For a shoulder product with a sleeve, take the length of the product in its final form plus the length of the sleeve with seam allowances.
Reference! If the product involves additional finishing, for example, patch pockets, various flaps, briefcase pockets, non-standard collars, or fabric with a pattern, pile, checkered, or striped is used, then the fabric consumption increases by about 0.3-0.4 m.
There are several rules for preparing for cutting:
- The edge of the material is usually cut off immediately.
- If necessary, the fabric is subjected to wet-heat treatment.
- The material is folded in half.
- The main parts are placed in the direction of the warp thread, that is, along the grain, so that during wear the material does not deform and does not shrink strongly. The largest parts should be placed first; the back is usually placed on the fold of the fabric, and the shelf on the edge.
- Sleeves are cut out unfolded in the direction of the grain, less often along the bias.
- Between large parts, smaller ones should be placed - valves, collars, belts, etc.
- When transferring patterns onto fabric, do not forget about allowances if the patterns were made without taking them into account.
- Fabric with pile is cut so that the pile is in the direction from top to bottom.
 Corduroy and velvet, on the contrary, are cut from bottom to top to preserve the matte shade.
- On a smooth, monochromatic material, patterns can be placed in opposite directions.
- Having laid out the parts on the fabric, they are fixed with pins and outlined with chalk or soap. Be sure to mark all control signs and lines.
- After shading, the patterns should be removed and the fabric should be pinned together to prevent it from moving. Cut out all the details.
 Corduroy and velvet, on the contrary, are cut from bottom to top to preserve the matte shade.
Important! The lining and insulation parts are built and cut in the same way as the main ones! If the insulation is planned to be voluminous, then the main parts are built one size larger.
ADVICE! When going to the store to buy fabric, you can take paper patterns of the product with you, so when choosing a fabric with a pattern, you can recalculate the fabric when choosing it.
Stage 3
Cutting fabrics and preparing to assemble the product
 After all the elements of the product are cut out, they proceed to the preparatory work.
All stitching lines on each part are transferred to the other side. To do this, place safety pins along the contours and trace them on the second part, while not forgetting to place control marks.
We must not forget about the center lines so that your product does not warp. A line is laid along them, the stitch length of which can reach 2 cm.
Now you can move on to basting. If the jacket is planned to have insulation, then immediately sew it together with a lining. Sweep away all the details, focusing on the control marks, which must match on all the parts.
Once all the main parts are connected, it is necessary to try it on to ensure a good fit on the figure, to clarify the length of the hem and sleeves. If everything is in order, then you can proceed to stitching - joining the parts with a permanent stitch.
Final product assembly
 If there are darts, you must sew them immediately.
If The product has pockets overhead or slotted ones, then they need to be stitched to the product. We mark the location of the future pocket on one part and put it face to face with the second to mark it on it too.
If the pockets are in the seams, then you must first overcast the edges of each part of the burlap and pin one part to the shelf, and the second to the back, aligning the control marks, stitch it to the edge and make fastenings.
Further join shoulder seams, to do this, you need to connect the shelf and the back facing inward and stitch. Overcast or edge the allowances and iron them.
Let's move on to the sleeves. We combine all the parts of the sleeve and sew them on the machine. Then we take the lining and do the same with it as with the outer part of the jacket.
If the jacket assumes a hood, then the prepared parts are ground off and basted to the jacket. They decide whether it will be removable or not.
Non-removable hood assembled: its outer part is sewn to the main part of the jacket, and the same is done for the lining.
 If hood with zipper, then one work occurs by analogy, but using lightning. We attach one strip to the bottom of the hood, the second to the neck of the jacket.
If desired, you can use snaps or buttons instead of a zipper, and also decorate the hood with fur. Again, 3 options: make the edge permanent or with buttons (zippers).
Let's move on to connecting all the parts of the jacket. We have the main part, two sleeves and a hood. We attach the sleeves from the wrong side, connecting the outer part with the outer part, and by analogy we do everything with the lining.
If desired, the cuffs can also be decorated with fur or knitted inserts.
All you have to do is fasten the hood and the jacket is complete!
 0
0