Socks of the wrong size, pining in the far corner of a cabinet or chest of drawers, or waiting for their lost pair are found in every home. Some people mercilessly throw them away almost immediately. Some people have the patience to move them from place to place for months until patience runs out. But those who are not deprived of imagination have learned to give a second life to this wardrobe item. The ease and speed of transforming a sock into a children's or interior toy makes this activity accessible even to children.
Sock toys - instructions
The product will turn out beautiful only if the fabric has no scuffs. If the sock “pleases” with a hole in the heel or toe, it doesn’t matter. You can choose a toy that allows you to painlessly get rid of the defect. So, for example, the frayed middle of the toe is not critical when making a bunny. And without a heel, a good doll will come out. The main thing is that the footprint (its upper and lower parts) has a presentable appearance.
The next point is small details.If the toy is intended for a small child, it is better to avoid beads and glued parts. Instead of eyes, tightly sewn buttons are also suitable. The nose can be drawn or made from fabric. And the sponges are simply embroidered.
Most of the seams on the product are hidden because they are made from the inside. But if you do not spare the filler, the color of the thread can deprive the toy of its neatness. Therefore, it is selected to match the socks. And just enough filler is stuffed inside the craft so that it holds its shape, but is not hard. Sintepon is considered optimal for these purposes.
Cotton wool rolls up when washed, so it is not suitable as a filler.
Stuffed Toys
The daughter is looking at a plastic and unsafe doll - you can offer her a soft and interesting alternative. Everything is in mother's hands. White socks turn into snowmen within 5-10 minutes. People of color replenish the collection of characters in the home puppet theater.
If you use grain or beads as a filler, the doll will also become a simulator for the development of fine motor skills of children's hands.
Doll

White and colored sock, scissors, needle and thread and stuffing. This list can be supplemented with buttons, beads or ready-made eyes. Or you can simply draw the necessary elements on the face - the needlewomen will deal with the final touches themselves. The basic step-by-step process of making a doll is as follows:
- The colored sock is cut into three parts: the toe with the mark, the heel with a strip of fabric connecting the mark and the shoe, and the shoe itself with an eraser.
- The leg is pulled together with a “needle forward” seam along the cut line, forming a hat for the future doll.
- The part of the toe highlighted in color is cut in the middle and legs are formed from it, sewing the cuts together.After this, the trace is turned inside out and filled with filler.
- The remaining hole is closed with a needle-forward stitch. The outline of the handles is formed with pins, which is then stitched with a stitch. Visually, the result resembles hands stuck in pockets.
- The trace of the white sock is stuffed with filler and sewn up. The resulting ball is the doll's head.
- The head and body are connected, a cap and hood are put on. All that remains is to draw or embroider the face.
If you don’t have padding polyester at hand for stuffing, you can replace it with small pieces from an old T-shirt.
Snowman
You can't think of a simpler toy than this. It is enough to fill 3/4 of a white sock with padding polyester, beads or grain and tie with a strong thread. The remaining free eraser is turned away and sewn or glued. After this, the blank in the heel area is tied with a bright ribbon and the snowman is ready. All that remains is to sew or draw on his buttons, eyes, nose and mouth.
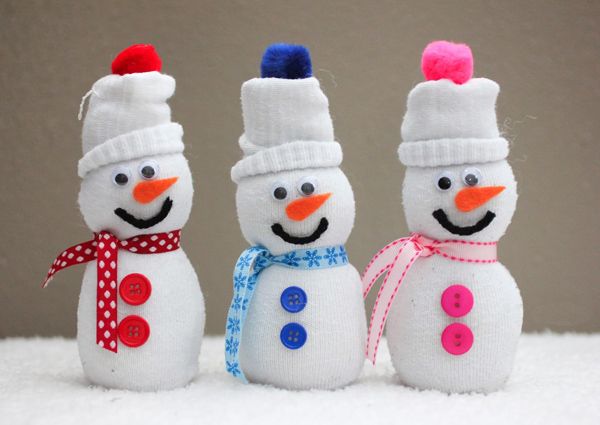
To prevent the toy from turning over, first a little grain is poured into the sock, and then it is filled with lighter material.
Bi-ba-bo toys
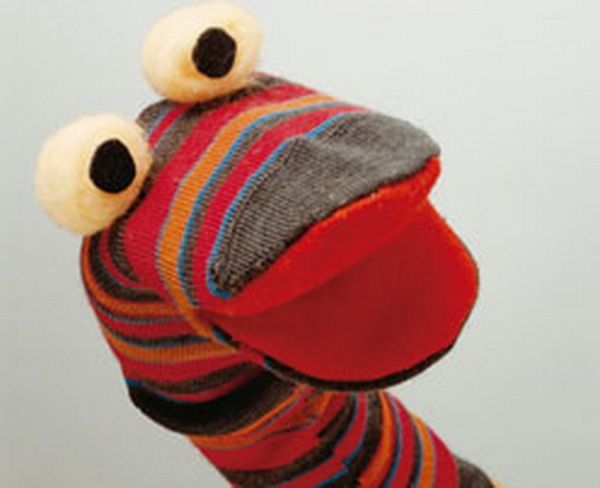
The main difficulty in making such toys is the correct formation of the future character's mouth. To cope with the task easily and quickly, you will need glue, cardboard and colored (pink, red or orange) pieces of fabric. The process of making such a toy is extremely simple:
- an oval is cut out of cardboard, the width of which is 5-7 mm less than the width of the sock;
- using it as a pattern, prepare a piece of colored fabric;
- the sock is straightened so that its right and left sides are located symmetrically;
- from the toe side, a cut is made in the center equal to half the long part of the oval;
- The sock cutting line is glued to the cardboard form, then a colored insert is attached to it.
The base is ready. All that remains is to sew on the eyes, ears and tongue of the desired shape and the character is ready to tell fascinating stories.
Animals
Bright terry socks make original little animals that you just want to pet.
Products that are too worn make animals untidy and sad.
Piglet
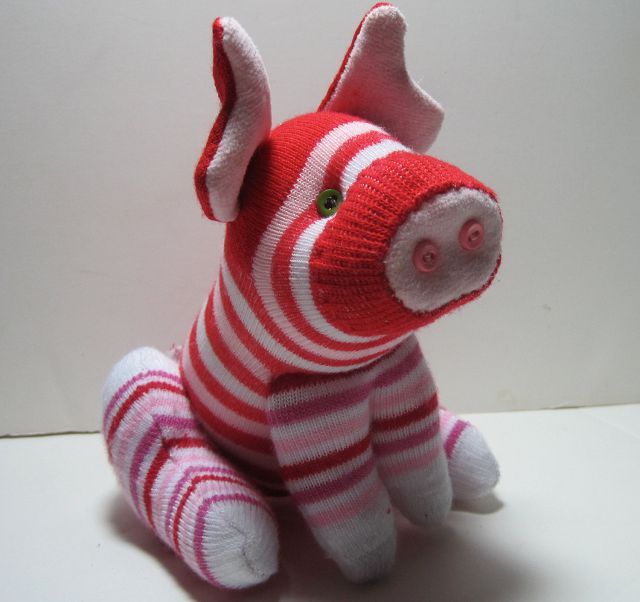
To make it, you will need a sock with a toe in a bright color that is different from the rest of the product. This will be the snout of the future pig, the manufacturing process of which is also quite simple.
- The sock is filled with filler approximately to the middle of the mark. The excess part is cut off, and the hole of the formed ball is tightened with a “forward needle” seam.
- The remaining segment is put on the piglet's body so that the eraser is near the toe. The front edge is fixed to the base with a hidden seam. The back one, after cutting off the excess part of the sock, is sewn up as in the previous paragraph.
- The remaining material is separated by cutting off the heel, which is cut in half. Ears are made from the resulting blanks. The details are sewn to the body and all that remains is to design the face.
If you sew a thin wire inside the ponytail, it can be twisted into a characteristic spiral.
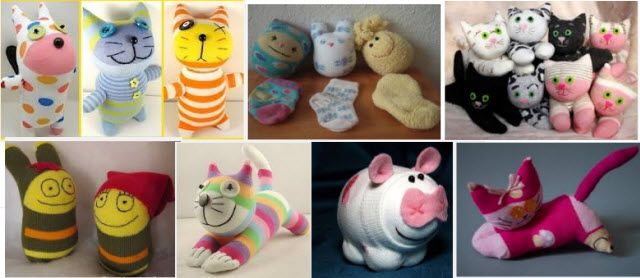
Kitty
To make a fluffy purr, you will need a pair of identical short socks. One of them turns out and straightens out on the table with his heel up. Then it is cut: from the toe side to approximately the middle of the mark, and from the eraser side to approximately the same length.
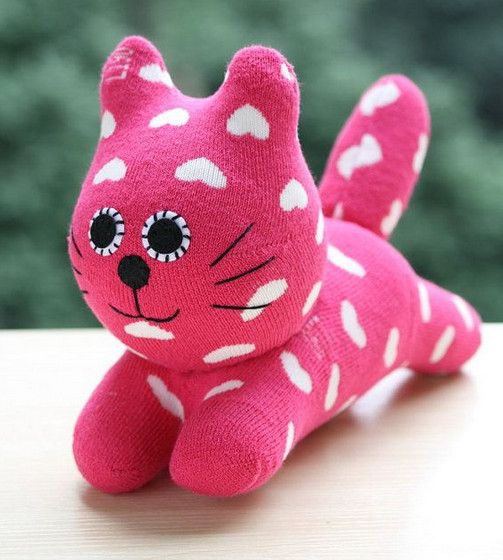
The cuts are stitched together to form the cat's paws. After this, under the heel, on the eraser side, a small incision is made, through which the product is turned inside out and stuffed.
The second inverted sock is cut in half along the line where the heel meets the footprint. The hole on the heel side is sewn up with a needle stitch backwards.You can sew from the center to the edge, forming the characteristic cat ears. The workpiece is turned inside out and filled. Having formed the face, the excess part of the eraser is cut off and the part is sutured.
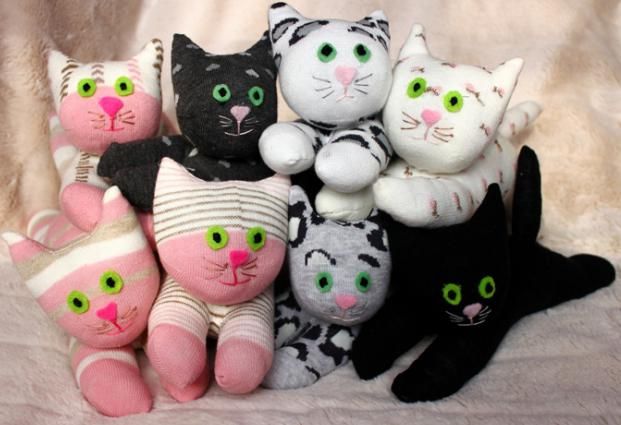
The kitten's head is sewn to the body from the track side. And in the place through which the cat’s body was filled, a tail sewn from the remains of a sock is sewn. Purr is almost ready, all that remains is to paint or embroider his face.
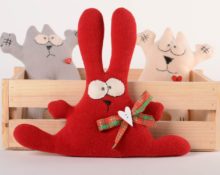
Bunny
The heel-up sock is cut from the toe side to approximately the middle of the footprint. On the other - to the beginning of the heel. The cuts are sewn together, with the exception of the hole between the future legs (on the toe side) sufficient to turn the workpiece inside out. Turning the sock inside out, fill it and sew it up.
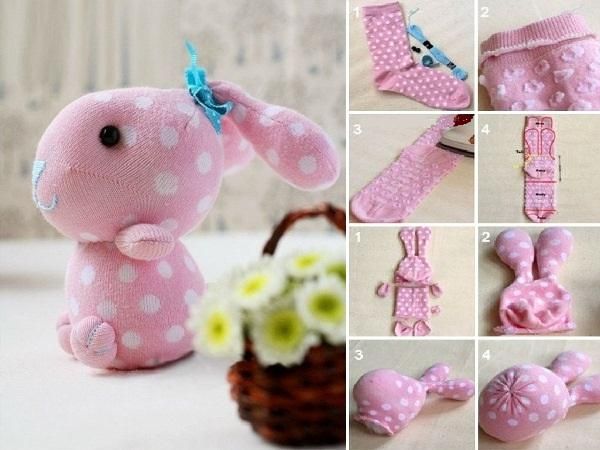
From the second sock, patterns for the front legs and a pom-pom tail are made. The parts are sewn in such a way that the heel of the first sock is the bunny's face. All that remains is to sew on the button eyes, embroider the nose and mouth, and the big-eared children's pet is ready.
Hedgehog
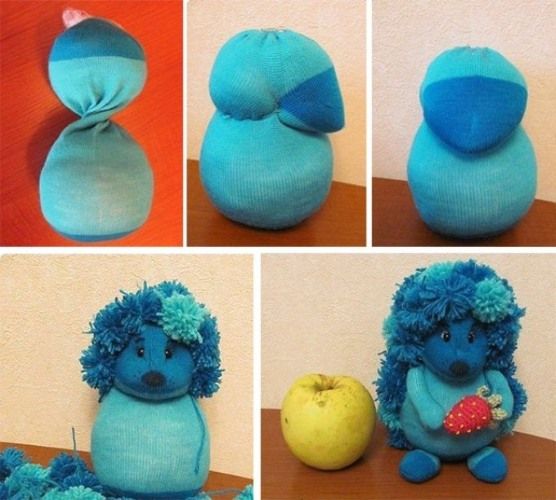
From an old lonely sock it’s easy to create a hedgehog living on a windowsill that can teach children how to care for plants. To do this, a little clean soil is poured into the product. The remaining volume is filled with soil with plant seeds. The free edge of the sock is tied and the future hedgehog is placed in a plate, having previously formed its muzzle. By watering and occasionally turning the hedgehog so that the sun evenly warms its sides, within a week the children will enjoy the lush green needles of an interesting “pet”.
Other simple and interesting options for using your imagination
A sock can be anything: it’s an interesting toy, a cover for a cup, or even a phone holder. The main thing is to forget for a moment about its intended use, look around and imagine it in the place of this or that object.And then it’s a matter of little things: scissors, a needle and thread, 10-20 minutes of free time and voila. No more forgotten socks huddling forlornly in the corner of the chest of drawers.
 0
0