Achieving perfect order in your closet can be difficult. Small things often cause clutter. An organizer will help eliminate this problem - socks cannot get lost in it. You can purchase a special device in a store or make the product yourself. The manufacturing process does not require special skills or knowledge.
What do you need to make it yourself?
You don't need a lot of materials to make a sock organizer out of a box. This is a budget product for which you can use improvised means.
Necessary materials for the organizer:
 cardboard box (can be taken from under shoes or equipment);
- thick vinyl wallpaper (they can be replaced with magazine pages if you want to get a colorful original design);
- glue or stapler;
- Ruler and pencil.
 cardboard box (can be taken from under shoes or equipment);
Additionally, you may need masking tape, cardboard or decorative elements (fabric, openwork and satin ribbons). You can ask the seller for the box or look for it yourself in the backyards of stores.This recyclable material is not of great value. If the drawer in the closet is large, then you can place several organizers in it at once. You can also reserve part of the drawer for personal hygiene items.
How to make a sock organizer from a box?
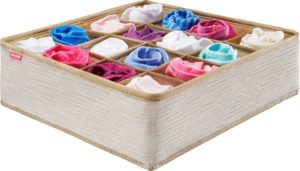
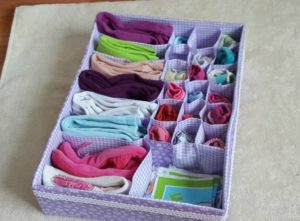
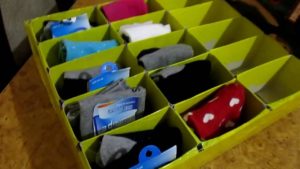
You can make a convenient sock organizer from an ordinary cardboard box. Several different methods are used for production. This useful device does not require expensive materials; most of them can be found at home. Anyone can cope with the work, because the process does not require special skills and knowledge. The homemade device is in no way inferior to its purchased Chinese counterpart.
Method 1
First you need to determine the size of the box, which will later serve as a place to store the sock organizer. Based on the obtained parameters, a box is selected. Ideally, the width and length of the cardboard product should be 1 cm less than the box. In the future, the cardboard frame will be covered with wallpaper, which will increase its thickness by several millimeters.
 From the bottom of the box you need to measure up a distance that will be 1 cm below the height of the box. This interval is marked with a pencil along the perimeter of the entire cardboard. The marks are then connected and turned into one continuous line.
- Then the box is cut according to the marks made. The work is carried out with a ruler and a stationery knife. Thanks to such simple manipulations, the basis for the organizer is ready. The cut parts do not need to be thrown away. They make excellent partitions.
- The next stage involves wallpapering. You can immediately process the bottom of the cardboard or insert a separately pasted liner corresponding to the area of the base.
- Then they begin to prepare the partitions. You need to know exactly the size of the organizer cells.Based on these parameters, the separators are cut out. They must be equal to the length, height and width of the box.
- Partitions should be covered with wallpaper. Grooves are also provided for connecting the dividers to each other. To increase the strength of the partitions, it is recommended to take a strip of wallpaper slightly wider than cardboard blanks. The excess material will need to be glued to the cardboard frame.
- When all the parts are ready, they are placed inside the box. For fastening, use glue or a stapler. The organizer must dry, and then it can be safely put into operation.
 From the bottom of the box you need to measure up a distance that will be 1 cm below the height of the box. This interval is marked with a pencil along the perimeter of the entire cardboard. The marks are then connected and turned into one continuous line.
Method 2
 First you need to strengthen the cardboard box. To do this, it is covered with masking tape. Next you need to make the internal parts, which will require thick cardboard. The width of the partitions should not exceed the height of the box. The number of inserts is determined by the dimensions of the organizer.
- It is necessary to make cuts on the partitions. They occupy half the height of the strip and are located every 5 cm. With their help, the liners are connected to each other. The whole box is treated with fabric. It is secured with a stapler or masking tape. The partitions can be immediately covered with satin ribbon. This will add aesthetics to the finished product.
- When all the parts are ready, they are placed inside the cardboard frame. At this point, the organizer is considered complete. Additionally, you can decorate the product at your discretion. For this, satin ribbons, lace, beads, seed beads and other decor are used.
 First you need to strengthen the cardboard box. To do this, it is covered with masking tape. Next you need to make the internal parts, which will require thick cardboard. The width of the partitions should not exceed the height of the box. The number of inserts is determined by the dimensions of the organizer.
 0
0