It's hard to imagine an autumn wardrobe without a coat. The classic model never goes out of fashion and looks very feminine. She is able to complete the image and emphasize individuality. This season, the most popular is a light coat without lining in a casual style. It is easy to sew, and looks no worse than the traditional style with lining.
Master class: sewing a demi-season coat with your own hands
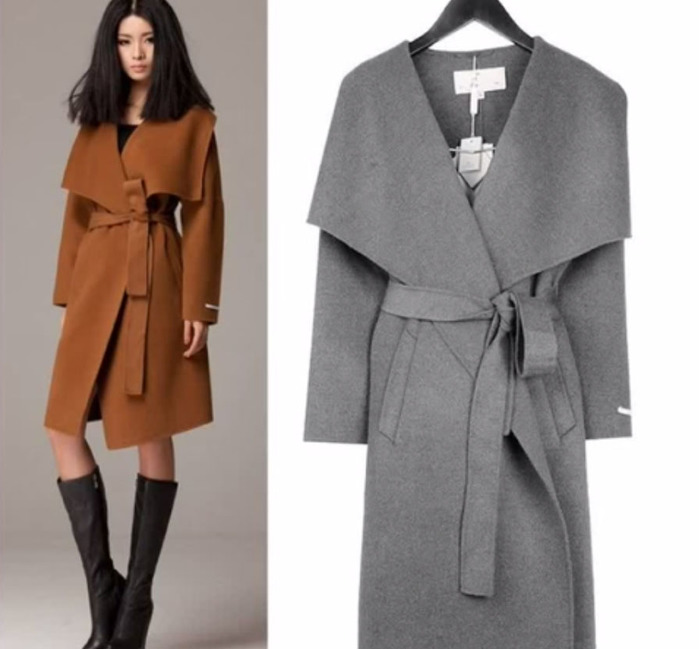
In this article we will look at how to sew a demi-season coat without lining with your own hands. For beginning dressmakers, it is better to use “non-flowing” fabrics. In this case, you can leave some cuts unprocessed or choose the current model with cuts outward. It is recommended to use loden, broadcloth, tweed, boucle, wool or cashmere are also suitable.
Materials, tools
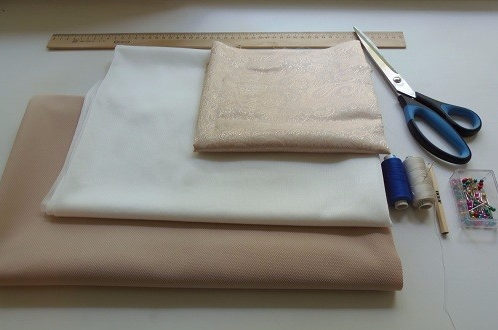 To sew the coat, we chose double-sided textured knitwear. This is a fairly dense fabric, so the absence of a lining will not spoil the appearance of the product.It also contains wool, so it will not only be beautiful, but also warm. To give rigidity to the sides we will use adhesive fabric - dublerin. Instead of dublerin, you can use non-woven fabric.
The tools we need are:
- sewing machine;
- overlock (not necessary if the sewing machine has a zigzag stitch);
- iron;
- scissors;
- pins;
- tape measure;
- tracing paper or graph paper;
- pencil;
- chalk or soap.
Pattern
Since we settled on a simple model with one-piece sleeves, no darts and a simple collar, our pattern will be simple. First, let's take measurements of the hip circumference and length of the product.
Taking graph paper, we build the details of the pattern:
Back
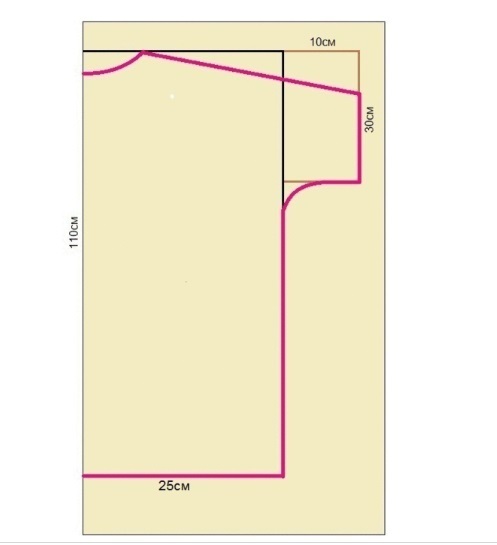
- From the top left point to the right we set aside the hip circumference measurement / 4 + 3 cm (to fit loosely); and down from the same point we put the length of the coat. Using the obtained points we draw a quadrilateral.
- Next, we build the back part of the one-piece sleeve. From the upper right point of the quadrangle we put 10 cm to the right and 30 cm downwards. Using these points, we build another small quadrangle. If desired, the sleeve can be modeled by changing its length or width.
- We outline the neck. From it, at an angle to the sleeve, we build a shoulder bevel. We connect the lower part of the sleeve to the side with a smooth line.
- Cut out the pattern.

Shelf and collar
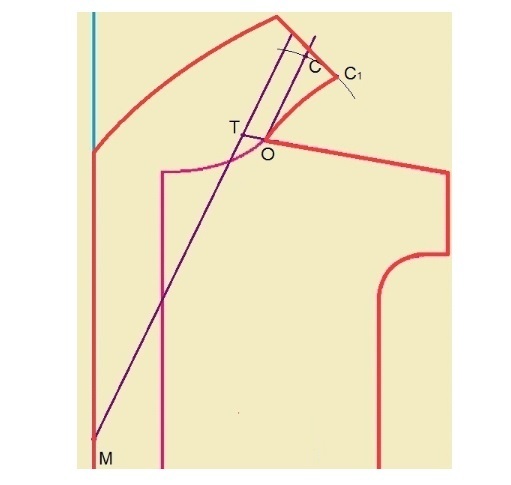
- We take the back pattern and apply it to graph paper, retreating 15 cm from the left edge. We extend the shoulder section towards the neckline by a couple of centimeters. On the front cut, “by eye” we determine the point of connection of the shelves (i.e., where the coat will be wrapped). Then we connect this point with a line to the point obtained from extending the neck. We have created a lapel fold line.
- From the intersection of the neckline and the shoulder slope (point 1) make a line parallel to the fold of the lapel. On it we will put 9 cm (point 2) at the intersection of the neckline and the shoulder bevel and build an arc with a radius of 9 cm.
- Then from point 1 we set aside 2 cm (this is the height of the goal post), put point 3. Connect points 1 and 3 with a small arc.
- From point 3, draw a perpendicular line to line 1–2 and set aside the width of the collar. We connect the resulting point and the left slice with a smooth line.
- The front part of a one-piece sleeve: the width of the sleeve is equal to the width of the armhole, the length is the desired length as on the back part.
ATTENTION! Before cutting, the fabric must be washed and ironed or wet-heat treated to avoid shrinkage of the material on the finished product.
Uncover
Back and shelves:
- Fold the fabric in half. Attach the back part to the fold, pin it with pins, and outline it with chalk.
- Add another 2 cm to the seam allowances on all sides (except for the bottom), and add 5 cm to the hem along the bottom. Trace with chalk and cut out.
- Attach the details of the shelf to the fabric folded face to face, pin it with pins, trace it, add allowances (2 cm each, bottom 5 cm), trace it again, cut it out.
Pick:
We fold the material face to face, apply the shelf detail, outline only the hem (lapel, collar and a piece of shoulder bevel). Use a curved line to connect the bottom and top edge. Trace, add allowances, cut out. We cut out two more parts of the lining from dublerin.
We cut the belt and pockets directly on the fabric:
- Belt 160 cm long, 12 cm wide (including allowances).
- Pockets 20 cm x 25 cm (including allowances).
IMPORTANT! If fabric with a pattern or pile is used, you need to pay attention so that when cutting they have the same direction.
In total, we got: one back piece, two shelves, four hems, two sleeves, a belt, four pockets.
We sew a coat step by step
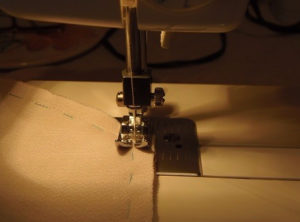
- We process all the edges of the parts using an overlocker or a zigzag stitch, having previously selected the length and width of the tie on a piece of fabric.
- We glue the lining with double tape.
- We connect the hems with the shelves along the collar line with pins, lay a basting line, grind, and iron the seams.
- Similarly, we connect the shelves and edgings along the front edge. We cut off the corners of the allowances and turn them inside out. Iron the seams. You can lay a finishing stitch at a distance of a couple of millimeters from the edge.
- We lay a basting stitch, connecting the shelves to the back along the shoulder seams. We grind. Let's iron.
- We baste the collar to the back, sew it on the machine and iron it.
- Sew the side seams.
- We bend the bottom edge of the sleeve by 1 centimeter, lay a basting line, bend it again by 2 centimeters, and machine stitch it. Let's iron. Sew the sleeves together and press the seams.
- We sew in the sleeves. We lay a basting line along the cuff line of the sleeve. We insert the sleeves into the coat face to face. We connect the two parts with pins, carefully straightening the sleeve gathers. We make a basting line. Turn it inside out. Let's try it on. If everything is good, we grind it on a typewriter. Let's iron.
- We work on the bottom of the product. We turn it 1-1.5 centimeters, baste it, iron it, turn it another 3 centimeters, baste it, iron it, machine stitch it. Let's iron. We lay a decorative stitch, stepping back a couple of millimeters from the edge.
- Glue a strip of dublerin to the top of the pocket.Place the 2 pieces face to face. Sew the top edge at a distance of 0.8 centimeters from the edge. Turn it inside out. Iron the seam on one side. Since we use the same material as lining here, it doesn’t matter which one. Sew the side and bottom edges using a zigzag stitch. Carefully iron the seam allowance (about 1 centimeter) inward. We do the second pocket in the same way.
- We sew the pockets with basting ties to the coat. We machine stitch at a distance of a couple of millimeters from the edge of the pockets.
- Sew on loops to attach the belt.
- We sew the belt, turn it inside out, and iron it. If desired, you can add a finishing stitch by stepping back a couple of millimeters from the seam.
- Iron all seams and joints. The coat is ready.
Some tips
As can be seen from the description, sewing a coat without a lining on your own is quite possible for a novice seamstress. And finally, a few tips to help make this process easier:
- be sure to iron all seams after each stage;
- Before laying the outer stitch, the parts must be thoroughly ironed and basted to avoid the fabric slipping and, as a result, unevenness of the stitching;
- It is more convenient to lay the outer decorative stitch using a special foot for a sewing machine with a ruler, then the stitch will lie at the same distance from the edge along its entire length;
- before sewing the belt, you should check whether it is tight enough and, if necessary, reinforce it from the inside with doublerin;
- if the length of the material does not allow you to cut out the entire belt, you can break it into two parts and then sew them together;
- Belt loops should be 1 - 1.5 centimeters larger than its width.


 0
0