Sewing clothes is not that difficult. When you have mastered the basic knots needed in sewing a dress, you have a proven pattern, the most interesting stage will be the correct fit of the sleeve. The beautiful shape of the edging and the absence of inclined creases will give your creation the appearance of something sewn by a professional.
Features of sewing sleeves to a dress

The order of sewing depends on the type of cut. And there are a lot of them in modern clothes. In a dress model, the cut of the product can be:
- set-in single-seam, medium volume with one middle seam;
- two-seam, two seams are located near the front and back rolls of the sleeve. This cut is also used on jackets;
- shirt is also single-seam, but of larger volume;
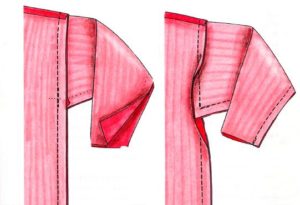
- one-piece with shelf and back;
- raglan, similar to one-piece, small volume.
The most common is the set-in sleeve with one seam. The first foundation that is designed for an individual figure is built with this particular cut.
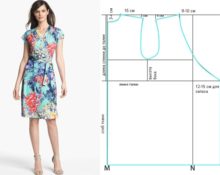
In most cutting systems, in addition to the point of the height of the roll, the points of the front and back roll are applied to the armhole.If you look at the finished product from the side, the ridge lines will limit the sleeve vertically. The upper section of the armhole between the front and rear ridges is made with a landing on the side of the ridge. In other words, this section of the collar is several centimeters longer than the corresponding section of the bodice.
Reference! This difference depends on the desired type of product, fabric and size of the girl.
What you need for work
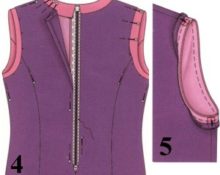
To sew everything on, you need to assemble the bodice and sleeves separately. The shoulder and side seams of the bodice are sewn and overcast, and all darts are connected. You can sew a stitch along the armhole line or glue an edge to prevent stretching. Two parallel lines are laid along the edge line: the first at a distance of 0.5 cm from the edge of the edge, the second at 1.5 cm. The length of the lines is from the front to the back roll.
Reference! One of the threads should be loosened. After sewing in the sleeve, the temporary stitching is removed.
For a single-seam sleeve, the middle seam is sewn down; for a two-seam sleeve, the seams of the front and back roll are sewn down. All allowances are ironed or ironed (according to the model), hems, neckline and fastener are processed.
Important! Ironing the product after each operation is one of the conditions for a neat appearance in the end.
The last step in preparing for stitching will be to fit the top of the edging. Carefully tighten the unloosened threads of the temporary stitches. The length of the edge should ultimately be equal to the length of the armhole of this section.
How to properly sew a sleeve into the armhole of a dress
All parts of the dress are prepared for assembly, and important points from the drawing are marked on the details when cutting. You can start connecting the sleeves to the bodice of the dress.
We find the height point of the edge and connect it to the beginning of the shoulder seam on the armhole, pin it together.
We connect the front roll point on the armhole with its analogue on the other part of the product. The fit is distributed so that most of it is closer to the shoulder seam. We pin it with a pin.
We also connect the dots on the back of the collar and the armhole of the back. The landing on the back should be larger than on the front, because the length of the sections is longer.
We combine the connection of the middle sections of the sleeve with the side seam of the dress. If the side seam of the dress (according to the model) is offset, there should be a notch corresponding to the position of the middle seam of the sleeve.
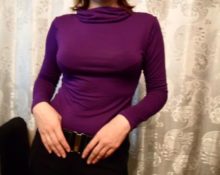
After pinning all the points, the dress can be basted and tried on. When trying on, you need to make sure that everything is done correctly: the dress fits without vertical creases, it is comfortable to move, and the volume of the product suits you. Only in this case can you make a sewing line.
The stitching operation should be done from the armhole side, this makes it easier to correct the fit under the sewing machine needle.
Important! You need to sew in the right sleeve from the point of the back roll to the middle seam of the sleeve. The left one, on the contrary, is from the middle seam to the rear roll. Thus, on the lower section of the back of the armhole there will be two stitching lines. A very useful addition to the stitching operation; if the stitching breaks during a sudden movement, it is precisely in this part of the armhole.
After connecting the main parts of the dress, the temporary stitching stitches for the edging are removed. The armhole is overcast or edged (according to the model). In the future, another dress may differ in model features, but the basic rules of stitching for a one-seam, non-voluminous cut will always be the same. Happy sewing!
 0
0