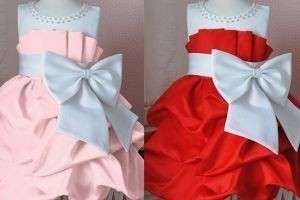
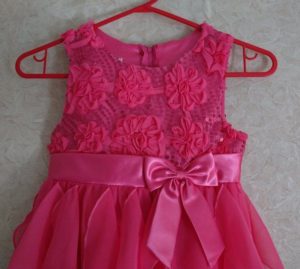
Among the classic decorative elements of clothing, the bow occupies a special place. It looks equally successful and appropriate on ballroom, cocktail, casual and wedding dresses. In addition, it can be accessed at any age. To create an interesting and competent image, you just need to choose the right place to place the decoration. So how do you tie it?
Where can you place a bow on a dress?
The following parts of the outfit are traditionally decorated:
 waistline (front, side or back);
- neckline (a wide bow will visually enlarge the breasts, a small centered one will attract attention);
- sleeves (usually short, puffy);
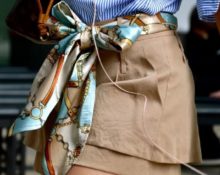
- on the belt (the decoration disguises the clasp);
- chest (the accessory acts as a brooch);
- on the straps of a dress (to hide or decorate them);
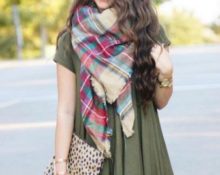
- on the neck or neck (instead of a tie, bow tie, scarf);
- on the shoulder (the decoration imitates a strap or replaces it);
- hem (a detail often present on empire style dresses and ball gowns).
 waistline (front, side or back);
A sewn bow is a decorative element that looks good not only on the waist, sleeves or chest. Sometimes the entire dress is decorated with small, neat bows. With this approach, the parts are placed at a distance from each other. The result is a convex volumetric ornament.
The bow can also act as a complementary element to the design. It is placed on the necks of embroidered kittens, on the heads of girls and on tree branches. Moreover, a similar motif is found not only on children's sundresses, but also on outfits for adult women. If you're the latter and have a backless dress in your wardrobe, try hiding the sides and bra clasp with a very wide bow.
Ways to beautifully tie a bow on a dress
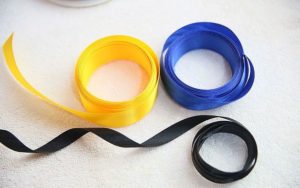
 Ribbons of different widths are used to decorate the outfit. Based on this feature, wide (width more than 5 cm) and narrow (less than 5 cm) options are distinguished. When using the latter, small, neat decorations are obtained. They look better on the side of the chest, straps, sleeves and hem. Wide cuts are traditionally used to drape the neckline and waist.
It is also worth considering the properties of the material. A complex design, in which the “ears” must hold their shape well and not fall off, is not built from satin and similar fabrics. But the material allows you to beautifully design the flowing ends and loops.
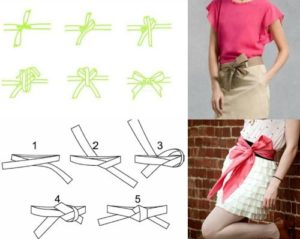
Simple bows
The principle of their creation is similar to tying shoelaces. A single knot is made and 2 loops are formed, which are then crossed. Then one of them is threaded into the “hole” created during the crossing.
Second method:
 tie a single knot;
- form a loop;
- wrap the second end around the loop and thread it through the knot;
- tighten.
 tie a single knot;
Complex bows
Their creation requires not only more time, but also materials and tools. Scissors will definitely come in handy. English needles will also come in handy. It’s worth stocking up on a needle and thread.
Bow flower
 To obtain such decoration, thin ribbons not made of flowing materials are more suitable. If you take a wide cut, then do not make the bow too large - the “petals” will begin to hang down, and the required design will not work. You will also need a second tape, even narrower. It is wrapped several times in the middle of the bow to secure the structure.
Important! Ribbons whose edges are trimmed or decorated with decorative coating hold their shape better.
Take the ribbon cut from the skein and fold it lengthwise several times. You will get a multilayer rectangular block. Pinch it in the middle with your fingers and then fold it in half, end to end. The place where the finger lay will become a fold. It needs to be cut off at an angle (do not cut too deep, otherwise the structure will fall apart).
Next, you need to straighten the workpiece along the fold line and thereby return to the position in which the finger lay in the middle of the rectangular bar. Now the figure will have recesses in the center at the top and bottom. A second, narrower tape will lie along these notches. With its help, the bow is fixed in the middle, and then on the person’s belt.
At this stage, you get a very basic bow shape, but not a flower. To give the final shape, you will need to pull out the loops that were formed by folding the tape multiple times (see step 1).
Important! If there are too many “petals” or they lie too tightly, the structure may fall apart. To prevent this from happening, the tape used for fixation must be strong and tightly tied.
The flower bow can be tied in another way. Moreover this method is much easier. For it you will need a ribbon, scissors and a needle and thread.
The essence of the technique:
 cut the tape into several parts (when determining the number of elements and the size of each part, keep in mind that in the future these cuts will become petals);
- form individual petals from the cut parts (just fold them in half and secure the ends with a stitch);
- combine the “petals” and decorate the flower;
- sew;
- mask the seam with tape (wrap the bow blank several times in the center);
- use the free edges of the masking tape as ties.
 cut the tape into several parts (when determining the number of elements and the size of each part, keep in mind that in the future these cuts will become petals);
The last step is optional. If desired, the remaining ends can be shaped into a false loop.
With one loop
Place a piece of fabric around your waist and make 2 loops of the same size from the ends. Wrap one around the other, thread it halfway into the knot. This will create 1 “eye” and a half threaded end. The latter must be pulled completely through the knot.
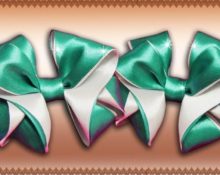
Multi-layer complex and stitched
 You will need 3 ribbons of different shades and sizes. The thinnest one should be placed in the middle of the widest one and secured in places on it (it’s better to glue it). There is no need to fasten along the entire length; a few fixation points are sufficient.
A circle is formed from the resulting multilayer ribbon (the edge is sewn together). Then the circle is placed and ironed so that it forms a rectangle. Its middle is wrapped and sewn with threads, resulting in a simple bow.
Then the process is repeated from the very beginning to obtain a second bow, which will be an exact copy of the first. These decorations are then sewn together in the middle. Then they start working on 3 previously unused tapes.A contrasting bow is formed from it according to the previously stated principle (it should be slightly smaller than the design of 2 bows sewn together). The resulting decoration is placed on top of 2 and fixed in this position with a thread and a needle.
The final stage: draping the core and seam lines using the thinnest ribbon.
Sewn bow - how to make?
Atlas version. Required materials and tools:
- cut size 50x20 cm;
- needle, thread;
- sewing machine;
- scissors.
 cut size 50x20 cm;
Sequencing:
- cut out 3 rectangular parts (dimensions: 15x8, 22x18, 5x8 cm);
- take the ends of the narrow side and fold a 22x18 rectangle in half (the wrong side should be on top);
- stitch the top edge at a distance of 1 cm;
- fold a 15x8 rectangle in the same way;
- sew so that you get a trapezoid (shown in the picture);
- iron the free edges of the trapezoid in different directions;
- turn both rectangles right side out;
- fold the larger rectangle in half in the middle;
- stitch along the side (at a distance of 1 cm from the edge);
- cut off the excess fabric separating the seam from the edge (cut 6–7 mm from 1 cm);
- squeeze the same rectangle with your fingers in the middle (give it the appearance of a bow);
- Secure the resulting shape with threads;
- fold a smaller rectangle, sew on a machine and turn it inside out;
- close the edges with a machine stitch;
- wrap a smaller rectangle around the bow blank;
- sew the resulting core;
- insert your finger between the smaller rectangle and the bow blank;
- Instead of a finger, place a trapezoidal piece, it will become the hanging ends of the decoration.
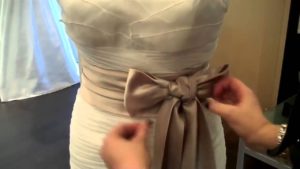
How to tie a bow on a girl's dress?
Sequencing:
 make a single knot;
- from the end that is below, we form a loop;
- With the little finger of the hand with which we hold the loop, we press the central knot so that it does not come apart;
- with the other hand we take the end of the tape that is on top;
- With this end we circle the loop from top to bottom, and then we direct it into the loop and bring it up;
- Align the edges, core and sides of the resulting decoration.
 make a single knot;
The double pinned bow is formed differently. Algorithm of actions:
- retreat 10 cm from the edge of the tape;
- Place the place where the indentation ends on the open palm;
- we lead the tape up and circle the middle finger with it (from top to bottom);
- then we circle the nameless one (from top to bottom);
- circle the middle finger again (the loop should lie next to, and not on top of the previous loop);
- circle the nameless one;
- circle the middle one;
- cut the tape, 20 cm away from the middle finger of the tape;
- We insert the end formed after cutting into the gap between the middle and ring fingers (you need to penetrate from the side of the palm), wrap it and bring it to the previous position;
- tighten;
- remove the resulting bow from your fingers and straighten its loops;
- pin or sew to the outfit.
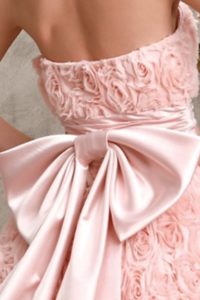
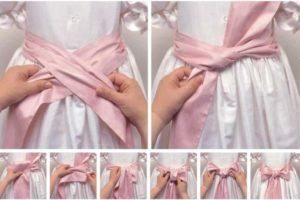
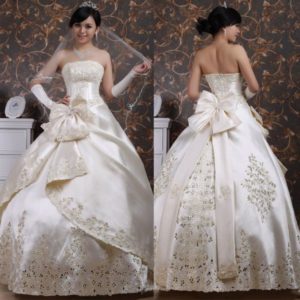
Bow on a wedding dress: examples
Method with wrapping around the waist:
 circle the front of the dress with ribbon and bring the ends back;
- cross the ends and send them forward;
- take it to the side;
- cross the ends, but not near the waist, but stepping back a little;
- tie a single knot;
- form a loop from the upper end;
- use the second tip to circle this loop, thread it through and bring it out;
- straighten the loops and core.
 circle the front of the dress with ribbon and bring the ends back;
This method requires a wide tape. When choosing a color for it, proceed from the fact that a lighter spot makes you look fatter. Therefore, for a double-encircling bow, you should take fabric darker than the tone of the dress.
Important! The idea for the color of the ribbon belt can be emphasized from the bride’s bouquet, the color scheme of the interior, the groom’s tie or the bridesmaid’s outfit.
 0
0