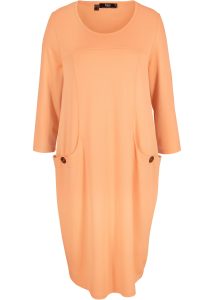
This type of dress is suitable for any figure. Anyone can sew a “balloon”, even a beginner in this matter.
For the dress we will need a small piece of material (the length of the sleeves plus the length of one item). Measure 22 cm. It is better to let the fabric be a little longer.
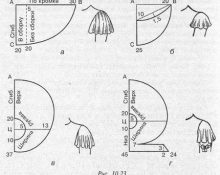
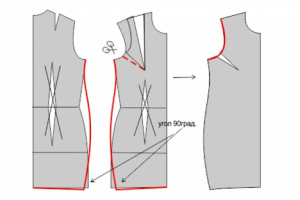
Attention! For the calculation, you need to take the largest coverage. Therefore, it is better to start with the hips or chest. The picture shows a pattern with increases (size 50).
A little advice: Before you start building the cut out part, pay attention to the figure. If the dress is made as a gift, take into account the nuances (for example, if a woman has full hips, the skirt should be fuller and slightly below the knees).
If your back is narrow and your chest is large, it is better to move the side seams to the back.
Stages
We start sewing the item from the base blanks of the product. The relief parts need to be stitched, then comes the middle seam of the back itself, the shoulders and the side lines.
The gaps are covered. This depends on the thickness of the future line.
If the fabric is based on knitwear, cut along the shoulder seam. It can prevent the dress from pulling out during use.
For the edge, you can choose thin braid or regular tape. The prepared base will help with the pattern of parts.
It is necessary to duplicate, warp and grind the ends. Seam allowances must be ironed. The facing is sewn along the cut from the outside.
Let's move on to the dress itself. We grind all the edges and the base. To do this, you need to put the central part and the facing on top of each other. Align them along the cut of the neck itself.
To make it more convenient, you can pin the base with a pin. Next, fasten them together using a machine stitch (the distance should be no more than 4 mm from the cut itself).
The seam allowances are distributed on the rounded part. In several parts it is necessary to cut the base with scissors.
A finishing line is laid along the neckline; the basting threads must be removed.
The neckline is ironed from the inside of the dress.
Let's move on to the edges. The flying part must be secured along the seam. You also need to walk through the central part. Make a few invisible stitches and prepare the panel for the skirt part.
Draw a raised line on the front and back of the skirt. The seam is ironed.
Panels prepared in advance are ground along the side cut. The seam allowance is ironed. The lining for the skirt is prepared in the same way.
Penultimate stage
Then the top of the skirt is connected to the lining part. To do this, you need to chop it face to face and fold it along the cut of the lower part. The accompanying seams are combined with each other.
The parts of the dress are fastened with machine string (the distance should be 10 mm from the cut). The pins should be removed.The seam allowance is carefully pressed to the lining side.
The turned skirt is prepared for joining the remaining fabric. First, each layer is pinned together. The prepared skirt is stitched to the base of the dress (width 1 cm).
The seam allowance must be overcast and ironed on top. If desired, a finishing line is placed along the seam.
Next we move on to finishing the sleeves. We prepare them in advance. On the lining and top parts, iron and grind the bottom seam.
Then the lining is stitched on top and the cut is connected to the skirt. We carefully sew everything up with a control stitch.
The prepared sleeves need to be sewn into the armhole of the product. It is necessary that the stitching width be no more than 13 mm. Finish the pass using an overlocker and iron it onto the sleeves.
Conclusion
Once the balloon dress is ready, iron it thoroughly from the inside and outside with an iron. Sewing a balloon dress at home is quite simple - just take your time and you will succeed.
 0
0