 Wrap dresses are particularly feminine and elegant. Many girls prefer this style, as it does not restrict movement, is distinguished by its versatility and favorably emphasizes the figure. Some representatives of the fair sex are engaged in sewing their own wardrobe items, creating unique and unusual outfits. You can sew a wrap dress with your own hands with minimal time investment.
Required measurements
In the process of preparing for further work, not only tools are required, but also measurements. At this stage, it is important to determine the style of the finished product: take into account the features of the sleeve, back (open or closed), length.
Required parameters
- Half neck circumference;
- back width;
- half chest circumference (removed above the chest, the tape passes through the armpit area);
- half-chest circumference (removed at the most protruding points of the chest, the tape does not move from the shoulder blades);
- shoulder width;
- half-waist circumference (place the sewing meter on the narrowest area of the waist);
- semi-circumference of the hips;
- length of the product.
If there are sleeves, additional measurements will be required.
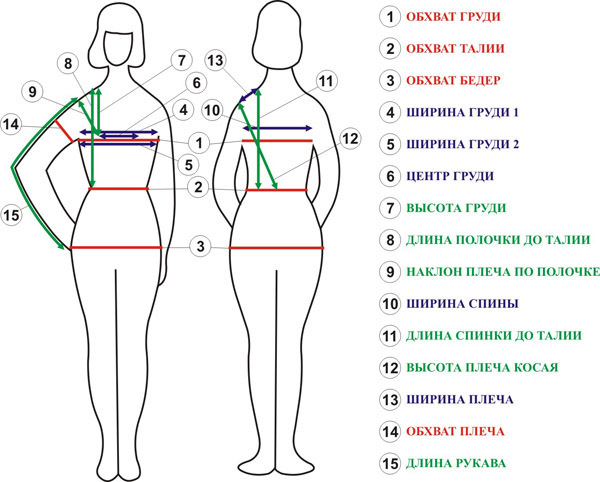
Measurements
- Shoulder circumference;
- the length of the sleeve;
- wrist circumference (with long sleeves);
- armhole width;
- armhole height.
Pattern based on ready-made patterns
You can prepare patterns for a wrap dress based on existing blanks.
The basis
Suitable for base sheath style dress pattern. To do this, the front part will need to be divided into two halves, since the product consists of three main parts.
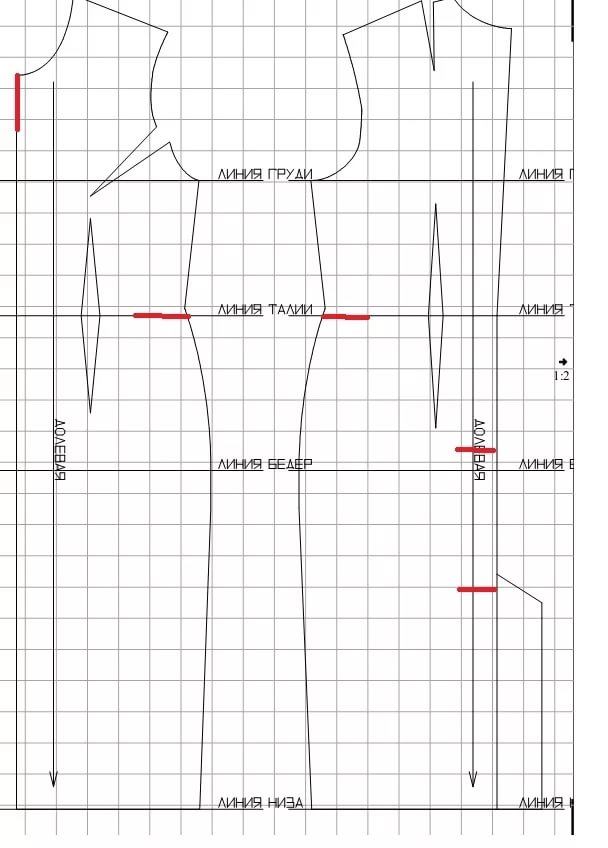
Attention! When preparing product components, seam allowances should be immediately calculated.
- On the front part it is necessary to mark the neck area. The depth of the cut depends on personal preference. A diagonal line is drawn from the cut on the left half. In order to make both halves the same length, the diagonal must be made with a slight slope.
- The right half is located on top. A diagonal line is laid from the neckline to the belt line. The lower diagonal is drawn in the opposite direction. Thus, a kind of triangle is obtained when constructing the right half.
Reference: To build the back and sleeves, existing blanks from a dress of a different style will be useful.
Pattern modeling
Creating a dress using individual patterns will allow you to sew a unique outfit that is suitable for any occasion.
Tools:
- whatman;
- pencil;
- ruler;
- scissors.
Completing of the work
We'll tell you step by step how to build a pattern.
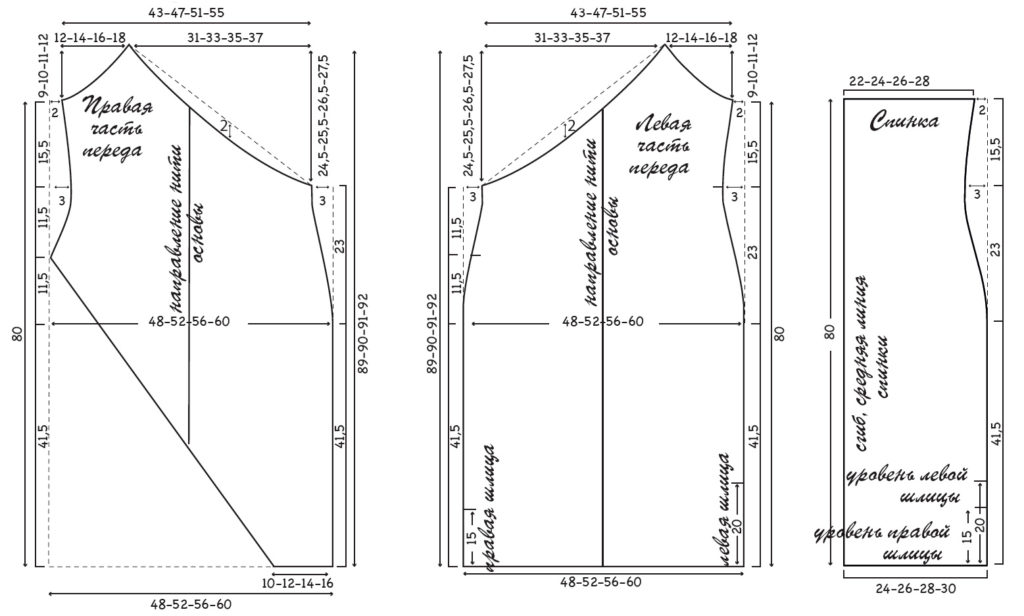
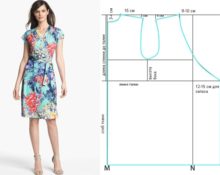
A rectangle is constructed on the sheet. We put points, the distance between which is equal to the width of the shoulders. When forming the neck area, the line can be made slightly rounded. A horizontal line is drawn from the points according to the parameters of the desired length. The bottom line is outlined.On the sides you need to add an armhole area for the sleeves. When marking, the half-circumference of the width is used, and the height is outlined. The back area is ready.
The second stage is the construction of the front shelves. To do this, the points for the location of the shoulders are outlined. From them, on one side, the sleeve area is built using the parameters of the armhole. From the point you need to set aside half the width of the shoulders and place a second point. This is where the cutout begins. The depth is formed in accordance with personal preferences. When preparing the left shelf, a vertical line is drawn from the waist line down, and a bottom line is formed. The part is ready.
The right half of the shelf is cut differently. A few centimeters are set aside from the waist line for the smell area. After the necessary calculations, a vertical contour is outlined and a bottom line is formed. The top point, indicating the beginning of the cutout, is connected by a smooth line to the beginning of the smell area.
Note: The size of the scent is selected according to personal requirements. The best option would be 12–15 centimeters.
The final stage is cutting out the belt. Width and length are selected individually. You can also add pockets, form a voluminous sleeve, outline the drawstring area for the elastic. Some girls add darts at the waist or back to make the dress fit more tightly to the body. The hemline can be supplemented with a vent if the dress is below the knee.
Sewing a dress
After fully preparing the patterns, you can start sewing.
Tools
- Fabric for dress;
- pencil;
- scissors;
- pins;
- iron;
- sewing machine.
Work algorithm
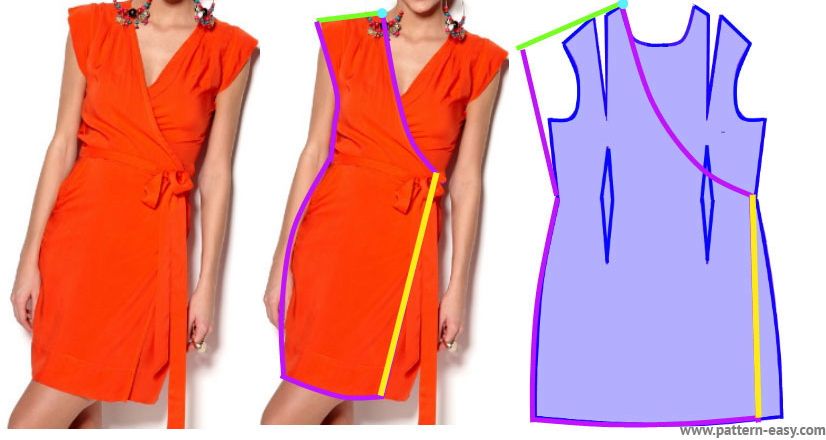
- The pattern components are transferred to the fabric. Use a pencil to outline the outline for future seams. If the patterns were prepared without allowances, they must be added. All parts are carefully cut out.
- Before using the sewing machine, it is recommended to fasten all parts of the dress together with pins and try them on. Such actions will help to correct errors in time and correct the length.
- After checking, we move on to the technological process. The edges of the shelves must be finished with a zigzag stitch. This will help avoid subsequent fabric crumbling.
- Shoulder seams are sewn down. In addition, it can be treated with an iron subject to temperature conditions.
- If there are sleeves, the side seams are attached. The sleeve is inserted into the armhole, hand-stitched or secured with pins. When the fit is correct, we sew it on by machine.
- The side stitches are also sewn with a zigzag stitch. The second side of the dress is processed in the same way. It is recommended to sew the hemline by hand. Many experts recommend using glue web, which makes the process easier. It is attached with an iron.
- The belt is folded in half from the wrong side. A line is laid along the entire length with a minimum pitch. You can use the manual method. One side must be left unhemmed in order to turn the product right side out. Then carefully stitch it.
- The belt is sewn to the dress depending on personal desires. Some girls place the long edge on the right side and hide the left one under the wrap. If you choose this option, you will need a small incision for easy tying.
A wrap dress is one of the must-have elements in a woman's wardrobe. This style is particularly comfortable and elegant at the same time. Self-sewing requires a minimum of actions and knowledge, which allows even a beginner to cope with the work. A few tips on pattern making and sewing will help you create a unique outfit.


 0
0