 The dress has deservedly received the status of the most popular and sought-after element of a woman's wardrobe. Many girls, using certain skills, sew them themselves. This product not only has a unique and attractive appearance, but also fully matches all the nuances of the figure.
The process of creating a straight dress is one of the simplest and easiest, which will allow every girl to cope with it. We will tell you how to make a straight dress pattern.
Basic pattern
When working, special precision must be observed so that the finished version fits the figure exactly.
Taking measurements
Taking the measurements necessary to properly construct the dress is the initial step.
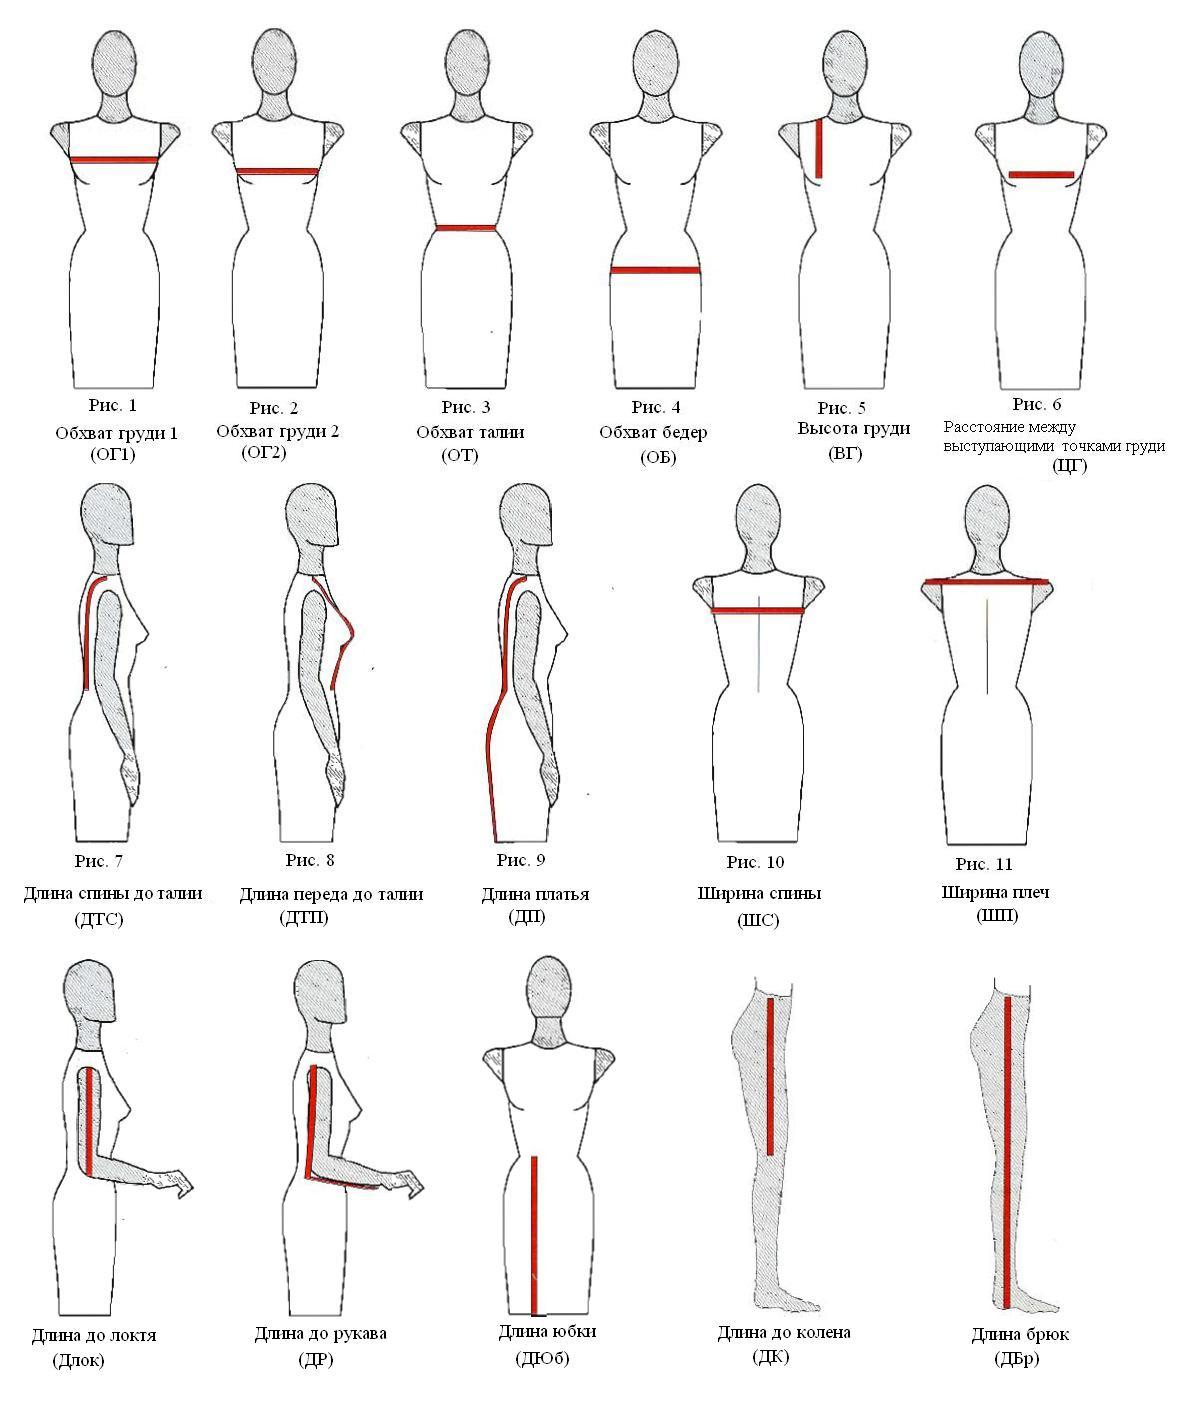
The following parameters are required.
- To start determine the length of the finished dress. This will require a length from the base of the product (throat area) to the desired result. It can be anything, depending on personal preference: a little higher or to the knee, mid-calf or to the floor.
- Chest area is one of the most difficult to build. To work, you will need a half-circumference under the chest, as well as a half-circumference at protruding points.
- For neck cutting required neck girth. Here you can adjust the parameters by adding a few extra centimeters. This will help create a looser or more voluminous collar.
- Shoulder width will help you create the exact size of the finished wardrobe item. To clarify these measurements it is necessary length from base of neck to end point. The length may vary depending on the dress model.
- In order for the product to fit correctly and easily to the figure, it is required waist circumference. At this stage, extra centimeters are also added. The dress can be fitted, completely fitting, or loose-fitting.
- We must not forget about semi-hip circumference. This indicator is measured at the most prominent points of the buttocks. Here it is also possible to adjust the size of the product using additional indicators. When adding, you should be guided by the numbers obtained from the measurements of the previous point.
- Despite the fact that the dress is made without sleeves, it is necessary to outline the location of the armhole - the opening for the arms. This will require arm circumference. To ensure that the seams do not press or rub in the armpit, you should add a few centimeters.
Making your own pattern
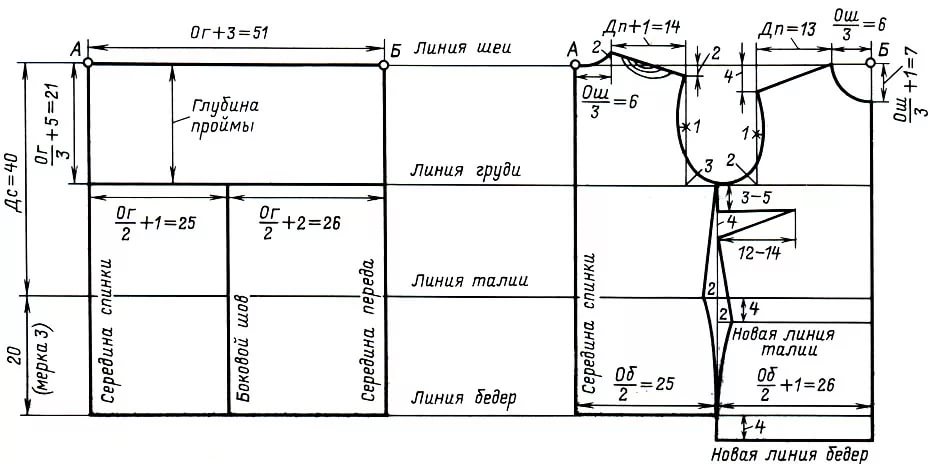
After specifying all the necessary parameters, you can proceed to creating a pattern. This model is basic. It can then be used to create a dress with sleeves or a fitted version.
Materials:
- ruler;
- pencil;
- cardboard;
- scissors;
- safety pins;
- fabric for sewing.
Advice: when working, it is recommended to use paper with a centimeter grid already marked.This will help you avoid mistakes when constructing.
Before modeling, you should decide on the number of parts. A sleeveless straight dress can consist of two parts - front and back, one front and two back parts.
At the initial stage, in the absence of the necessary skills and knowledge, it is recommended to use a lighter option: one shelf and one back.
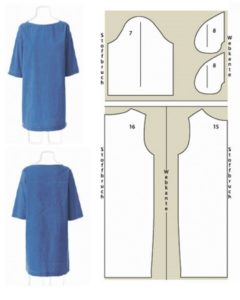
Before
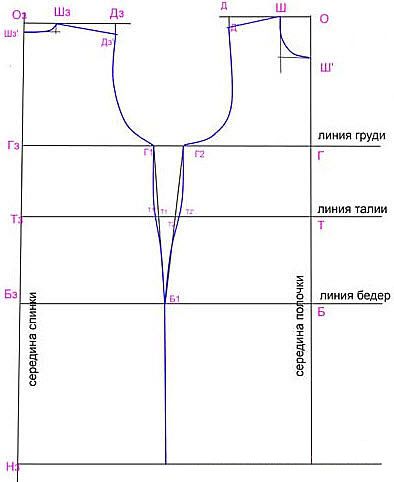
First we make the front part. On paper we mark the location of the shoulder width and draw an armhole from it. From the cut for the arms we lay out the final length of the product. We outline the position of the cutout and make the second shoulder from it. Next we proceed in the same way. The final stage is the bottom line.
Important: When creating a pattern, do not forget about 1-2 additional centimeters, which are spent on allowances and hemming of the bottom.
The diagram shows how to use the resulting dimensions to build a basic framework.
Back
Let's move on to building the back. We note the location of the shoulders, taking into account a possible cut on the back in the neck area. We outline the armhole and make the length. Finally, we make the bottom line.
Both patterns are carefully cut out according to the contours, and then transferred to the fabric.
Modeling based on basic patterns
These patterns are used as a basis for the construction of products of many styles. For example, they can be used when sewing products with a semi-fitting or adjacent silhouette.
Reference: This pattern will also be useful when creating patterns for a blouse, shirt or coat.
Darts
The difference between these styles and straight cuts is the presence of darts. They will help hide excess fabric and make the silhouette more fitted and sophisticated. Data darts contribute to the formation of shapes, located in the chest area, along the length of the skirt and on the back.
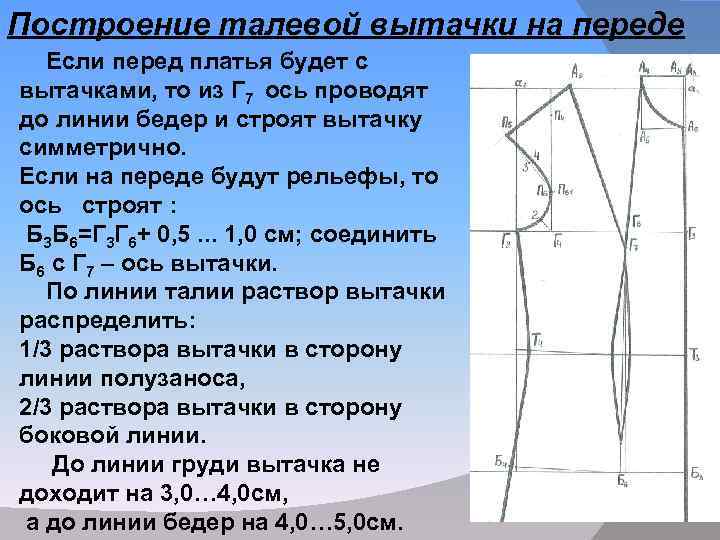
Darts are formed at the initial stage of pattern construction. We retreat a few centimeters from the neck on each side, forming the width and depth of the part. They depend on the chosen style. For a tight-fitting dress, more material should be removed. In the back area, the depth of the darts is several centimeters.
The result is a pattern with darts.

Note: Make sure that the dress does not tighten the body. If calculated incorrectly, using such a product will be uncomfortable.
The base of the lower dart is located at the level of the end of the armhole. The recommended length is approximately to the middle of the buttocks.
Straight dress with sleeves
A dress with a sleeve is no less popular.
Constructing a pattern
The patterns for sewing a dress with sleeves are practically no different from the method described above. The exception is the construction of the sleeve itself. To do this, you need to decide on the length and volume.
IMPORTANT! If the sleeve is long, you should additionally measure the girth of the arm and hand.
The girth of the arm is necessary not only for creating an armhole, but also for sewing sleeves. The indicators must be identical to each other.
Sewing
When the dress pattern with sleeves is ready, you can begin the sewing procedure.
Materials
To sew a straight-cut dress with your own hands, you will need the following:
- patterns transferred to fabric;
- scissors;
- threads;
- needle;
- iron;
- sewing machine;
- additional accessories as desired (for example, lace to decorate sleeves or hem lines).
Completing of the work
- We cut out all the parts from the fabric and fasten them together according to the location of the intended seams. Here
 you can simply baste the components.This stage is necessary in order to correct and eliminate possible errors. Safety pins are also suitable for fastening.
 - Before carrying out work, it is recommended to iron the location of the seams.
- First, make the shoulder seams. This is how both elements of the dress (back and front) are connected to each other. You can immediately draw a neck line. In order to add attractiveness to the dress, a hemming strip is suitable, which is carefully sewn into the neckline area.
- Let's move on to the sleeves. Carefully bending the allowances, sew the sleeve to the armhole. We do the same on the other side. We process the side inner seam, then the lower part.
 you can simply baste the components.This stage is necessary in order to correct and eliminate possible errors. Safety pins are also suitable for fastening.
Attention! In order to avoid deformation, it is not recommended to stretch the fabric too much during the sewing process.
- We connect the sides with a stitch and finish them with a zigzag stitch. It is recommended to use a zigzag, as it prevents possible scattering and crumbling of the material.
- Finally, the design of the bottom line. A zigzag stitch is also used here. For additional attractiveness, the bottom can be trimmed with a lace strip.
At the end of the process, the temporary seams (if any) are carefully removed. The straight dress with sleeves is ready.
No girl can do without a stylish and elegant dress. This wardrobe item will help you create any look, from sporty to evening or feminine. Straight cut products are distinguished by their versatility and are suitable for ladies with any type of figure. A few useful tips will help you create this style yourself.
 0
0