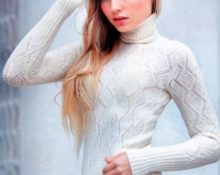
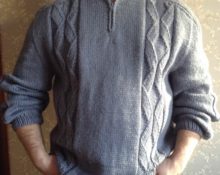
 What caring mother doesn’t dream of knitting the warmest and most beautiful sweater for her son? An item knitted with your own hands will combine both parental preferences in appearance and confidence that the sweater contains exactly the thread you want.
We knit a pullover for a boy with our own hands
Quite often, when buying a product made from natural wool, which is still warmer than acrylic, when you look at the ingredients tag, you will discover the addition of artificial material. And the cost of a good factory wool product, especially from high quality threads (for example, merino or angora wool) is quite high.
Another plus to your collection of self-knitted children's clothes will be the fact that as your baby grows, simply by purchasing the necessary thread, you can knit a sweater, adding the required length and width.You can even unravel any “adult” sweater if you like the quality of the thread and the performance properties of the product made from it, and from the resulting yarn knit your child a sweater, a hat with a scarf, and even warm socks.
Advice! If you want to knit a new item from an old one, you need to prepare a thread that you will unravel from the knitting. To do this, it must be steamed so that the yarn fibers straighten and fluff up.
Usually this is a rather labor-intensive task, but experienced craftswomen have one funny secret. You need to thread the end of the thread into the spout of the teapot, pulling it out of the top round hole, and pour boiling water into a quarter of the teapot’s volume. Then close the top of the kettle with an inverted lid and thus stretch the entire skein over the steam from the hot water.
A pullover is probably one of the most successful sweater models for children, especially for the little ones. The very name of this item of clothing translates as “put on top,” i.e., due to the comfortable neck, you can easily dress up even the most restless baby in such a sweater without causing him any discomfort.
If you knit a pullover for your child yourself, you can choose:
- product color;
- its style;
- patterns and decorative elements;
- quality of yarn and its composition;
- the length and width of the product according to your baby’s measurements.
As you can see, there are only advantages to making a warm sweater for a boy on your own, and the problem is “Don’t you have the same one, only with mother-of-pearl buttons?” will decide by itself.
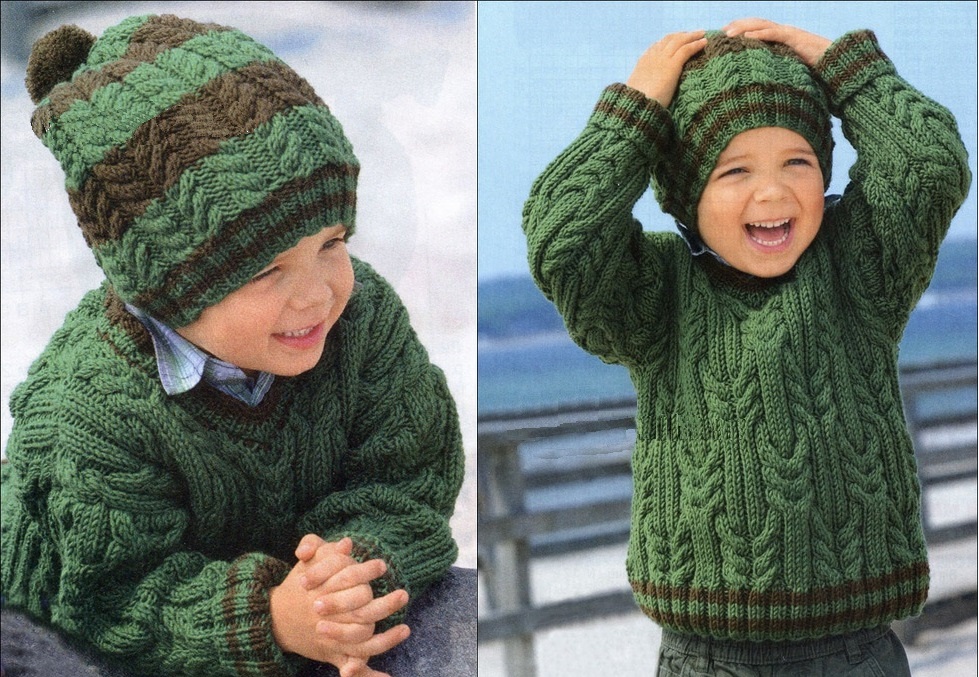
We knit a pullover for a boy (2–3 years old) with knitting needles
For average temperatures in the cold season, a pullover made from semi-synthetic yarn is perfect for a boy.It is also quite warm, but due to the acrylic in its composition, it will significantly save the family budget, since it is cheaper than natural analogues.
Preparation of materials
For size 98/104 (2-3 years) we will need 450g of green and 150g of brown yarn with a composition of 60% wool and 40% polyacrylic. A skein contains 85m of yarn weighing 50g.
Required Tools
- straight knitting needles number 4 and 4.5;
- circular knitting needles number 4;
- hook number 4.
In Fig. 1 shows a pattern that you need to focus on during the knitting process. Beginning needlewomen often transfer such patterns onto life-size paper and apply the product to them during the knitting process.
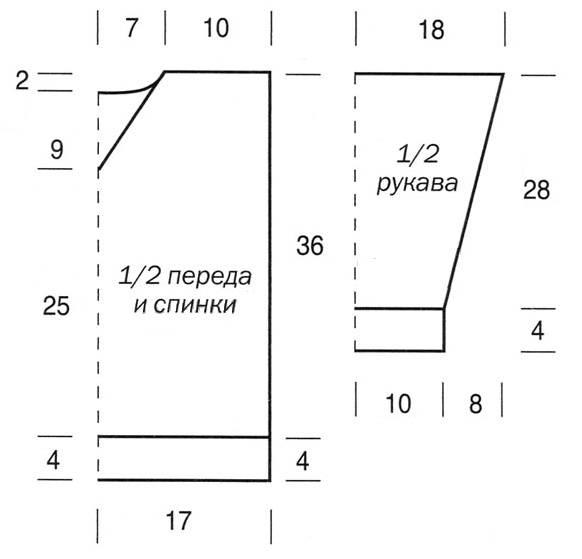
Rice. 1 – Pattern of a pullover for a boy 2–3 years old
Knitting stages
Facial surface knitted according to the well-known pattern: on the front side of the product - facial loops (LP), on the wrong side - purl loops (IP). In rows that are knitted in circular needles, all stitches will be RS.
Purl stitch it is knitted the other way around: on the front side of the product there will be IP, on the wrong side - LP. In rows with circular knitting needles - IP.
Rubber: alternate 2LP and 2IP.
Pattern SPIT 1 knitted 22p wide. according to the corresponding diagram in Fig. 2. On the reverse side of the product we knit according to the pattern. We repeat rapport loops from rows 1 to 28.
Knitting density: for braids on knitting needles number 4.5 – 26p.*22.5r. for an area of 10 cm*10 cm.
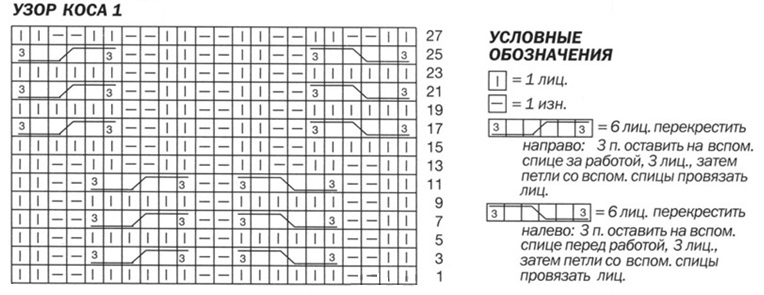
Rice. 2 – Pattern diagram and symbols
Back:
Take a green thread and cast on 74p. on straight needles No. 4. We knit a 4 cm elastic band, changing the thread from green to brown and back every 1 cm. On the last row of ribbing, add 16 stitches evenly.Next, using a green thread in the “Cable 1” pattern with knitting needles number 4.5, retreating one edge loop (KP), we knit the fabric starting from the right edge of the pattern (it is repeated to the left edge of the product). To cut the neckline, 34 cm from the end of the elastic band, close 26 stitches for the neckline. in the middle. Next, we knit the two parts formed separately and close them symmetrically from the center in 2p. once 5p. After 36 cm from the elastic band we close the loops for the shoulder.
Before:
We knit in the same way as the back, only we make a v-neck for the neckline. For this, we close the 2 middle loops 25 cm from the bar and knit the two formed parts of the product separately. At the same time, we close symmetrically along the edge of the cutout in turn in every second row 6*2p. and 5*1p. At a height of 36 cm, close the loops for the shoulder.
Sleeves:
We cast on with a green thread 46p. On knitting needles number 4, knit an elastic band 4 cm long, alternating green thread with brown thread every 1 cm. In the last row of elastic, add 8 stitches evenly. Then we change the knitting needles to number 4.5, knit the pattern after the edge loop, starting from the right edge of the pattern in the diagram. Add 10*1p in every fourth row. and in every second - 11*1p., including new loops in the pattern. After 28 cm from the elastic band, close all the loops.
Assembly:
We make the shoulder seams first. Then we sew in the sleeve, sew the sides of the product and each sleeve along the seam. We tie the neckline with a brown thread using a hook, making one row of single crochets. From the outer part of the columns we cast on 80 stitches on circular needles. green thread, knit an elastic band in one 1 cm strip with green and brown threads. In the middle of the front part of the pullover, symmetrically decrease 1 st from the two central loops. in every second row. Then close the loops.
Bonus! Below we give a diagram and description for knitting a hat, which is shown in the photo with a pullover.
To knit a headdress, we will need another set of stocking needles numbered 4 and 4.5.
Pattern BRAID 2 16p wide. Knit according to the corresponding pattern in Fig. 3, in even rows on circular knitting needles we knit according to the pattern. Rapport loops are repeated from rows 1 to 4. We alternate green and brown threads every 12 rows.
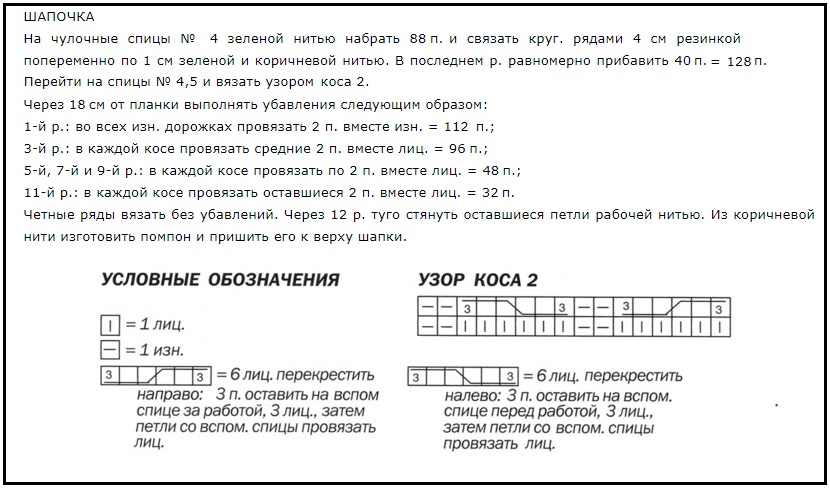
Rice. 3 – Pattern diagram and description of the process of knitting a hat for a boy
Knitting a pullover for a boy for different ages from 5 to 11 years
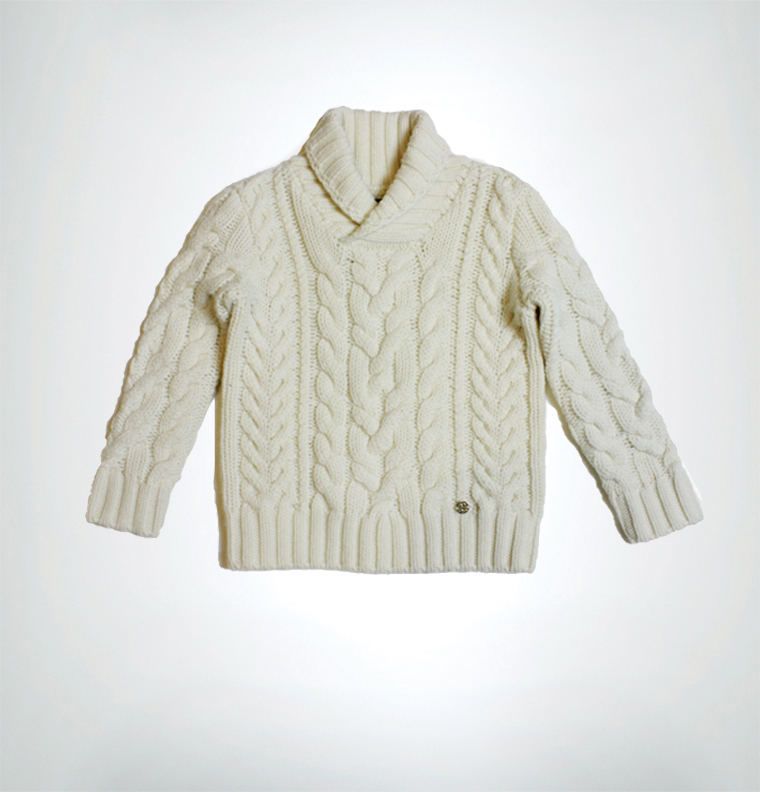
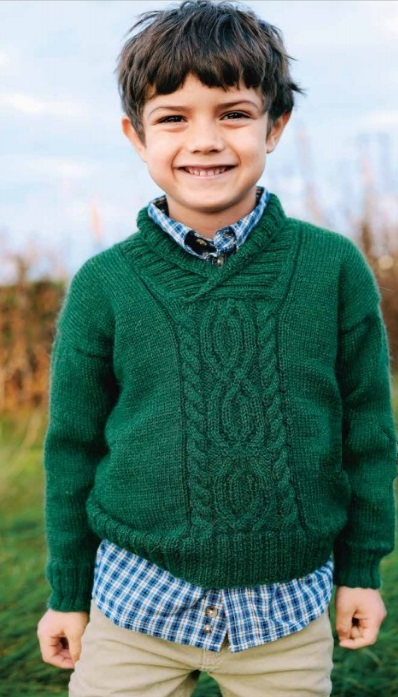
The pullover will look good on children over three years old. This sweater is especially interesting for schoolchildren, who usually wear shirts to study. The part of the collar that is visible from the neck looks very impressive and elegant.
We present to your attention a pullover with an interesting shawl collar. According to the author of the model, the pattern is knitted both on the front and back of the product. But it will be quite enough to leave the decoration only on the front of the pullover, and knit the back with stockinette stitch. Also, this model will look great in absolutely any color.
Here are the adjustments for three sizes: for children aged 5-7, 8-9 and 10-11 years.
The difference in the number of loops and centimeters will be indicated in order in one line through a dash.
Below we provide a table in which we will more clearly indicate the measurements to accurately determine the size required for your child.

size table
Preparation
You will need:
- yarn containing 60% alpaca wool and 40% acrylic, skein weight 50g with 160m thread, 5-6-7 skeins;
- stocking needles sizes 2.5 and 3.5;
- circular knitting needles with short fishing line size 2.5 for knitting the neckline.
To calculate the loops, we knit a sample of 10 cm * 10 cm on 3.5 knitting needles, we get 26 sts. and 32r.
Knitting process
Back:
We knit a 6 cm elastic band in the 2LP + 2IP format using knitting needles size 2.5, casting 88-96-104p. Then we knit 2p. Stockinette stitch on needles size 3.5. In the first row we add 4 stitches evenly, we get 96-104-112 stitches. Then we knit up to 45-48-52 cm according to the pattern: 1 CP + 30-34-38 LP + 36p. pattern + 30-34-38 LP + 1 CP. At the end we close the loops.
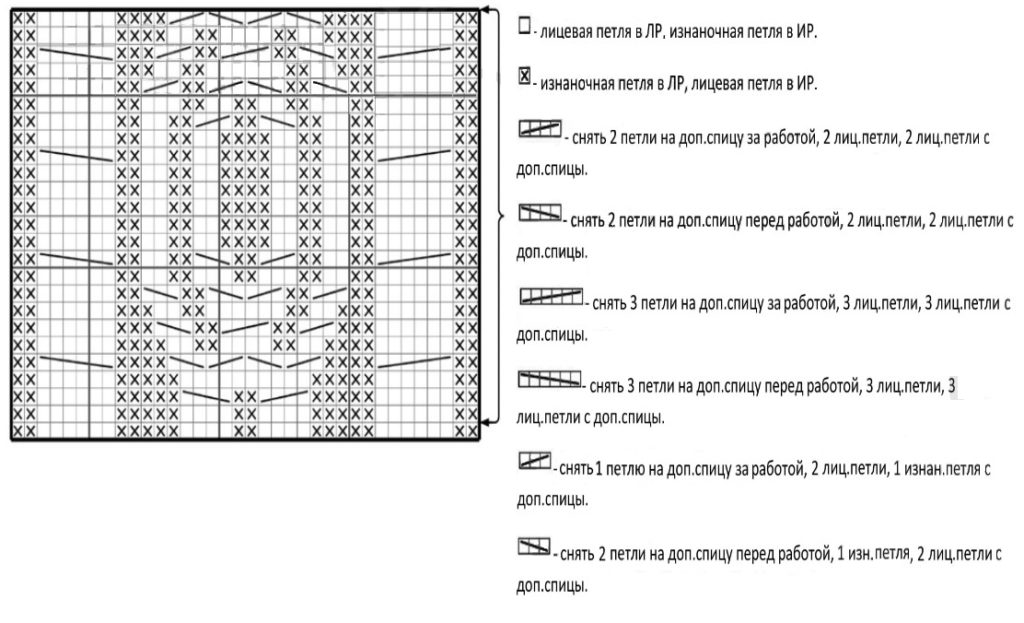
Pullover pattern with shawl collar
Before:
We repeat the same steps as in the previous part, up to a height of 29-31-34 cm. At this height in the middle we close 24-26-28p. for the neckline, knitting each of the resulting sides separately. After the CP, remove 5*1p from the neckline. for each shoulder every 2.5 cm. For the right shoulder, the slope of the decreasing loops should go to the right, for the left - to the left.
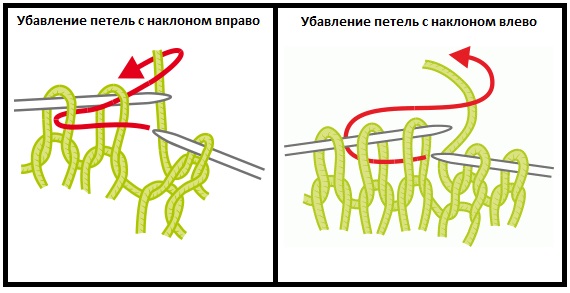
How to set the slope of decreasing loops
We knit up to 45-48-52 cm, then close the shoulder of one half and move on to working on the other.
Sleeves:
On stocking needles size 2.5 we cast on 48-52-52p. and knit with an elastic band 2LP + 2IP 6 cm. Then we knit with stockinette stitch on stocking needles 3.5. At the beginning of the kuga (where the “tail” remains at the bottom of the elastic band) insert a marker (this can be either a special plastic lock or a thread of a contrasting color). Add 1p at a time. on both sides of the marker every 1 cm until reaching 78-82-86p.
Continue knitting until 34-37-42 cm and bind off the loops.
We knit the second sleeve in the same way. Then we sew the sides of the front and back to the armholes and sew in the sleeves.
Collar:
On short circular needles 2.5 we cast on edge stitches 100-108-112p along the neckline (from the center of the front). We knit with an elastic band 2LP + 2IP 2-3-3 cm and then start knitting in short rows as follows.Insert a marker into the center of the collar on the back. After the marker, knit 5-5-6 stitches, then unfold the work and yarn over the loop. We continue to knit 10-10-12p. in the opposite direction, then also turn the work and yarn over again. We knit on 5-5-6p. more with each subsequent turn in different directions. There will be 4 such turns in total.
Advice! To avoid the appearance of holes in the places where the knitting is turned, we knit the loops wrapped in thread together with this thread (with a crochet).
We continue to knit the elastic band up to 9-10-11cm on the short part of the neck. Close the loops, then sew the edges of the collar to the neck.
Pullover with shawl collar is ready!
Using the example of two pullovers, we described two different methods of casting on loops at the neckline for further knitting the neckline.


 0
0