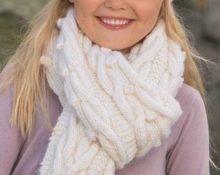
 Often, when choosing a scarf in a store, we cannot find “the one” that we have been looking for for a long time. Either the color is wrong, or the composition is wrong, or it’s too expensive. But there is always the opportunity to take up the knitting needles and knit the desired item yourself. In fact, knitting is not as difficult as it might seem. Our article will help you verify this and knit your first item in just a few hours.
Knitting a scarf can be done in two ways:
- crochet;
- knitting needles
Crochet scarf technique
It is believed that crocheting is much easier than knitting. When crocheting there is only one open loop, but on knitting needles there are many more. Therefore, it is almost impossible to accidentally lower a row with a crochet; you do not need to follow all the loops at once.
If you have never crocheted before, it is better to start with the simplest pattern.
Crocheting a scarf with single crochet stitches
Knitting method:
IMPORTANT! First, knit a sample of the product, measure its length and width, and wash it in warm water with regular powder and conditioner. After this, measure the sample parameters again. This way you will understand whether the product will shrink or stretch after washing. Knit your product taking into account these features of the yarn.
Knitting stages:
- To knit a simple product, you need to cast on a chain of air loops (hereinafter referred to as ch) of the same length as the finished item should be. Usually it is 1.5-2 meters.
- Then turn the product over, go up one row and knit a single crochet stitch into each of the chain stitches (hereinafter referred to as dc).
- When you reach the end of the row, you need to knit another ch (also called a “loop for lifting”), turn the product over again and continue to work in the same way as in the previous row.
- When you reach a scarf length that you are happy with, simply close the loop and add fringe at both ends if desired.
Once you learn the most common crochet techniques, you can alternate them and create your own patterns, or look at the patterns with descriptions and understand how to implement them.
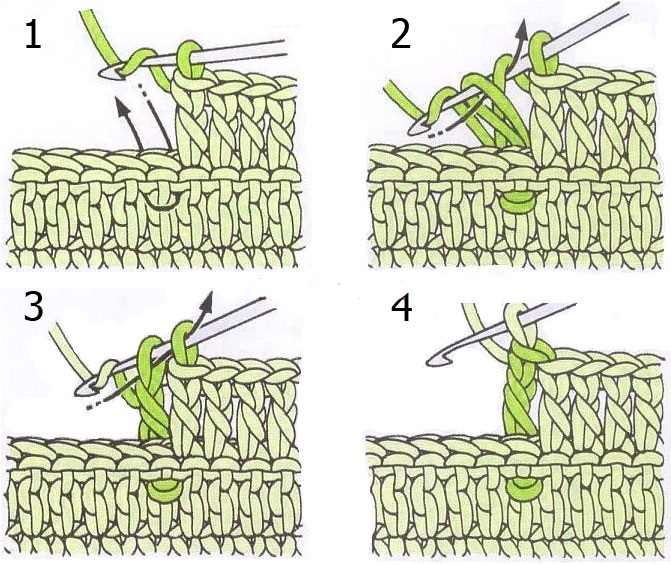
To knit such a scarf, you will need a yarn that you like and a suitable hook for it.
Knitting stages:
- First we dial the required number of ch. This will determine how long the finished item will be.
- Select the fourth loop from the end and knit a dc into it.
- We make the same columns in each ch of the previous row.
- The last one will be ch in order to raise the knitting one row up, after which we again make a single crochet (hereinafter referred to as sc).
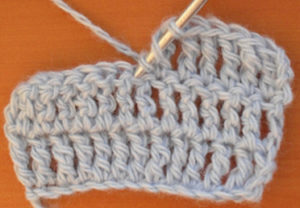
- Next, to give airiness to our scarf, we knit a sequence of 5 ch, then we knit a sc in the fourth row from us.We make three more air loops in the same column, forming a small tubercle in this place.
- We do the same until the row ends.
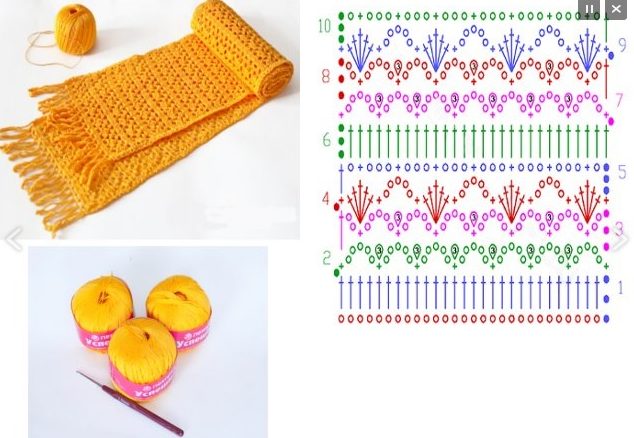
- Continue knitting according to the diagram, alternating the loops drawn in the diagram. The end result will be an openwork scarf with large and small holes. If desired, you can add fringe at both ends.
Crocheting can be mastered quickly by any beginner. You need to practice knitting different types of loops, and then, looking at the diagram, connect them together.
Master class: how to crochet a men's snood scarf
Simple plain scarves with a regular pattern are more suitable for men, so it will be very easy for beginners to knit such a scarf (photo).

Choosing yarn for knitting
First of all, you need to choose the right materials. It is best to take yarn that consists of wool and acrylic. This yarn will provide warmth without being too prickly. Rely on your feelings when choosing yarn. Remember that after washing with conditioner the product will become even softer.
Do not take thin yarn; for such a scarf, yarn with a thickness of 50–100 g/100 m is suitable. You will need 2–3 skeins.
The yarn label will always indicate the hook size you should use to knit with, so just look at that recommendation. Now you are ready to knit a scarf!
Stages of work step by step
- Cast on the required number of chain stitches. If you already have a cowl scarf, measure its length and make a chain of the same length. As a rule, it is 140–170 centimeters.
- Start knitting another row of the product with simple sc, starting with the second chain loop from the end.
- When you have knitted the entire row, make a lifting loop and turn the product over.
- Continue single crochet, hooking only the back wall of the previous row.This will make the scarf more textured.
- Knit this way until the width you want, and then bind off the last stitch.
- Twist the scarf once or twice, and then connect the edges with a needle to make a collar.
- Wash the resulting scarf.
Knitting technique for scarves
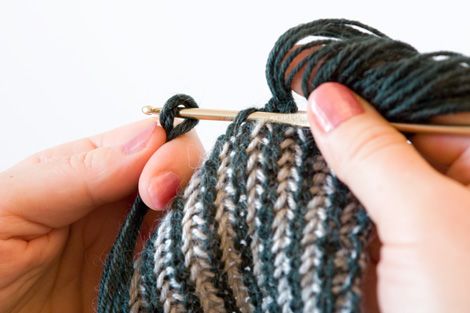
Knitting requires more skill and care, but there is also a greater variety of patterns and models with them. First of all, you should learn how to cast on loops. Practice free typing first. Many beginners tighten the stitches too tightly when casting on, so that the product ends up narrow at the base. Some, on the contrary, tighten the loops too loosely.
IMPORTANT! Make sure that when casting on, the thread from the ball is not too tight, but does not sag, then the cast-on loops will be evenly tightened.
Methods for knitting scarves
The main way to knit a scarf is to knit a classic rectangular scarf. This method is the simplest and most accessible for beginners. A rectangular scarf can be knitted in different patterns, but the easiest way is to knit it with an elastic band. This is the name of knitting in which the front and back loops alternate. As a result, this pattern gives the effect of an elastic band, and the scarf can be stretched in width.
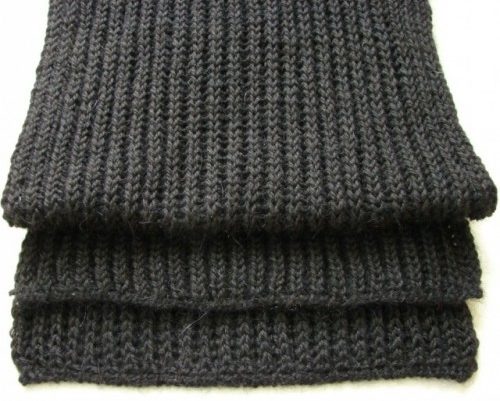
Knitting a classic scarf
To do this, you will have to learn how to pick up stitches on the first row, knit and purl stitches, and bind off stitches at the end of knitting.
Knitting pattern: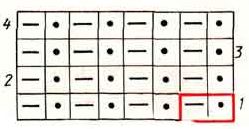
IMPORTANT! Please note that edge stitches are always knitted purlwise to ensure that the product has a straight edge.
Knitting stages:
- To create a classic scarf with an elastic band, cast on about thirty loops on two knitting needles, then take out one of them and on the resulting loops, begin to knit the front and back loops in turn.
- After knitting the first row, turn the scarf over and continue knitting. Only now in place of the knit stitches there will be purl stitches, and in the place of the purl stitch stitches there will be knit stitches.
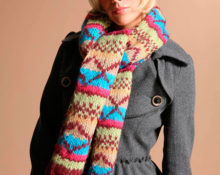
This method does not require attention, since it is very easy to remember the pattern. Therefore, such a scarf can be knitted in just a few hours. By adding yarn of the desired colors and sewing on the emblem, you can get a Barcelona scarf.
There are also other ways of knitting scarves for women, which can be seen in photos on the Internet or in videos on YouTube: knitting a triangular scarf, a scarf in the shape of a parallelogram, a scarf-collar (it can also be called a snood, a collar or a pipe), which will replace a hat, a winter set or a figure eight. To knit items of this shape, you will need to learn how to increase and decrease stitches. A cowl scarf is knitted in the same way as a regular knitted rectangular scarf, but at the end its ends must be connected to each other.
Step by step knitting a women's openwork scarf-stole for beginners
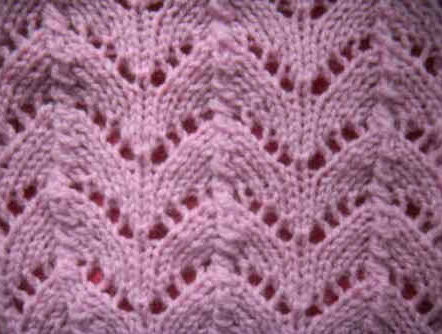
An unusual openwork stole will become a decoration that suits many looks, and will also be practical - because it protects well from the cold even in winter. First, you need to decide what kind of stole you want the cape to look like. Depending on the yarn, it can be very warm, voluminous and textured, or it can be light, weightless and serve as decoration.
Materials and tools
Let's look at the step-by-step knitting of a weightless openwork mohair stole. For knitting you will need children's mohair mixed with polyamide. Polyamide will give softness and pliability to the yarn, so it will be much easier to knit. You will need no more than three skeins, since the yarn consumption will be very small. You also need size 4-5 knitting needles.
Knitting process
First, knit a sample of your future stole to understand how the pattern will look with the selected yarn and knitting needles. If you don't like the result, you can adjust it by choosing smaller or larger needles. If the product seems too tight and not airy to you, then you should take larger knitting needles. Then the distance between the loops will be greater, and the scarf will become flexible and flow on your shoulders. If, on the contrary, it seems to you that the product is too loose, then take a smaller knitting needle size to knit the pattern more clearly.
In addition, the sample will need to be measured for width and height, and then washed and dried. After that, measure it again and understand how much the yarn shrinks. Then you will need to knit taking this difference into account.
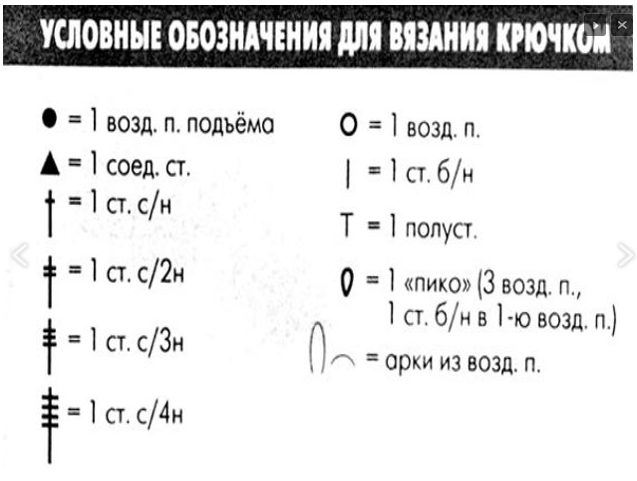
To knit this simple but beautiful stole, look at how these loops are knitted according to the pattern: 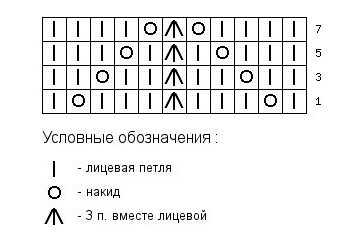
- Face loop.
- Yarn over
- Decrease of facial loops.
- Purl loop.
- Decrease purl stitches.
Stages of knitting a stole
- It is best to take circular knitting needles with a long fishing line, since the product will be wide. The first row is to select the width of the future stole.
- All edge loops (that is, those located on the edge of the product) need to be knitted with purl loops. All other loops are knitted according to this pattern.
- When you have knitted the first row according to the pattern, you need to turn the product over.
- Now you have the wrong side of the stole in your hands. Continue knitting according to the pattern, but knit purl stitches in place of the knit stitches. On the reverse side they will look like the front ones.
- Continue knitting according to the pattern until the stole is the length you need.
- Finish the knitted item as you prefer. The easiest way to do this is with knitting needles, because in this case you won’t need any other tools that you may not have.To do this, start knitting as usual. When you knit the third loop in this row, pull it through the two previous ones that you have left on the right needle. Now you only have one loop on it. Knit like this until you finish.
The original openwork scarf stole is ready!
 0
0