It's hard to imagine a modern man's wardrobe without at least one pair of shorts. Of course, you can buy the model you like in a store, but it’s much more interesting to sew them yourself. In addition, shorts cut by yourself fit much better, because during the construction of the pattern all the features of the figure are taken into account
Key features of the men's shorts pattern process
There are several ways to create a pattern with your own hands:
- rip old, well-fitting shorts or trousers, iron them, transfer them onto paper and use the resulting parts as patterns;
- download the foundation you like on the Internet and modify it in accordance with the characteristics of the figure;
- take measurements and build a new one yourself.
How to make a pattern for men's shorts with elastic
Light summer shorts with elastic are most often sewn according to the pattern of men's “family” briefs. This model is perfect for sports and beach holidays. The appearance of the finished product depends on the quality of the fabric and color scheme.By combining pieces of fabric of different textures and colors, it is possible to create very non-trivial shorts.

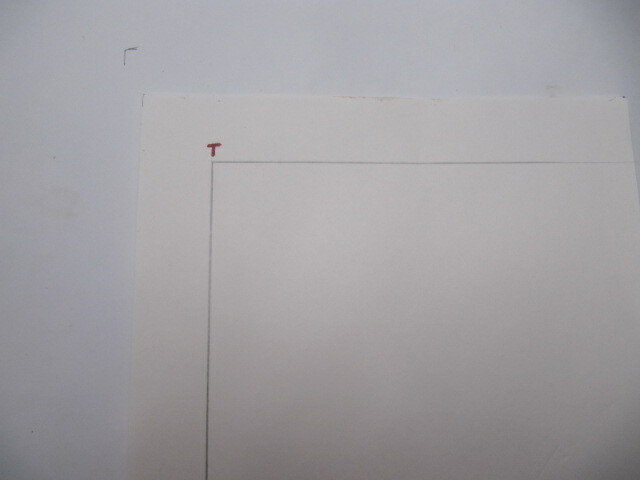
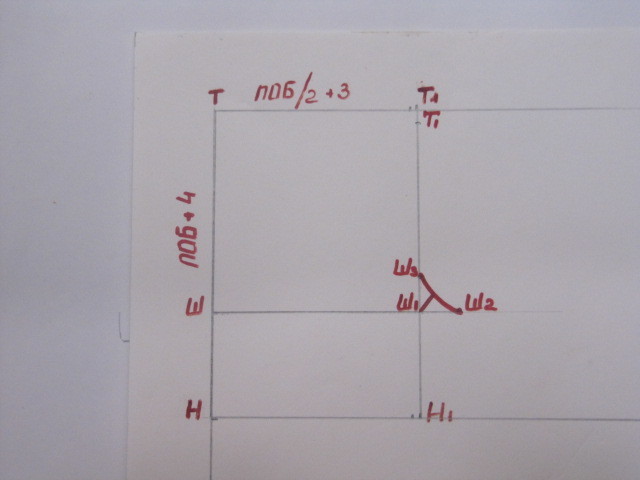
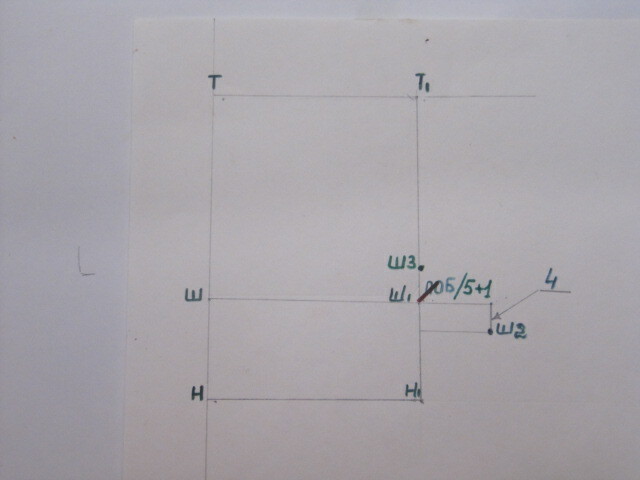
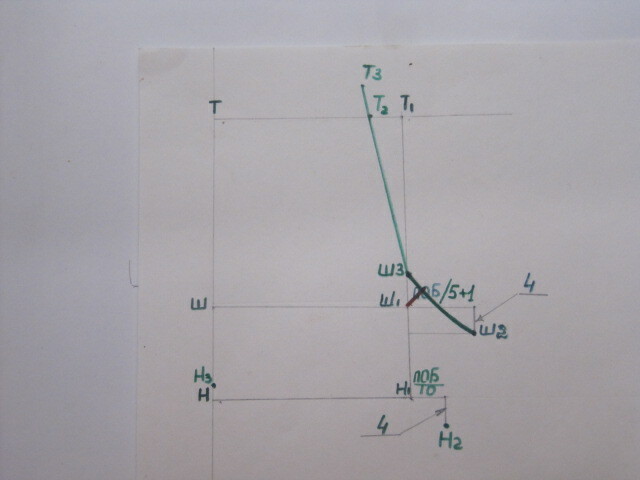
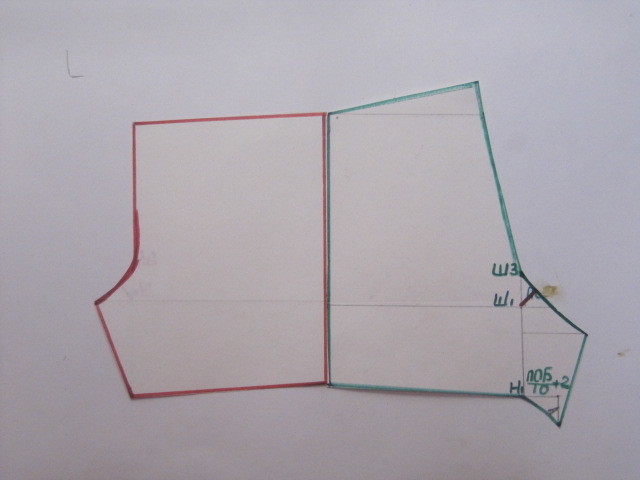
Constructing a pattern for the front half
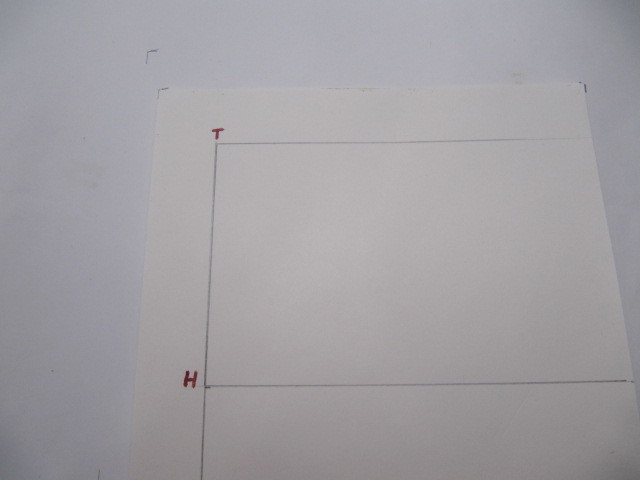
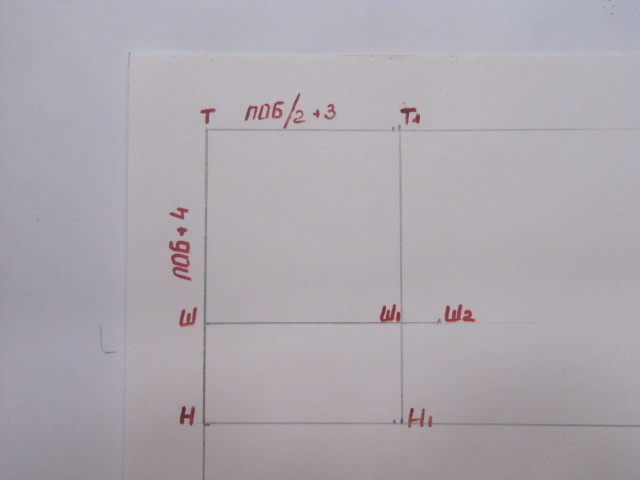
- Construct a right angle with a vertex at T.
- Place a measure equal to DI down vertically, put t.H and draw a horizontal bottom line through it
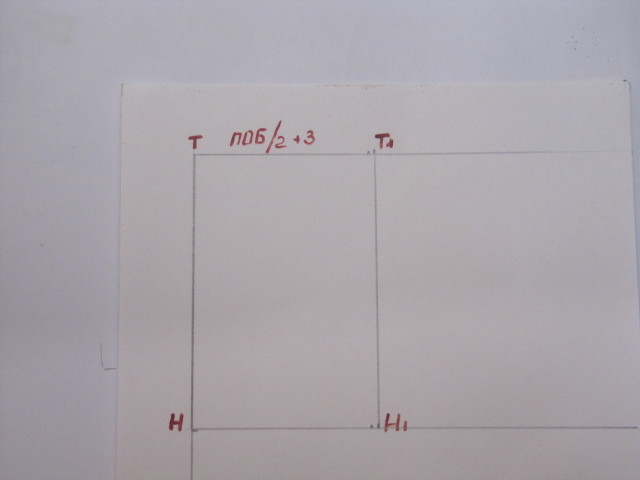
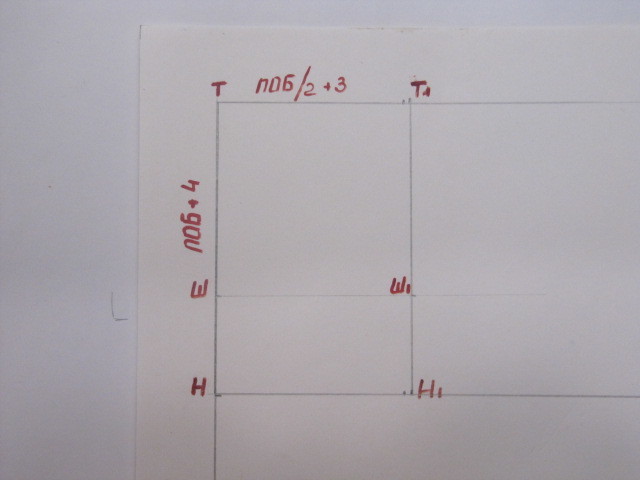
- To the right, along the bottom and waist lines, set aside the distance POB/2 + 4, place t. H1 and t. T1, respectively
- From t T down, lay down POB/2 + 4, put t. W and draw a horizontal step line. At the intersection of t Ш1.
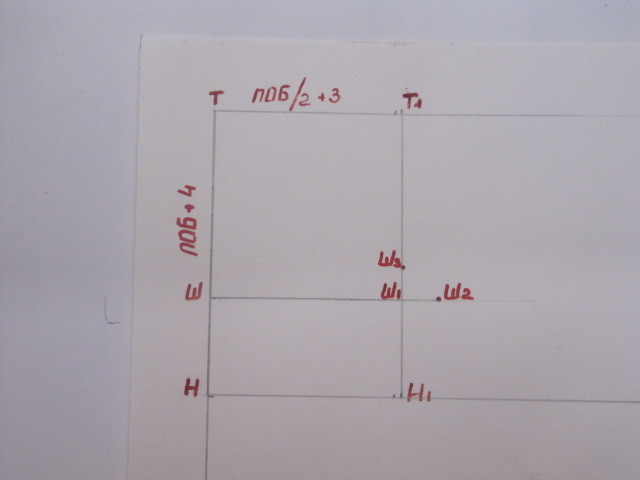
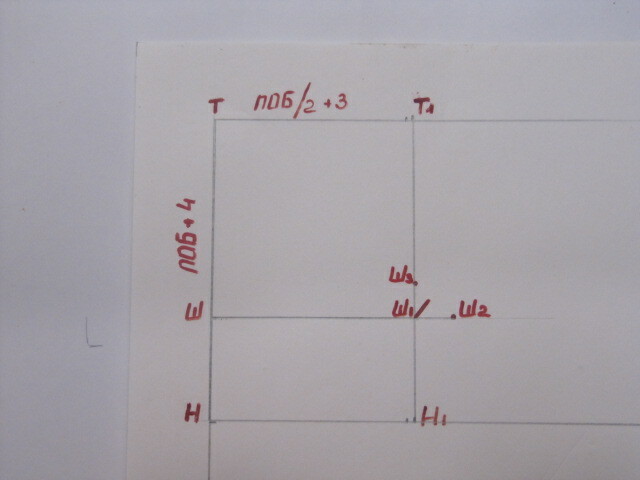
- From point Ш1 to the right they put aside POB/10, point Ш2.
- From point Ш1 upwards they lay down POB/10, point Ш3
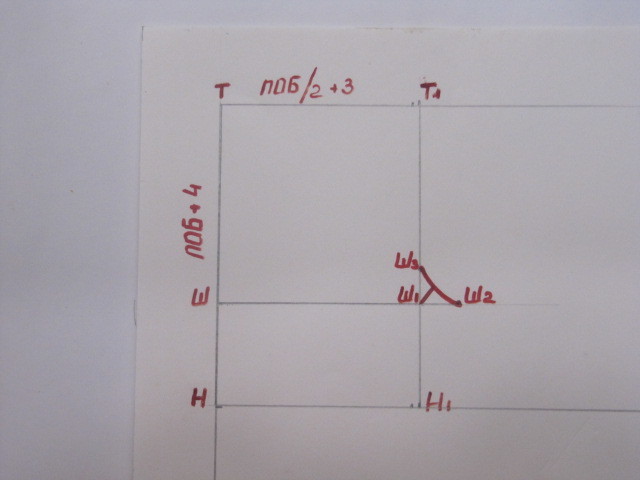
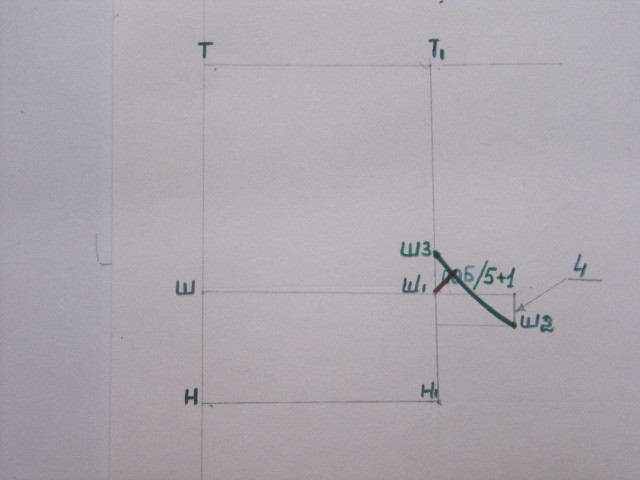
- A bisector 2.5 cm long is drawn from the corner.
- Connect Ш3 and Ш4 with a concave line.
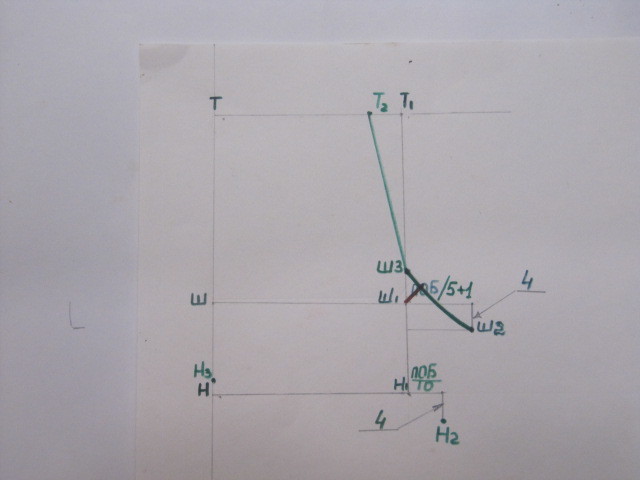
- From T1 down 1.5 cm we get T2.
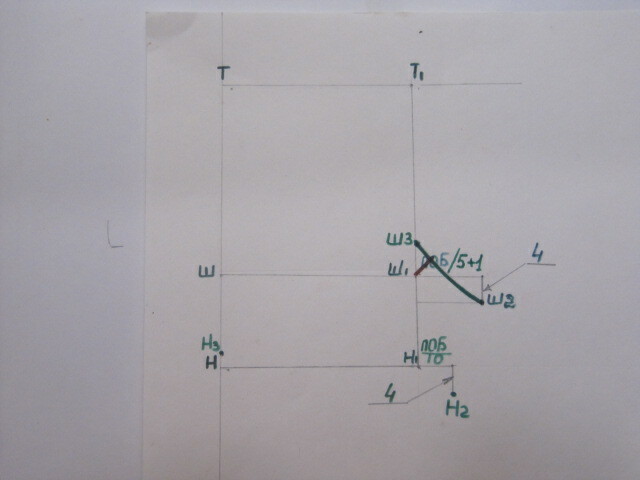
- From t. H upward 2 cm, t. H2 is obtained.
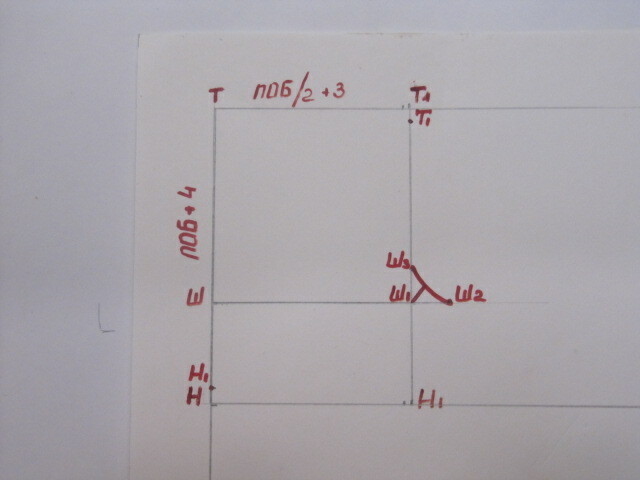
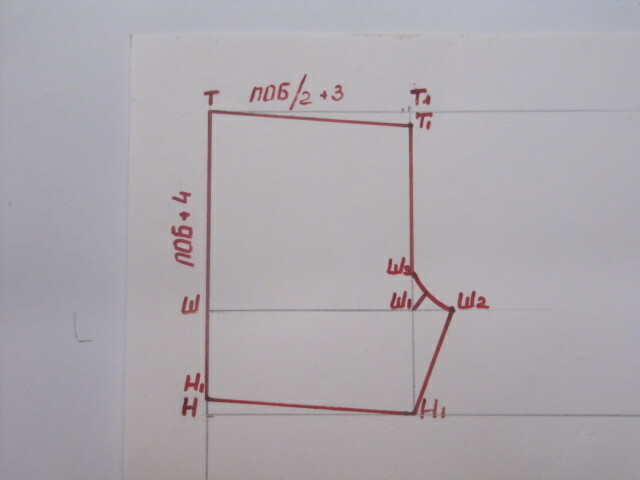
- Connect all the dots.
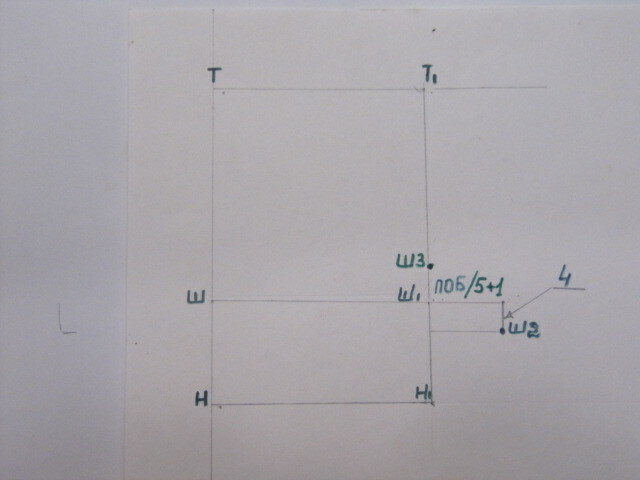
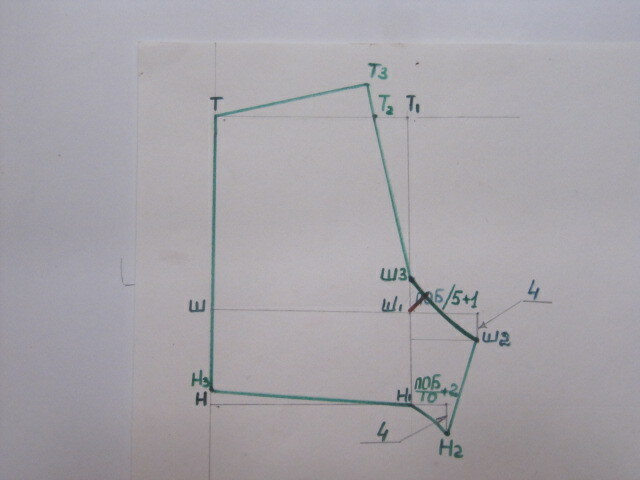
Constructing a pattern for the back half
- Construct a right angle with a vertex at T.
- Place a measure equal to DI down vertically, put t.H and draw a horizontal bottom line through it
- To the right, along the bottom and waist lines, set aside the distance POB/2 + 4, place t. H1 and t. T1, respectively
- From t T down, lay down POB/2 + 4, put t. W and draw a horizontal step line. At the intersection of t Ш1.
- From point Ш1 they lay down POB/5 + 2 cm and down 4 cm it turns out to be point Ш2.

- From point Sh1 they put POB/10 up and get point SH3.
- A bisector 3.5 cm long is drawn from the corner.
- Connect points Ш3 and points Ш4 with a concave line.
- From t. H1 to the right POB/10 + 2 cm and down 4 cm get H2

- From t. H up 2 cm we get t. H3
- From t. L1 to the left 3 cm, get t. L2 and connect it with a straight line to t. Ш4.
- Extend straight line Sh4L2 to distance POB/10
- Connect all the dots.
Depending on the wishes of the customer, the waist line is lowered down.
Nuances of patterns for men's shorts size 52
Larger sizes of shorts are somewhat more difficult to cut, because in most cases the figure has some deviations in the form of a protruding belly or voluminous buttocks. Or excessively thin legs with rather impressive hips. Such nuances must be taken into account and leveled out during modeling.
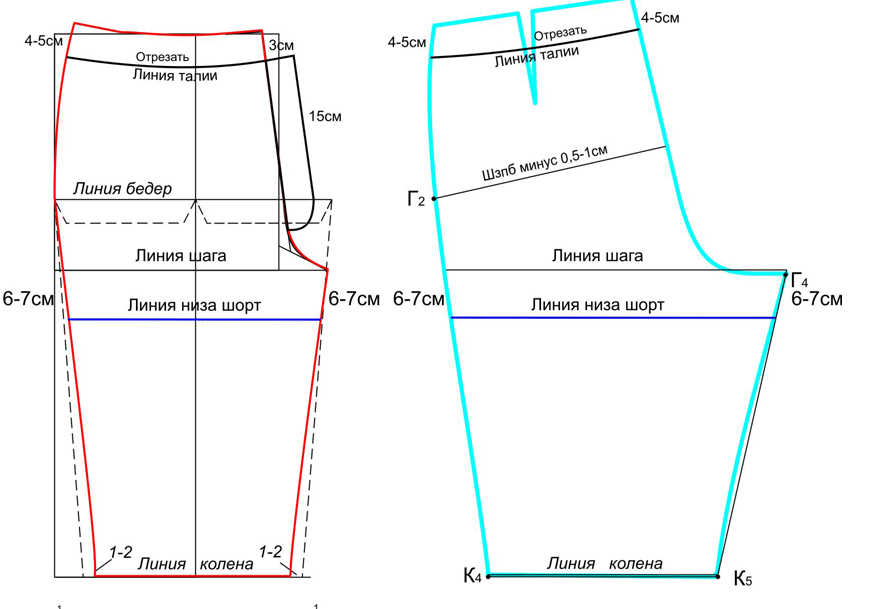
First of all, it is necessary to clarify how the man plans to wear shorts or trousers. Very often, men prefer to lower their trousers a little under their belly; due to such socks in the front, they do not bulge aesthetically. To avoid this, you should change the pattern a little.
- Cut off the waistline of the front half.
- Add the step line (wedges) by the same amount.
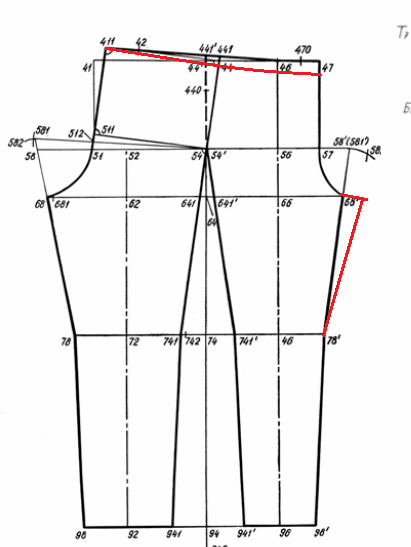
Please note that it is not recommended to cut more than 1/20HB ×1.5. Those. if FOB for size 54 = 57, the cut size should not exceed
1/20 × 57 × 1.5 = 4.27 cm.
If a man prefers, on the contrary, to pull his trousers higher onto his waist, then the adjustment is carried out using the “female” method.
- Cut off the waistline on the back half of the trousers.
- Add wedges to the step line.
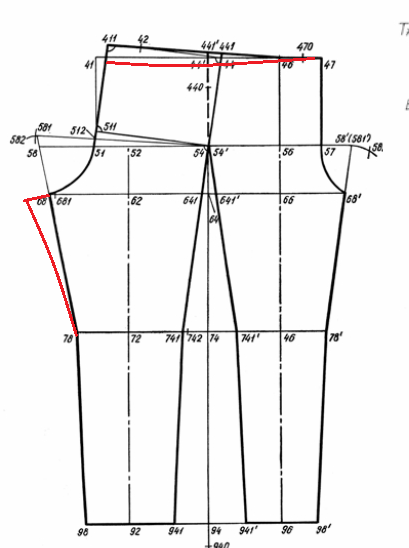
In this case, it is recommended to cut off no more than 1/20 PB.
How to correctly draw a pattern for men's shorts size 54
The pattern for men's shorts size 54 is based on the same principle as size 52. You can use the basic pattern of trousers or sweatpants as a basis.
Pattern for men's shorts with elastic, size 56: how to make them correctly
When drawing up a pattern of loose shorts with an elastic band, to increase the loose fit, take the maximum value of 5 - 6 cm. If there is a protruding belly, then appropriate adjustments are made. To prevent shorts from restricting movement when walking, you can insert a small wedge along the step line.
How to cut shorts for a man wearing size 66
Often, men who wear size 66 trousers and shorts have a non-standard figure. When taking measurements, it turns out that the waist circumference is several centimeters greater than the hip circumference. This feature of the body must be taken into account when creating a pattern.
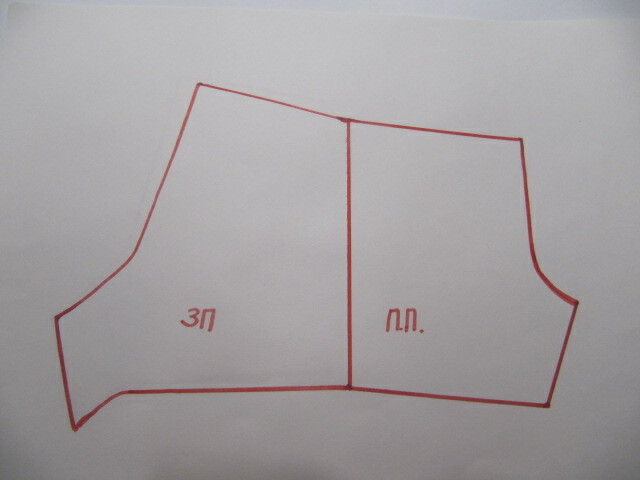
The basic basis of the front and back halves of the shorts/trousers is drawn out in the same way as in other cases. And only after building the base do they begin to model the pattern for size 66 shorts with a protruding belly.
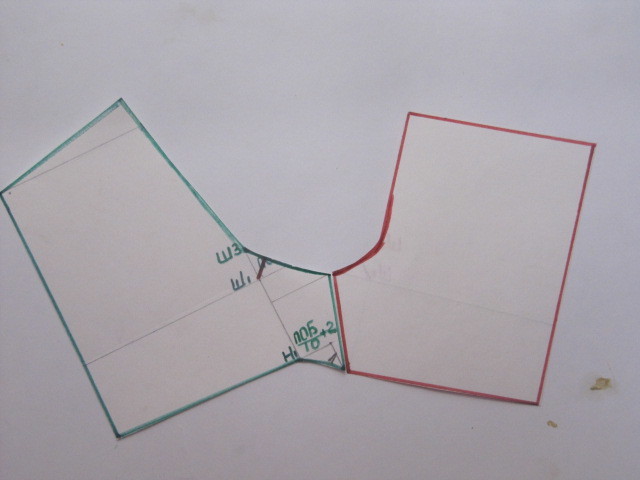
- Combine the back and front halves of the pattern along the side line and trace them along the contour.

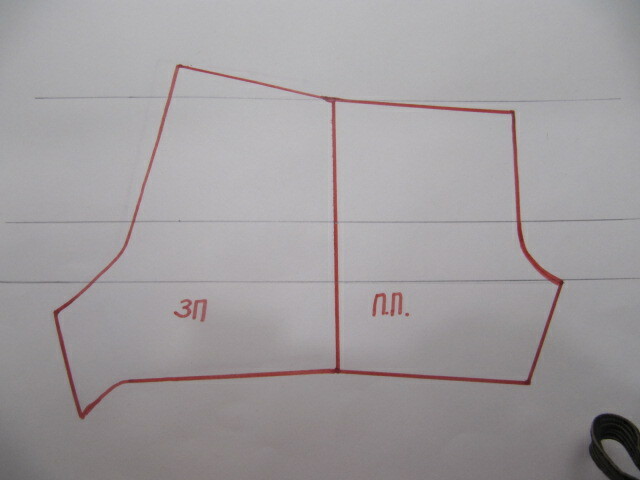
- Draw lines for the waist, hips, and steps.
- On the front half, they retreat 5 cm to the right, from the received mark they rise up 3 cm and place a t. O.
- Connect the point O to the hip line.
- Connect the point O to the waist line.
- On the back half, 3 cm is removed from the waist.


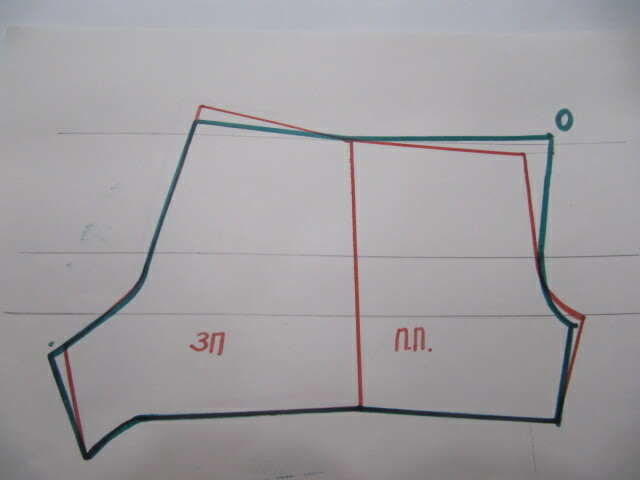
Due to this adjustment of the basic base, it is possible to simulate an additional allowance for the belly and not disturb the lines of the bow and step, which are built from the calculation of the OB.
- To prevent sewn shorts from gathering in folds in the form of a “bubble” in the groin area, the step lines are adjusted.
- On the front half, step back along the step line to the left 1.5 cm and down 1.5 cm and place t. A.
- Connect point A to the hip line.
- Connect point A to the bottom line.
- On the back half, add 1.5 cm along the step line, lower it 1.5 cm down. A new line is being drawn.
- Depending on the desired model, a new waist line is drawn, lowering it by the desired amount. Cut out a belt or facing and pockets.


Recommendations for creating a pattern for men's shorts for beginners
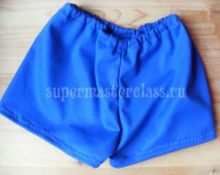
For those who are just starting to master the basics of tailoring, the best way to hone their sewing skills is on sports shorts with an elastic band.This model is easy to cut, does not require wet heat treatment, and fits well to the figure.
How to take body measurements correctly
Correctly taken measurements are half the success. Therefore, it is necessary to approach this moment with all seriousness.
To create a pattern for shorts you will need the following measurements:
- SW = ½ FR – half waist circumference;
- PHB = ½ OB – semi-circumference of the hips;
- DI – length of shorts.
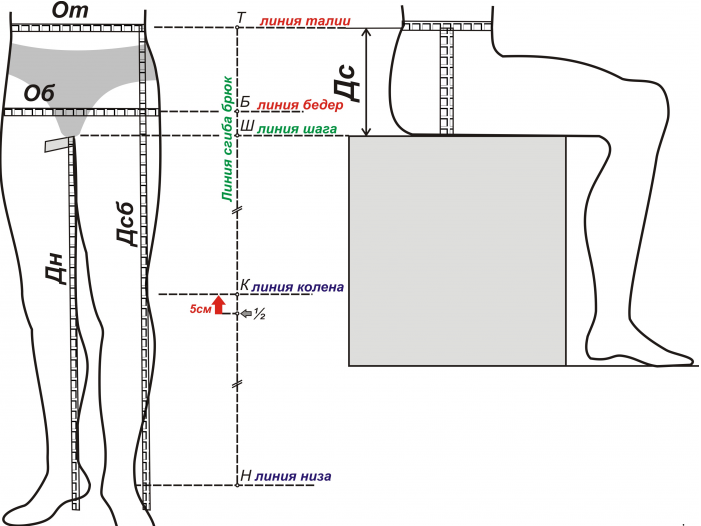
All measurements are taken from the model in a standing position. A thin fabric belt is tied at the waist, which serves as a guide for correct measurement. It is necessary to ensure that the person stands in the most natural position: does not arch his back or stick out his hips.
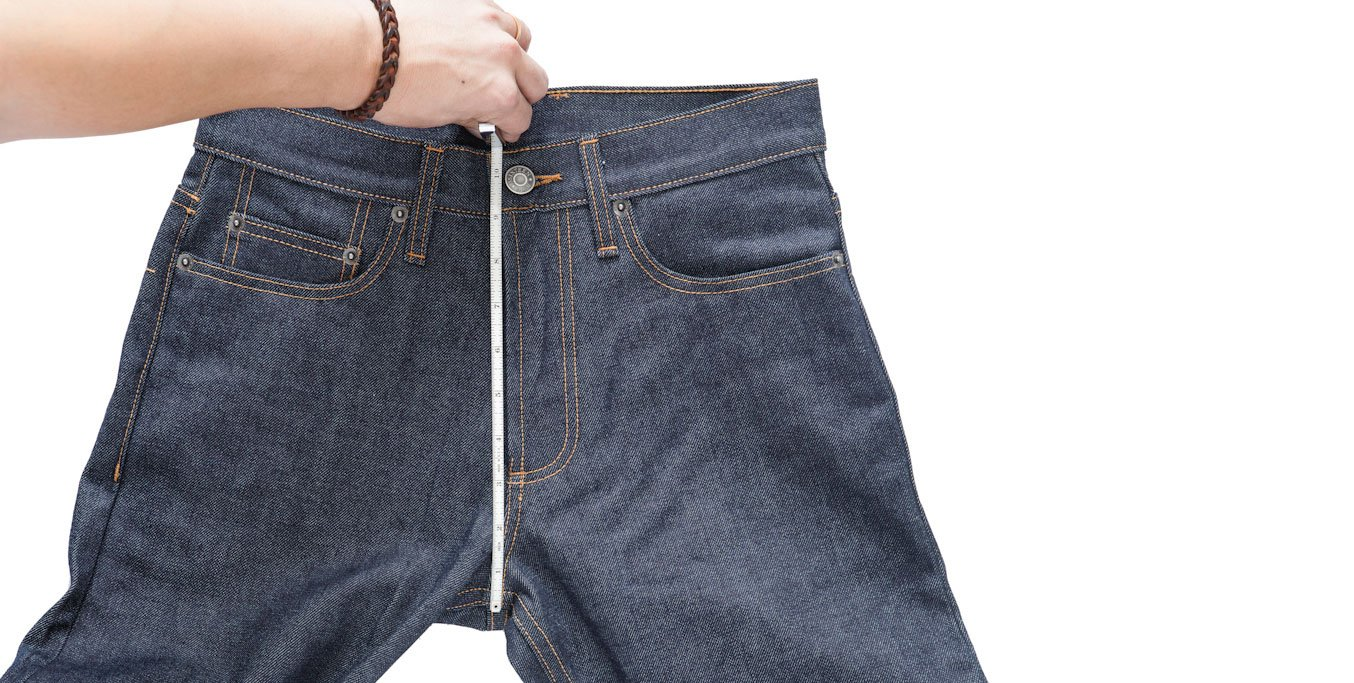
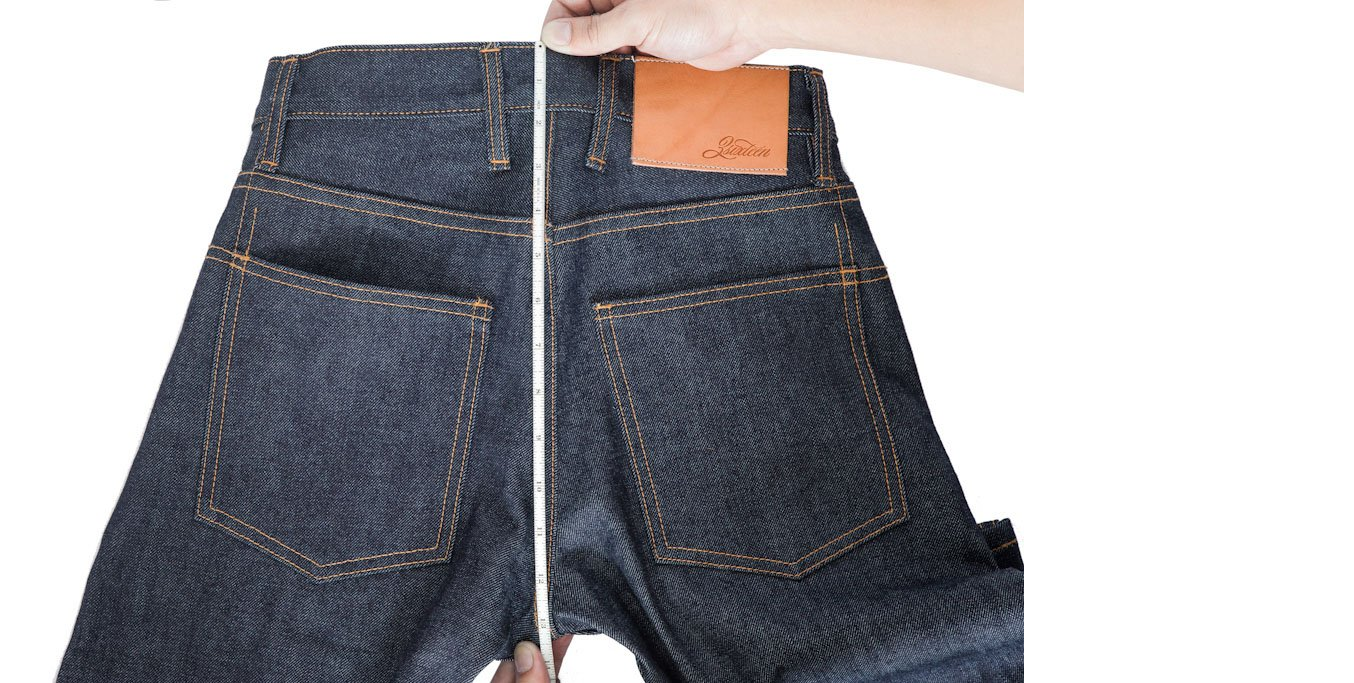
When sewing and cutting shorts, it is very important to correctly calculate the bow line. It’s good if you have an experienced mentor nearby who can promptly point out any shortcomings during the work process. Unfortunately, most seamstresses have to independently develop their own algorithm for constructing a drawing through trial and error. To check how correctly the pattern is made, you need to take another measurement. To do this, move a measuring tape between your legs and measure the distance from the ribbon tied at the waist. Subsequently, this distance should be equal to the bow line on the front and back halves of the shorts together.
How to draw a pattern
Before creating a pattern for shorts, the waist and hip measurements taken are divided in half.
To construct a drawing, you can use the above pattern for men's shorts with an elastic band, substituting the values of your measurements into the formulas.
After the pattern has been created, you need to use a measuring tape to measure the bow lines of the front and back halves of the shorts and add up their values, and then compare it with the measurement taken.The ideal option is when the bow line on the pattern is larger than the taken measurement by the amount of increase for a loose fit.
However, you can compare them with store-bought trousers or shorts that fit well on your figure.
Measure the outer and inner side cuts. They should be the same on the back and front halves.
If it turns out that an error has crept in somewhere, you will have to double-check all the construction steps.
How to sew high-quality men's shorts using your own pattern
Most types of fabric experience significant shrinkage after wet heat treatment. Unfortunately, it is almost impossible to predict in advance how much a particular canvas will shrink. Shorts sewn according to a hand-made pattern sometimes shrink by 5–7 cm after washing. To minimize risks and protect themselves from unpleasant consequences, experienced craftswomen must subject the fabric to decating. To do this, the fabric is soaked in hot water without adding detergents, dried, ironed, and only then they begin to cut the fabric.
The fabric is folded in half and all the available details are traced. If you want your shorts to have a pocket, be sure to carefully cut it out too.
Be sure to mark seam allowances:
- 2 cm along the lower edge;
- 1.5 cm on the sides;
- For elastic band 9 cm.
If a cutting belt for elastic is provided, then its width is 10 cm, and the allowance for stitching is from 1 to 1.5 cm.
Before sewing all the parts on a machine, you need to baste them by hand and try them on the model; you may need to make some minor adjustments. After the shortcomings have been corrected, you can add machine stitches.
Assembling the shorts begins by stitching the front and back halves along the side cut.
Then a seam is placed along the inside of the trouser leg.
Sew 2 pant legs along the bow line.
Fold the bottom edges and sew a stitch.
Fold the allowance for the elastic and sew a stitch. Insert an elastic band. Ready.
 1
1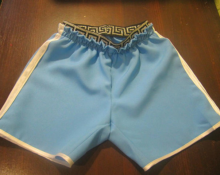


In the text of the upper description of the construction you have points L1, Ш4, and in the figure T1 and Ш3. For a long time I tried to understand where the L points came from...