 Every woman has faced the problem of folding a sweater. Difficulties are caused by long sleeves and a high neckline. They “peek out” from an already folded knitted sweater. If you hide them well inside, then the thing begins to puff up. One part of it turns out to be more voluminous than the other. This makes the sweater look untidy in the closet. You can't put anything on it - everything falls.
However, for some reason these same wardrobe items appear normally on store shelves. Consequently, everything depends not on the shape or type of product, but on the folding method. Any clothing can look beautiful, you just need to choose the right approach to it.
Ways to compactly fold a sweater
Most methods are designed to use a solid base. The surface should be wide enough to accommodate the spread out sweater (don’t forget about the sleeves, they also take up a lot of space). The second requirement for it: smoothness. The presence of bumps will not allow you to pack a knitted item nicely and evenly.
Like in a store
On the shelves, even bulky sweaters take up minimal space and look as if they spent a lot of time laying them out. In fact, the process has been put on a conveyor belt. The staff serving the hall are required to place the goods very quickly and accurately. They do their job as follows:
 lay out the thing;
- the sleeves are folded in the center so that they do not intersect;
- fold down the bottom of the sweater;
- then turn it over and bend it again.
Using a hanger
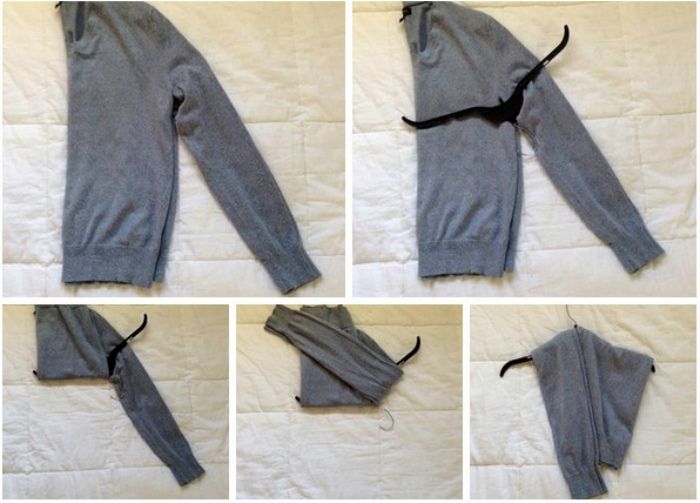
Regular plastic hangers will do. They should not be the same size as the sweater, since the item is wrapped on top and not spread. The essence of the method:
- fold the sweater in half (the right edge goes to the left);
- place the hanger on top of the jacket so that the hook is in the armpit space, and the bottom bar is facing the neck of the item;
- lift the hem of the sweater up as far as it will go (it is necessary that the fold falls on the edge of the hanger);
- then the sleeves are folded back.
Ready. The hangers can be sent to the wardrobe.
Fastest method
An option for those who have household chores and without folding knitted items take too much time.
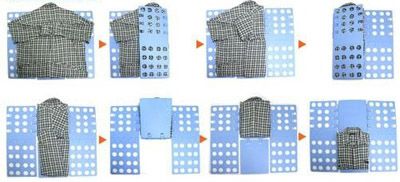
Method number 1. Using auxiliary items
Algorithm of actions:
- buy a special “fold”;
- use it to fold the lower part;
- then come the sleeves (one at a time);
- then the product is folded in half.
Important! The “fold” takes up a lot of space. You will have to work with it either on the floor or on a dining room table.
Method number 2. Without the use of auxiliary items
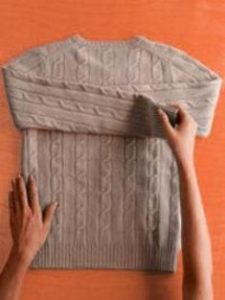
- lay out the sweater;
- fold the sleeves along the seam line;
- visually divide the product into 3 vertical parts;
- Fold the leftmost third in half;
- fold the right outer third in half;
- as a result, the edges of the product should meet;
- now visually divide the item into 3 horizontal parts (taking into account the straightened collar);
- fold the bottom lobe;
- then the top (including the collar);
- straighten the folds.
As a gift
 A properly folded item is much easier to pack. Already wrapped, it will look like a beautiful symmetrical square or rectangle. The recipient will be pleased to unwrap such a gift. It is also worth considering that clothes intended for another person are folded for not half an hour or an hour. During the period of time separating the processes of packaging from unwrapping, the item of clothing manages to take on the shape given to it. If you don’t want to see a wrinkled sweater in the hands of the person receiving the gift, use smart folding technology.
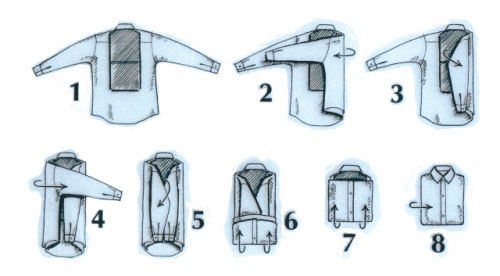
Option one
- place the item face down;
- fold the sleeves along the armhole;
- mark the intersection of the sleeves;
- from this point, bend each sleeve down (eventually they will lie parallel to each other);
- fold the gift in half;
- turn face up;
- to wrap up.
Option two
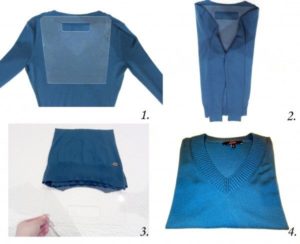
It will require hard cardboard. Suitable format: A4.
- The cardboard will need to be placed on top of the back of the sweater (that is, the front side of the sweater should be facing the surface on which the folding is taking place). When placing the sheet, make sure that it is 1-2 cm below the start of the neckline and is centered relative to the edges of the jacket.
- Then accordion fold the sleeves in the middle over the cardboard and fold the sweater over the cardboard. If necessary, make another turn. Then pull out the sheet and smooth out any rough edges.
On a note! Some people advise tucking the collar directly into the item. However, the person receiving the gift may not understand the meaning of such a step.
Roll into a suitcase
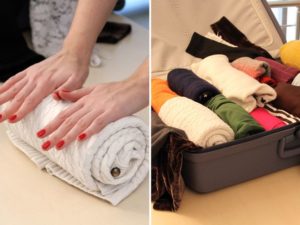 People who frequently use suitcases know firsthand the problem of side space. After folding the main things, a high, but not wide niche is formed along the edges. This creates the following dilemma: there seems to be free space, but there is very little of it. And when filling these “holes,” there is a risk of wrinkled clothes so much that ironing them will take the lion’s share of the vacation. So that the long-awaited vacation is not overshadowed by the need for prolonged work with the iron, fold sweaters into the remaining space on the sides. But do it in an unusual way. The result should be not a symmetrical geometric figure, but a roll. This shape will fit perfectly into the niche and eliminate the hassle of ironing.
The technique requires small rubber bands. Stationery ones are ideal, as well as those used for packaging banknotes. Description of the method:
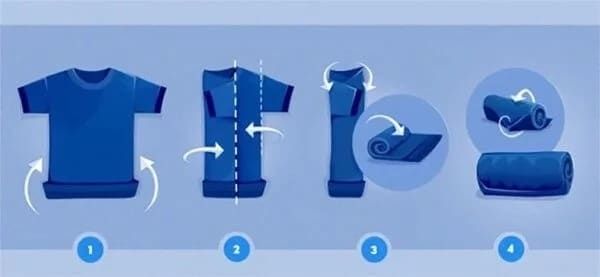
- spread the jacket on a hard surface;
- fold the sleeves in the center;
- fold the main part of the sweater in half;
- starting from the bend, begin twisting (you can apply force);
- Having received the roll, secure it with two elastic bands (one at each end).
Important! If the sweater is too bulky, do not try to put a thin rubber band on it. It's better to buy a piece of elastic from a fabric store and make your own fastening bands that are ideal for specific wardrobe items.
How to fold sweaters in a closet?
Even stacks of clothes cease to be so as soon as an incorrectly folded sweater is placed on them. To prevent the contents of your wardrobe from falling out due to any careless movement, use the following folding method:
 lay the jacket out on a hard surface;
- visually divide it into 3 parts;
- bend the lower third upward;
- fold the sleeves along the armhole;
- at this stage you should get a figure that is as close as possible to a rectangle or square;
- fold the “square” in half so that the sleeves are on the inside and not on the outside;
- if there is a neck, roll it up carefully and place it inside the “square”.


 lay out the thing;
 lay the jacket out on a hard surface;
 0
0


