 Fashionable hoodies this year owe their existence to sweatshirts. Therefore, one cannot help but recall once again the “founder”, or rather, the bearer of such a convenient little thing - L. N. Tolstoy. It is only thanks to him that there is such a practical thing in the everyday wardrobe. A hoodie is just a type of sweatshirt. The most typical element for a hoodie is the hood. Not only an experienced knitter can knit a hoodie using convenient patterns; a novice knitter can also do this. You just need to master a couple of patterns, the basics of knitting, and you can start your creation.
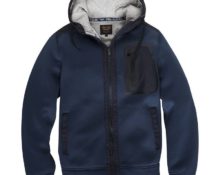
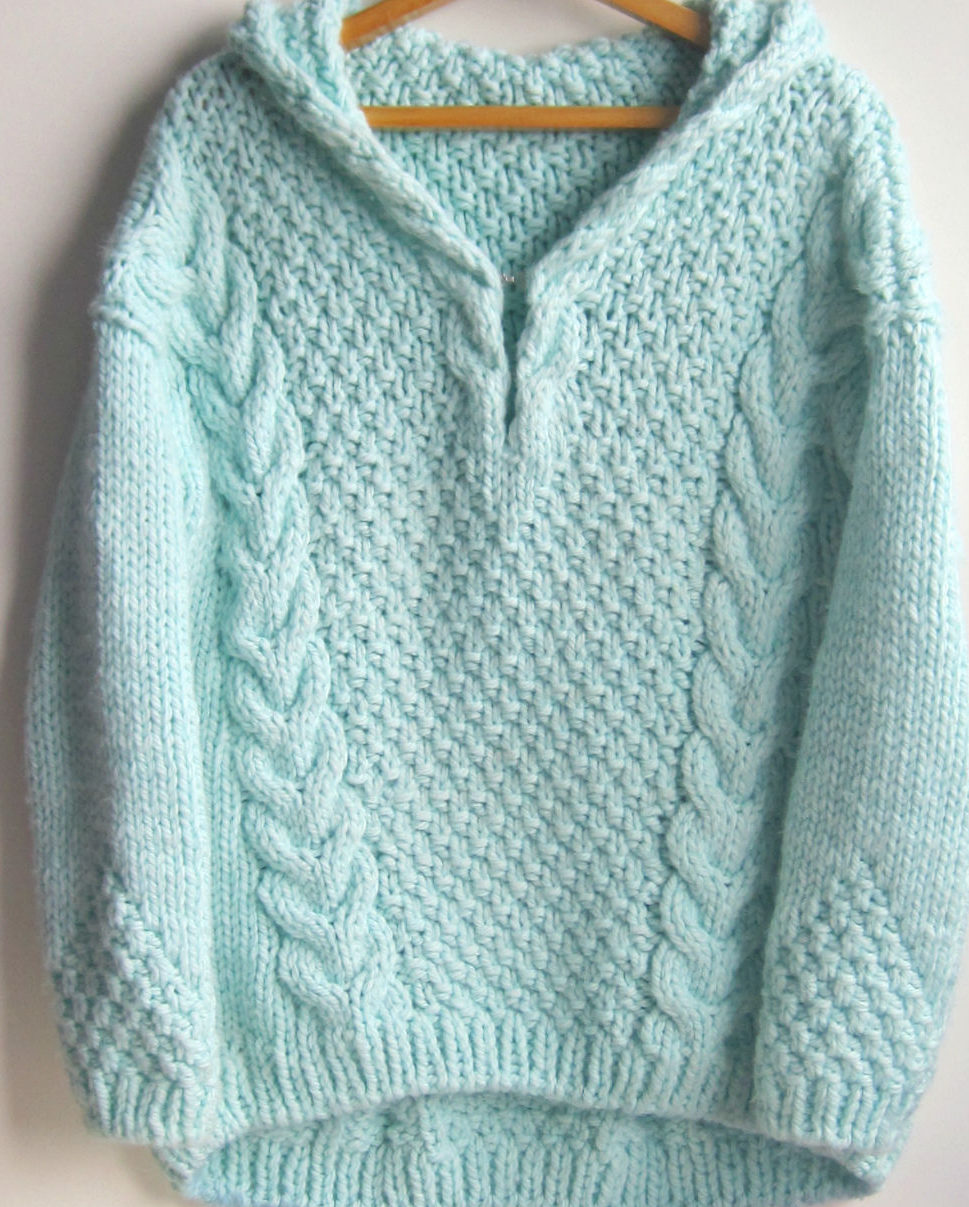
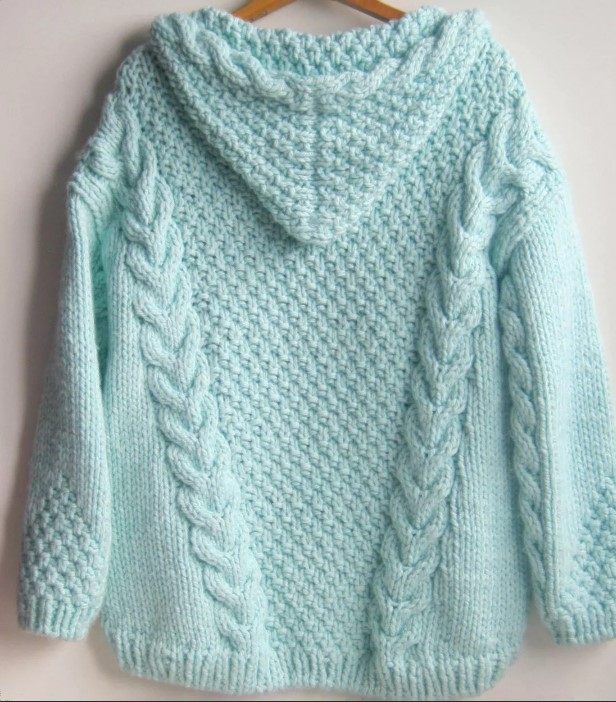
DIY hoodie for women
It’s better to plan everything in advance so as not to return to trifles:
- Decide on a model; it can be an elongated model or, conversely, a shortened version. You should also carefully consider the choice of color, based on trendy fashion colors and those that suit the model.
- You need to know exactly your dimensions; it is advisable to try on some indicators before work.
- Calculate the amount of yarn for your size.There are many ways to calculate the amount of yarn, but you always need to take it in reserve; it is impossible to calculate its exact amount even for a small part.
- If the product has some kind of motif, then practice performing it before creating the product.
Important! One wrong loop can ruin the entire product. If you make a mistake, it is better to immediately unravel the product and correct it before assembling the hoodie begins.
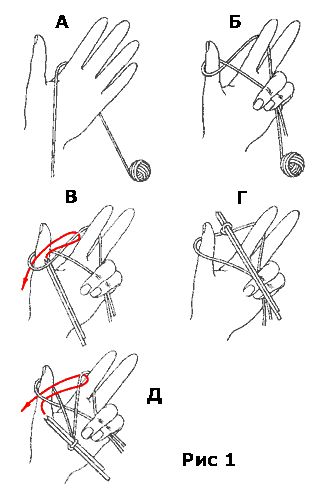
Set of first stitches for 2 knitting needles
Model selection
Some fashion trends will help you choose a hoodie model. For example, this year the trend is mid-thigh length. The cage will be in fashion, and therefore it is worth paying attention to patterns with geometric patterns.
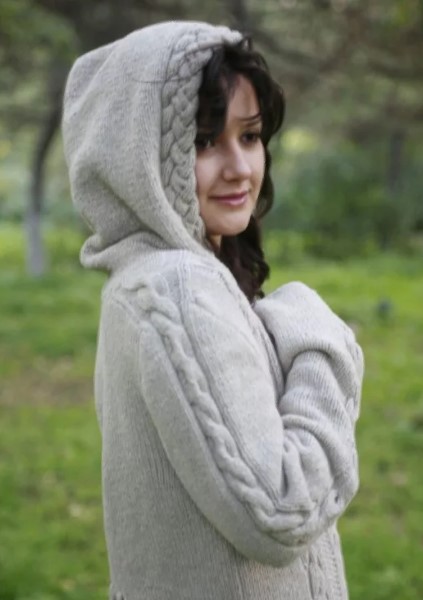
Volumetric models do not go out of fashion (they can be made with voluminous braids and many lush patterns, for example, “bumps”). It is one of the voluminous hoodies that will be discussed further with a detailed description and diagrams.
Materials and tools
 For knitting we will need:
- long knitting needles;
- pekhorka yarn “Autumn”;
- scissors;
- hook (it will be an assistant after the product is knitted - it will hide excess threads).
Knitting a hoodie step by step
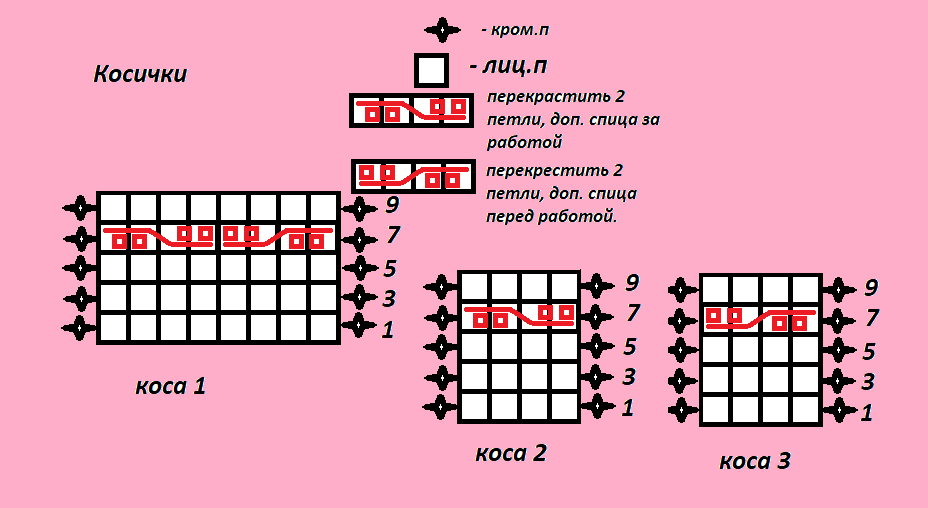
For this model hoodie Three patterns were used:
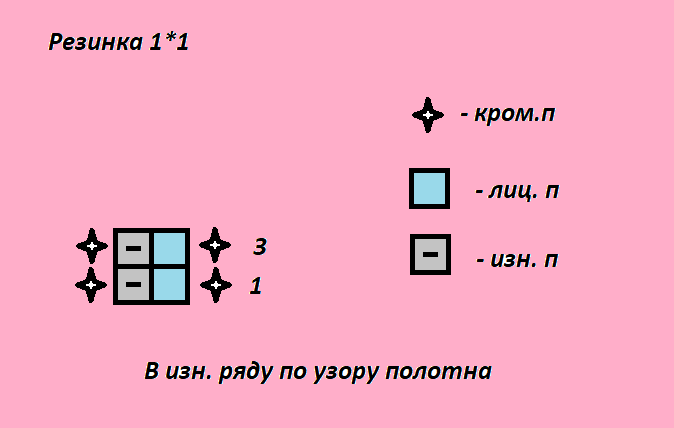
- elastic band 1*1;
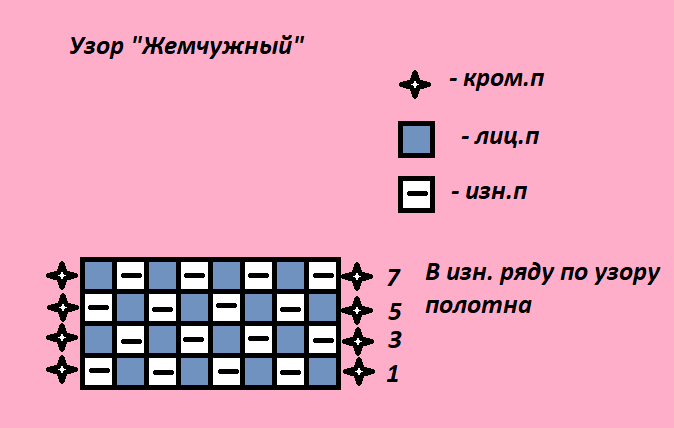
- pearl pattern;
- braids.
 Schemes of each pattern are presented separately.
- The elastic will be used to create elastic at the bottom of the garment and elastic at the sleeves.
- A pearl pattern will be required for the middle front and back, as well as small triangular inserts on the sleeves.
- The braids are used to frame the pearl pattern on the front, back and along the edge of the hood.
Important! The model uses several motifs and therefore it is worth practicing separately on creating an elastic band, trying to create braids and accordingly making a pearl pattern.This is necessary to know how to knit and not to unravel the product further in case of a small mistake. Moreover, the more frequent unraveling of the yarn leads to the fact that the thread becomes much thinner, and then the hoodie will turn out with braids of different sizes and other elements.
Sleeves
Cast on 40 stitches with knitting needles. Go straight to the 1*1 elastic band pattern. You need to create 4 rows with an elastic band. On the wrong side, knit according to the pattern of the fabric. Then go to the front loops, and in the center of the sleeve you need to make a pearl pattern for 16 loops.
On the wrong side, also according to the pattern of the fabric, then in each subsequent one, decrease one loop of the pearl pattern, and knit knit stitches instead. In other words, in the 7th row there will be 14 loops of the pattern, and in the 9th there are already 12. Continue this way until there are 2 loops left. Then all rows with the same facial loops until the 60th row. Pay attention to the additions (in rows 25,29, 33, 37, 41, 49). Next, bind off the stitches on the front row.
Important! If it is difficult to understand knitting, it is better to draw your own drawings in advance and indicate where and how many loops need to be knitted.
Back
Cast on 57 stitches on the needles and start with 1*1 elastic. Knit only 4 rows and proceed to the fabric pattern. 12 knit stitches - braid - pearl pattern (17 loops) - braid - 12 knit stitches.
In order for the braids to neatly diverge to the sides, it is necessary to make increases between the braids and decreases in the front loops on the sides.
Additions should be made at the level of the cross in the braids on the sides of the pearl pattern, so that the displacement of the loops is not visible.
Decrease at the very beginning of the row and at the end of the row and also at the level of the cross in the braids.
The result should be 14 rows with increases and decreases.Accordingly, 28 loops will be added and they will need to be subtracted. There were 57 loops in the canvas, so they will remain at the end of the part.
Before
Knit the front similarly to the back. Only here, at a height of 10 of the intersection of the braids, it is necessary to mark the neckline. To do this, make one front loop in the center of the pearl pattern, then in each row add two from the sides of the central loop, so the front loops will gradually obscure the pattern. When there are 9 knit stitches in the center of the row, bind off one in the center and continue knitting separately on each side.
You will need to add a small braid from diagram number 3 to the pattern of the canvas. The right one is tilted to the right, the left one is tilted to the left. At the height of the 13th cross of the braids, close the loops on the sides - leave the braid and 10 loops for the hood.
Hood
For the hood, you need to use a “pearl” pattern and continue the braids from the front. Slip the front stitches onto the knitting needles (left half), then the back stitches (middle 24 stitches) and the right half of the front.
Knit up to a height of 10 crossings of the hood braids. Then sew the hood along the closing loop line, carefully aligning the braids.
All that remains is to sew on the sleeves, sew the side seams and hide the excess threads with a crochet hook.

The product is ready. You can also try on a new thing. A hoodie with a hood, massive braids and a voluminous pearl pattern will emphasize the fragility of the figure.
 0
0