In order to get a half-sun from a sun skirt, you need to carefully study the entire process of transforming the product. This will allow you to avoid mistakes and achieve the desired result. The re-cutting steps are simple and are described below.
How to make a pattern for a half-sun skirt
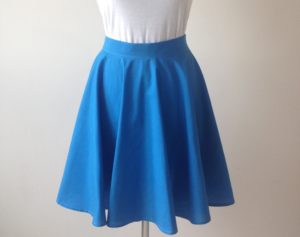
To create a pattern for a semi-sun skirt you will need only 2 measurements:
- length of the product;
- waist circumference (if you plan to sew a skirt with a belt) or hip circumference (if you plan to sew a skirt with an elastic band).
Important! The appearance of the finished product depends 90% on the correctness of taking measurements and the accuracy of calculations when constructing a pattern. Therefore, it is worth taking this seemingly simple process with all seriousness.
The main mistake many novice seamstresses make is neglecting the installation belts when taking measurements. Of course, it’s good when the figure is close to ideal and has clearly defined waist, hips and chest lines. However, in reality this is more an exception to the rule than a pattern, and the waist is not always the narrowest place on the body.This feature is especially visible among owners of:
- protruding bellies;
- shapes such as “apple” or “rectangle”;
If you want the finished product to fit perfectly on your figure, be sure to use the installation belt when taking measurements.
Procedure for taking measurements:
- Tie a thin, non-elastic band around the waist, strictly parallel to the floor surface.
- Measure the distance from the installation belt to the planned length of the skirt.
- Measure your waist circumference where the braid is located.
- Measure the volume of the hips at the most protruding points of the buttocks and thighs.
Record the received data in this way:
- DI – skirt length;
- OT – waist circumference;
- AB – hip circumference.
To create a pattern you will need to make basic mathematical calculations:
- Divide the waist and hip measurements in half. No arithmetic manipulations should be performed with measuring the length of the product.
- Calculate the depth of the notch (the distance from the top of the corner to the waist line) using the formula.
The formula is as follows:
POTS/2 + 2 cm, where
SWEAT - ½ waist circumference;
2 number of pattern parts;
2 cm – increase for loose fit;
Then you can start making the pattern:
- Construct a right angle and mark its vertex with point K.
- From t A, set aside the distance obtained as a result of calculations in both directions. Label the resulting points P and P1.
- Connect points P and P1 with a radius arc. For this purpose, you can use a compass with a large solution or regular braid with a pencil tied to it.
- From t Pi P1, set aside a measure on both sides equal to the length of the future skirt DI.
- Connect the resulting points with a radius arc. Please note that when drawing the lower radius (bottom of the skirt), the center should be t K, and not the upper arc (waist line).
At this point, the process of making a half-sun skirt pattern is considered complete, all that remains is to check the correctness of the construction. To do this, you need to measure the waist line on the drawing with a centimeter tape; it should be equal to half the waist circumference + 1 cm. Deviations of a few millimeters in any direction are quite acceptable, but if the deviation is much more significant, it is worth reviewing all calculations and construction stages.
If there are no errors, you can start cutting out fabric and sewing.
Important! To sew a half-sun skirt, you need to cut out 2 identical parts.
If the width of the fabric and the design idea allows, then it is quite acceptable to make a skirt with 1 seam. To do this, you need to fold the fabric in half, and attach the pattern with one edge to the fold. In cases where you have to combine a pattern, or there is not enough fabric width to cut out, the skirt is sewn with 2 seams.
How to make a half-sun out of a sun skirt
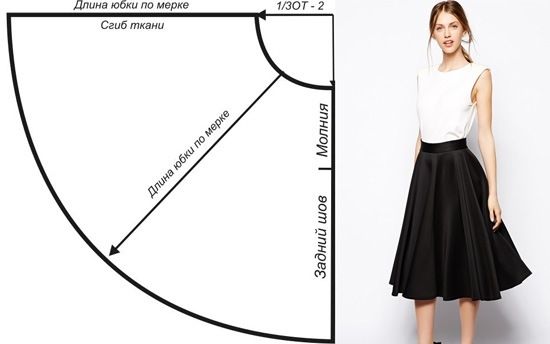
Despite the fact that the cut of the sun skirt is carried out according to the same algorithm as the half-sun, there are 2 serious differences:
- the sun skirt consists not of 2, but of 4 identical segments;
- When calculating the depth of the excavation, the formula POT/4 + 2 cm is used.
As can be seen from the formula, the depth of the notch in this case is 2 times less, because the upper arc is only 4 parts of the waist circumference. Of course, if it is necessary to redo the pattern at the stage of drawing up a drawing on a paper basis, this does not present any difficulties. All you need to do is draw 2 new radius lines.
But what if you need to remake a ready-made sun skirt? In this case, you first need to calculate whether its length is enough for such manipulations. After all, in the process of reshaping you will need:
- remove half the width, in other words, make a semicircle from a circle;
- increase the depth of the notch to create a new waist line. The larger the size, the deeper the notch will be, and accordingly, the greater the chances of not hitting the length.
This can be done quickly and easily in a simple, proven way. Set aside a distance from the belt equal to a quarter of the waist circumference; this will be the line of the top cut of the skirt after the alteration, and everything higher will have to be mercilessly cut off. If the remaining length is enough, then you can proceed to further actions.
Important! Such calculations are only acceptable if you plan to alter a skirt that fits you perfectly.
Procedure:
- Undo the belt or elastic band.
- Open the seams.
- Iron the product.
- Next, use only half of the product for work.
- From the top cut, set down a distance equal to ¼ of the waist circumference and draw a new arcuate line.
- Check for correct application using a simple measurement. If the length of the line is equal to OT, you can cut off the excess.
- Stitch the seam.
- Cut out a new belt.
Finally, the belt should be stitched and ironed.


 0
0
